
Specifications


3.
4.
5.
6.
1.
2.
3.
4.
5.
6.
7.
8.
9.
10.
11.
12.
13.
a.
b.
c.
d.
e.
14.
a.
b.
15.
1.
2.
3.
4.
Double click the Exchange Server that you want to configure.
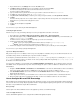
From the left hand panel of the server configuration window, select Outlook Anywhere.
Enter the external host name for your Exchange Server, for example: mail.mycompany.com.
Set the authentication type to By default, authentication is set to , which does not work for clients that are connecting from aBasic. NTLM
different domain than the Exchange Server.
Step 3. Configure the Outlook 2013 Client
On the client’s Windows system, configure the Outlook 2013 client:
Open the Control Panel
Double-click the Mail.
Click Show Profiles
Click to add a new mail profile. Add
Enter a unique for the mail profile and click .name OK
Select the option and click .Manually configure server settings or additional server types Next
Select the option and click .Microsoft Exchange or compatible service Next
In the field, enter the Barracuda SSL VPN hostname, for example: Server sslvpn.example.com
In the field, enter your username in the following format: Do NOT click .User Name username@domain. Check Name
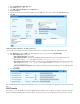
Click More Settings
Select the tab.Connection
In the section, select the option and click .Outlook Anywhere Connect to Microsoft Exchange using HTTP Exchange Proxy Settings
..
In the section, complete the following steps:Connection settings
In the Use this URL to connect to my proxy server for Exchange field, enter the Barracuda SSL VPN hostname.
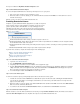
Check the option for .On fast networks, connect using HTTP first, then connect using TCP/IP
Check the option for .On slow networks, connect using HTTP first, then connect using TCP/IP
In the area, select from the Proxy authentication settings Basic Authentication Use this authentication when connecting to
drop-down menu. my proxy server for Exchange
Click and then click .OK Next
The Exchange Server prompts you to connect and requests your credentials:
In the User Name field, enter your username using the following format: \domain username
In the Password field, enter your password and click OK.
Click Finish and then click OK.
Step 4. Test the Configuration from an External Network
Use the following procedure to determine if your Outlook 2013 clients are successfully connecting to your Exchange Server 2013 using Outlook
Anywhere:
From the command line, start . The Outlook email client and an outlook.exe /rpcdiag extra diagnostic window opens. Keep this window
open to test your configuration.
If prompted, select the new Outlook profile and click OK.
The Exchange Server prompts you to connect and requests your credentials. Using the format \ type your usernamedomain username,
and password, and click OK. The Outlook client then retrieves the client’s email from the Exchange Server through the Outlook Anywhere
connection.
Check the Connection Status window.
When the Outlook client is fully connected, you will see 4 connections (2 Mail types and 2 Directory types) to your Exchange Server. All of these
connections should show a connection ( type of HTTPS. If they do, the test is successful.Conn)
Troubleshooting Outlook Anywhere
If the connection type is TCP/IP, then the Outlook client is connected directly to the Exchange Server and is not using RPC. If this is the case,
verify the following points to troubleshoot the issue:
Verify your Outlook 2013 client configuration.
Verify your Exchange Server 2013 configuration.
Verify that you have a valid SSL certificate signed by a trusted root Certification Authority (CA) or a
self-signed certificate installed on the Barracuda SSL VPN.
If you are using a self-signed certificate, verify that you have imported it to the local certificate store on