
Specifications

2.
3.
4.
5.
1.
2.
3.
4.
5.
6.
1.
2.
3.
4.
5.
1.
2.
3.
4.
5.
Take a snapshot of your virtual machine.
Edit the settings in your virtual machine, and either increase the size of the hard drive or add a new hard drive.
Restart the virtual machine.
During the system , answer the pop-out console displays a message asking if you want to use the new additional space.bootup Yes after
If you do not respond in 30 seconds, the pop-out console times out and defaults to . Resizing can take several minutes, depending onNo
the amount of hard drive space.provisioned
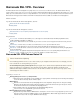
How to Deploy Barracuda SSL VPN Vx Virtual Images
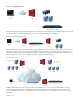
Barracuda offers three types of packages for virtual deployment. Follow the instructions for your to deploy the Barracuda SSL VPN Vxhypervisor
appliance.
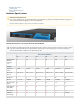
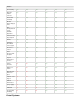
Package Type Hypervisors
OVF images
VMware ESX and ESXi 3.5
VMware ESX and ESXi 4 x.
Sun/Oracle VirtualBox and VirtualBox OSE 3.2
VMX images
VMware Server 2.0+
VMware Player 3.0+
VMware Workstation 6.0 +
VMware Fusion 3.0+
XVA images
Citrix Xen Server 5.5+
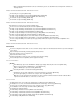
Deploying OVF Images
VMware ESX and ESXi 3.5
Use the OVF file ending in for this .-35.ovf hypervisor
From the menu in the VMware Infrastructure client, select .File Virtual Appliance > Import
Select , and navigate to the fileImport from file BarracudaSSLVPN- <version#>-fw__FIRMWARE__-<version#vm >.ovf .
Click to review the appliance information, review the End User License Agreement, and give the virtual appliance a name that isNext
useful to your environment.
Click .Finish
After your appliance finishes importing, right-click it, select , and then click the green arrow to power on the virtualOpen Console
appliance.
Follow the instructions to provision your Barracuda SSL VPN Vx appliance. Quick Start Guide
VMware ESX and ESXi 4 x.
Use the OVF file ending in for this .-4x.ovf hypervisor
From the menu in the client, select .File vSphere Deploy OVF Template
Select , and navigate to the fileImport from file BarracudaSSLVPN-vm3 1.0-fw__FIRMWARE__-20120327-4x. .ovf .
Click to review the appliance information, review the End User License Agreement, and give the virtual appliance a name that isNext
useful to your environment. Set the network to point to the target network for this virtual appliance.
After your appliance finishes importing, right-click it, select , and then click the green arrow to power on the virtualOpen Console
appliance.
Follow the instructions to provision your Barracuda SSL VPN Vx appliance. Quick Start Guide
Sun/Oracle VirtualBox and VirtualBox OSE 3.2
Use the OVF file ending in for this .-4x.ovf hypervisor
From the menu in the VirtualBox client, select .File Import Appliance
Navigate to the .BarracudaSSLVPN-vm3 1.0-fw__FIRMWARE__-20120327-4x. .ovf file
Use the default settings for the import, and click .Finish
Start the appliance.
If you are deploying the Barracuda SSL VPN Vx on a VMware hypervisor, complete How to Enable Promiscuous Mode on VMware for
after deploying the VM.the Barracuda Network Connector