. Barracuda SSL VPN - Overview . . . . . . . . . . . . . . . . . . . . . . . . . . . . . . . . . . . . . . . . . . . . . . . . . . . . . . . . . . . . . . . . . . . . . . . . . . . . . . . . 1.1 Barracuda SSL VPN Release Notes 2.4 . . . . . . . . . . . . . . . . . . . . . . . . . . . . . . . . . . . . . . . . . . . . . . . . . . . . . . . . . . . . . . . . . . . . . . 1.2 Deployment . . . . . . . . . . . . . . . . . . . . . . . . . . . . . . . . . . . . . . . . . . . . . . . . . . . . . . . . . . . . . . .
1.7.3 Agents . . . . . . . . . . . . . . . . . . . . . . . . . . . . . . . . . . . . . . . . . . . . . . . . . . . . . . . . . . . . . . . . . . . . . . . . . . . . . . . . . . . . . . . . . . . 1.7.3.1 How to Configure a Server Agent . . . . . . . . . . . . . . . . . . . . . . . . . . . . . . . . . . . . . . . . . . . . . . . . . . . . . . . . . . . . . . . . . 1.7.3.2 How to Configure the SSL VPN Agent . . . . . . . . . . . . . . . . . . . . . . . . . . . . . . . . . . . . . . . . . . . . . . . . . . . .
Barracuda SSL VPN - Overview The Barracuda SSL VPN is an ideal appliance for giving remote users secure access to network resources. The Barracuda SSL VPN only requires a browser to give remote users access from any computer. Built-in and third-party multi-factor authentication and network access control (NAC) only connects clients that meet chosen security standards. For secure remote access through smartphones and other mobile devices, the Barracuda SSL VPN supports both L2TP/IPsec and PPTP.
When configuring Barracuda Network Connector on Macintosh systems, note that DNS insertion and Up/Down commands are mutually exclusive. What's new with the Barracuda SSL VPN Version 2.4.0.
Fix: Vulnerability - Authenticated, XSS-Not Persistent [BNSEC-1239 / BNVS-4078] Fix: Vulnerability - CSRF, HTTP Header Injection, XSS-Not Persistent [BNSEC-1144 / BNVS-4026] Fix: Vulnerability - Click Jacking [BNSEC-509 / BNVS-4024] Fix: Vulnerability - URL Redirection [BNSEC-727 / BNVS-3665] Version 2.4.0.
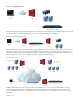
Direct Access DMZ Deployment The Barracuda SSL VPN is deployed behind the firewall. Only one port (443) has to be opened up by the firewall and forwarded to the SSL VPN. You have direct access to all services (authentication, file, web, etc.) in the intranet without further configuration. Multilayer Firewall DMZ Deployment The Barracuda SSL VPN is deployed in a DMZ behind the corporate firewall but before the internal network firewall.
Hardware Specifications Virtual Systems High Availability Deployment Licensing Hardware Specifications Warranty and Safety Instructions Unless you are instructed to do so by Barracuda Networks Technical Support, you will void your warranty and hardware support if you open your Barracuda Networks appliance or remove its warranty label. Barracuda Networks Appliance Safety Instructions Hardware Compliance.
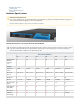
Features SSL Tunneling Yes Yes Yes Yes Yes Yes Barracuda Network Connector Yes Yes Yes Yes Yes Yes Intranet Web Forwarding Yes Yes Yes Yes Yes Yes Windows Explorer Mapped Drives Yes Yes Yes Yes Yes Yes Citrix XenApp/VNC/NX /Telnet/ SSH/RDP Applications Yes Yes Yes Yes Yes Yes Remote Desktop Single Sign-On Yes Yes Yes Yes Yes Yes Antivirus Yes Yes Yes Yes Yes Yes L2TP/IPsec, PPTP Mobile Device Support Yes Yes Yes Yes Yes Yes Client Access Controls Yes
The Barracuda SSL VPN is available as a virtual appliance. Because it is mostly used after office hours, it is suitable on a server hosting virtual m achines that are used intensely during office hours but sit idle for the rest of the time. You can pair a Barracuda SSL VPN Vx with a hardware Barracuda SSL VPN appliance to create a high availability cluster.
2. 3. 4. 5. Take a snapshot of your virtual machine. Edit the settings in your virtual machine, and either increase the size of the hard drive or add a new hard drive. Restart the virtual machine. During the system bootup, answer Yes after the pop-out console displays a message asking if you want to use the new additional space. If you do not respond in 30 seconds, the pop-out console times out and defaults to No. Resizing can take several minutes, depending on the amount of provisioned hard drive space.
5. Follow the Quick Start Guide instructions to provision your Barracuda SSL VPN Vx appliance. Deploying VMX Images VMware Server 2.x 1. Put the files ending in. vmx and. vmdk into a folder in your datastore (which you can locate from the Datastores list on your server's summary page). 2. From the VMware Infrastructure Web Access client's Virtual Machine menu, select Add Virtual Machine to Inventory. 3. Navigate to the folder used in step 1, and click the BarracudaSSLVPN.
Barracuda Networks recommends that you configure a port group to allow promiscuous mode. Enable Promiscuous Mode on a vSwitch Add a new port group, and set it to promiscuous mode. Then set your VM client to the port group. 1. 2. 3. 4. Log into the vSphere client, and select the ESX host. Click the Configuration tab. From the Hardware menu in the left pane, select Networking. On the summary page for the virtual switch, click the Properties link.
6. Set the port group to promiscuous mode. a. Select your new port group, and click Edit. b. Click the Security tab. c. From the Promiscuous Mode list, select Accept. d. Click OK, and then click Close. 7. Set your VM client to the new port group. a. Right-click the Barracuda SSL VPN virtual machine, and select Edit Settings. b. In the left pane, click Network Adapter 1. c. In the Network Connection section, select the port group that you just created and click OK.
Barracuda Vx license token, which you received via email or from the website when you downloaded the Barracuda SSL VPN Vx package. The license token is a 15 character string, formatted like this: 01234-56789-ACEFG. Complete the following steps: Before You Begin Step 1. Enter the License Code Step 2. Open Firewall Ports Step 3. Log Into the Appliance Web Interface and Verify Configuration Step 4. Update the Firmware Step 5. Change the Administrator Password for the Appliance Web Interface Step 6.
If PPTP or L2TP/IPsec access is required, also open the following ports: Port Protocol Direction Usage 47 GRE In/Out PPTP 1723 TCP In PPTP 500 UDP In L2TP/IPsec 4500 UDP In L2TP/IPsec Note: Only open the appliance administrator interface ports on 8000/8443 if you intend to manage the appliance from outside the corporate network. Configure your network firewall to allow ICMP traffic to outside servers, and open port 443 to updates.barracudacentral.com.
1. Test the connection by using a web browser from the Internet (not inside the LAN) to establish an SSL connection to the external IP address of your corporate firewall. For example, if your firewall's external IP address is 23.45.67.89, go to https://23.45.67.89 in your browser. 2. When you are prompted to accept an untrusted SSL certificate, accept the warning and proceed to load the page.
5. Create a backup of the existing Barracuda SSL VPN configuration using the ADVANCED > Backup page. 6. Use the ADVANCED > Task Manager page to verify that no processes are running. 7. On this page, enter the Cluster Shared Secret and click Save Changes. This is the password shared by all Barracuda SSL VPN appliances in this cluster. It is limited to only ASCII characters.
Administrator password. Cluster Shared Secret, though this must be the same for the cluster to work properly (on the ADVANCED > Linked Management page) . Time Zone (on the BASIC > Administration page). The appliance GUI and SSL VPN HTTP and HTTPS ports. Whether the latest release notes have been read. All customized branding (models 600 and above, on the ADVANCED > Appearance page). Licensing For more questions about your Barracuda SSL VPN license, contact your Barracuda Networks sales representative.
In this article: Before You Begin Step 1. Install the SSL Certificate Step 1.1. (Optional) Generate a CSR Request Step 1.2. Upload Signed Certificates Step 2. Configure System Contact and Alert Email Addresses Step 3. Change the Administrator's Password for the SSL VPN Web Interface Next Steps Related Articles Administrative Interfaces Barracuda SSL VPN Quick Start Guide (PDF) Before You Begin Install Java Runtime version 1.6 or above on your client computers.
1. Log into the appliance web interface (e.g., https://sslvpn.example.com:8443). 2. Go to the BASIC > Administration page. 3. In the Email Notification section, enter the email addresses of those who should receive system alerts and security news and updates. 4. Click Save Changes. Step 3. Change the Administrator's Password for the SSL VPN Web Interface Change the password used by ssladmin to log into the SSL VPN web interface. 1. Log into the SSL VPN web interface (e.g., https://sslvpn.example.
The default login credentials for the SSL VPN web interface are: User: ssladmin Password: ssladmin Access Control To access and use the resources provided by the Barracuda SSL VPN, a user must be able to authenticate. Additionally, the user´s device must adhere to any configured network access control (NAC) policies.
Policies are lists of users and groups that are attached to resources. Users can only access a resource if they are included in the policy attached to the resource. A resource can include multiple policies that contain separate lists of users and groups. You can grant different users with varying levels of access to a resource by assigning Access Rights to the user or group. To help you easily assign resources to everybody, a built-in Every one policy is included by default.
Create the User Database To create the user database: 1. 2. 3. 4. 5. Log into the SSL VPN web interface. Go to the Manage System > ACCESS CONTROL > User Databases page. Enter a Name for the database. In the Create User Database section, select and configure the authentication service. Click Add. The user database is now listed in the User Database section.
After you add the user database, it appears in the User Databases section on the bottom of the page. Authentication Schemes To authenticate users with more than just their usernames and passwords, configure authentication schemes. Every authentication scheme comprises at least one authentication module, such as PINs, passwords, certificates, or one-time-passwords. You can add as many authentication modules as your security policy requires.
Public Key Public key authentication is one of the most secure methods of authentication, because the authentication information can be stored on a removable medium such as a USB key device. You can generate the key files for every user, or you can reset the public keys for everyone, letting users generate the keys during initial logins. After the key is generated, the login applet searches external media and the user's home directory for available keys.
Related Articles Authentication Schemes Example - How to Install and Configure YubiRADIUS SSL Client Certificate Authentication Hardware Token Authentication using SSL Client Certificates The token or smart card contains an SSL client certificate which is used to authenticate to the system. Some vendors require software installed on the client, or card readers depending on the solution.
Related Articles Authentication Schemes Regular Expressions (Reference) Example - Authentication with SMS Passcode RADIUS server In this article: Prerequisites for Sending OTPs by SMS Step 1. Configure the SMTP Server Step 2. Configure the OTP Settings Step 3.
and managed by the Barracuda SSL VPN. The module can be used as primary or secondary authentication mechanism. The administrator has to generate a private and public key which is then uploaded to the Barracuda SSL VPN and stored on the users USB key device or home directory. When you authenticate with a public key, the following steps are followed: 1. 2. 3. 4. 5. The Barracuda SSL VPN generates a random ticket (certificate) The user selects the private key and enters the corresponding passphrase.
browser or operating system. After the initial setup is complete, the authentication process requires minimal user interaction. Users must only select the installed certificate when prompted, and the rest of the setup is completed automatically by the browser and the Barracuda SSL VPN. The Barracuda SSL VPN validates the offered client certificate according to parameters that are defined by you.
In this article: Pre-Requisites Reference Installing the YubiRADIUS Virtual Appliance Configuring the YubiRADIUS Virtual Appliance Configuring Barracuda SSL VPN Pre-Requisites A YubiKey A VM host server to load the Virtual Appliance An external user database, such as Active Directory or LDAP, that both Barracuda SSL VPN and YubiRADIUS servers can query Reference The YubiRADIUS configuration guide can be found here: http://static.yubico.com/var/uploads/pdfs/YubiRADIUS_Virtual_Appliance_3_5_1.pdf.
4. Apply the settings and enter the user password to confirm. 5. Disconnect from the network and reconnect using the network icon in the top right area of the screen. 6. With a web browser, navigate to the IP address of the appliance, which should present a Webmin logon screen. 7. Log in with user yubikey and password yubico.
7. 8. Enter a valid domain name and click Add Domain. 9. Click on the Global Configuration tab, then click General. You may opt to set Auto-provisioning to Yes, although it may be simpler to keep it set to No initially. Ensure that Append OTP to is set to Password.
10. Go back to Global Configuration and click Validation Server. This configuration will use the YubiCloud validation servers. For this to work, your network's firewall needs to allow outbound access on TCP ports 80 and 443 to api.yubico.com, api2.yubico.com, api3.yubico.com, api4.yubico.com and api5.yubico.com. 11. To get a client ID and API key, go to https://upgrade.yubico.com/getapikey/. Enter the email address you used to register with Yubico.
12. Insert the resulting client ID and secret key in the Client ID and API key fields and click Save. 13. Navigate to the Domain tab, then select your domain that was added earlier. 14. Click the Users Import tab. Enter the hostname for your user database and set the Directory Type to either Active Directory or LDAP. - Set the Base DN to the LDAP-style root DN. - Enter the username that should be used to connect and cache the users in DN format. - Enter the service password.
15. The users should now be imported successfully: 16. Now go back to the Domain tab and click on your domain, you should now see which accounts may authenticate. If you click on a group, the users should become visible (note that there are currently no YubiKeys assigned).
17. Click the Assign a new YubiKey link at the bottom of the page. Enter the username you wish to assign a key to, select the OTP box and press the YubiKey button to send the password. 18. Your user should now have a YubiKey ID assigned as shown in the example below: 19. At this point a local test can be performed. Go back to the main YubiRADIUS Virtual Appliance module under Servers in the left menu and click the Troubleshoot tab.
20. - Click the Configuration tab. - In the Add Client section, enter the IP address of the Barracuda SSL VPN, and set and confirm a shared secret (this will be needed for the Barracuda SSL VPN configuration). - Click Add. The RADIUS client should now appear in the list: Configuring Barracuda SSL VPN 1. Log on to the Barracuda SSL VPN web interface as ssladmin and navigate to ACCESS CONTROL > Authentication Schemes.
3. Navigate to ACCESS CONTROL > Configuration and scroll to the RADIUSsection. a. Enter the hostname or IP address for the YubiRADIUS appliance in the RADIUS Server field. b. Keep the ports the same. c. Enter the same shared secret as used in the YubiRADIUS RADIUS client configuration earlier. d. Set the Authentication Method to PAP. Everything else may use the default settings. e. Click Save Changes.
4. Now you can connect to the Barracuda SSL VPN via this user account. Enter the username and click Login. 5. Insert the user's database password (don't confirm with enter at this stage) and immediately press the YubiKey button (so that the password is a combination of the user's password + the YubiKey password).
The user should now be logged on successfully: Example - Authentication with SMS Passcode RADIUS server You can use SMS Passcode servers to authenticate users with one-time passwords (OTP) that are sent via SMS. The user logs in with a username and password and then receives an SMS containing the OTP (e.g., nc43sa). After entering the OTP, the user is logged in. For multi-factor authentication, you can combine SMS Passcode with other authentication modules.
In this article: Step 1. Configure the RADIUS Server Step 2. Create an Authentication Scheme Step 3. Test the SMS Passcode Authentication Step 1. Configure the RADIUS Server On the Barracuda SSL VPN, enter the configuration for the SMS Passcode RADIUS server. 1. Go to the Manage System > ACCESS CONTROL > Configuration page. 2. In the RADIUS section, enter the following information: RADIUS Server – Enter the hostname or IP address of the SMS Passcode server. Authentication Port – Enter 1812.
Step 2. Create an Authentication Scheme Create an authentication scheme that includes the SMS Passcode RADIUS server. 1. Go to the Manage System > ACCESS CONTROL > Authentication Schemes page. 2. In the Create Authentication Scheme section: a. Enter a Name for the scheme (e.g., SMS Passcode RADIUS). b. From the Available modules list, select RADIUS and click Add. RADIUS then appears in the Selected modules list. c.
3. Go to the Manage System > ACCESS CONTROL > Policies page. 4. In the Create Policy section, configure your policies. For each policy: a. Enter a name for the policy. b. Add the Accounts and Groups that must be members of the policy.The Accounts that you add appear in the Selected Accounts section, and the Groups that you add appear in the Selected Groups section. c. Click Add to create the policy. The policy appears in the Policies section.
4. In the Copy to User Database section of the Edit Access Right window, double-click the user databases that you want to copy the access right to. 5. Click Save. Resources Within the Barracuda SSL VPN, you can configure different types of internal network corporate resources that your users can access externally such as applications, email, network shares, or intranet websites. Within a resource, you can apply the policies that you have created.
Path-Based Reverse Proxy Host-Based Reverse Proxy Tunneled Proxy Replacement Proxy Direct URL Path-Based Reverse Proxy The Path-Based Reverse Proxy (most commonly used) acts as the front end to your web servers on the Internet or intranet. The Barracuda SSL VPN receives all the incoming web traffic from an external location and forwards it to the appropriate website host.
generated hostname and create an explicit entry for it on your DNS server, or create a wildcard entry so that all lookups resolve to the same IP address as the Barracuda SSL VPN. As with the Path-Based Reverse Proxy, accessing links to a location that was not specified in the configuration fails unless you configure the destination hostname as an allowed host (with the Allowed Host option).
passes through the SSL VPN, making it possible to create custom replacement values for different remote users. If you have absolute URL addressing, use the Replacement Proxy when the other Custom Web Forward types do not work. The Replacement Proxy works most of the time, provided that the web page is not using a lot of JavaScript. However, using a Replacement Proxy is more resource intensive than the other proxies.
To configure additional options (e.g., Authentication Type and Allowed Hosts) for the custom Web Forward, edit its settings. 1. In the Web Forwards section, click Edit next to the Web Forward entry. 2. In the Edit Web Forward window, configure the additional settings. 3. Click Save. Step 3. Launch the Web Forward Add a resource category to the Web Forward to make it available to users on their My Resources page. 1. In the Web Forwards section, click Edit next to the Web Forward entry. 2.
Step 2. Create a Web Forward To create and configure the Web Forward: 1. 2. 3. 4. 5. 6. 7. 8. 9. Log into the SSL VPN web interface. Verify that you have selected the correct user database on the top right of the page. In the Create Web Forward section, select the database the users reside in from the User Database drop down list. Enter a unique name for the Web Forward in the Name field, for example SharePoint.
Network Places provide remote users with a secure web interface to access the corporate network file shares. With appropriate permissions, users can browse network shares, rename, delete, retrieve and upload files just as if they were connected in the office. In addition, Network Places also provide support for Web Folders and the Windows Explorer Drive Mapping feature.
7. a. You might have to enter the domain as well as the Username session variable, using the following format: domain\${s ession:username} b. In the Password field, select session:password. 8.
Some tasks require the use of client-server applications. The Barracuda SSL VPN Agent on the client established a secure tunnel to the Barracuda SSL VPN and then launches the application specified by the application resource. Application definitions are regularly updated with En ergize Updates. There are two types of application resources: Full Application Download No preinstalled application is necessary. The download automatically starts when the application resource is started.
3. Select the resource categories that you want to apply to the application in the Resource Categories section, and then click Add. 4. Click Save. How to Configure Outlook Anywhere To protect the Microsoft Exchange server from the direct external access, you can deploy a Barracuda Spam and Virus Firewall for all SMTP traffic and a Barracuda SSL VPN to handle all HTTPS traffic coming from the Internet. The client connects to the Barracuda SSL VPN using Outlook Anywhere (formerly known as RPC over HTTPS).
3. 4. 5. 6. Double click the Exchange Server that you want to configure. From the left hand panel of the server configuration window, select Outlook Anywhere. Enter the external host name for your Exchange Server, for example: mail.mycompany.com. Set the authentication type to Basic. By default, authentication is set to NTLM, which does not work for clients that are connecting from a different domain than the Exchange Server. Step 3.
all the client systems that are using Outlook 2013. If required, verify that you have opened port 443 on your internal firewall for the Barracuda SSL VPN to communicate with your Exchange Server. Make the appropriate Outlook and Exchange Server configuration changes, and test your configuration from your external network.
1. On your Android device, start Settings and scroll to the Accounts section. 2. Tap Add Account, then Corporate. Type in your email address and password and click Next. The mobile device attempts to retrieve the account information and does not succeed. The device prompts for further information. 3. Type in your Active Directory domain name in front of your username so that it is in the format: domain\username 4. For Server, type in the SSL VPN hostname. e.g., sslvpn.example.com 5.
1. Open the RESOURCES > Applications page. 2. Enter a Name. E.g., RDP RemoteApp 3. 4. 5. 6. Select RDP - Microsoft RDP Client from the Application list. Enter the Hostname. Select the policies this resource should be available for and click Add. The policies are now visible in the Selected Policies list. Click Add. Add the RemoteApp Configuration to the Application Resource Use a text editor to open the rdp file and then complete the following steps to configure the RemoteApp on the Barracuda SSL VPN: 1.
but to a Port on the 127.0.0.1 interface. The SSL VPN Agent accepts the local connection and forwards the traffic through the SSL tunnel. The Barracuda SSL VPN forwards the traffic to the destination IP and Port defined in the SSL tunnel configuration. The traffic from the Barracuda SSL VPN to the destination IP in the network is not encrypted anymore. SSL tunnels can be configured to only allow local connections or to allow connections directly to the remote network.
Step 2. (Optional) Configure Advanced Tunnel Settings You can configure additional settings such as auto launch, multiple port ranges or tunnel type by editing the SSL tunnel configuration: 1. In the SSL Tunnels section, click the Edit link associated with the tunnel. The Edit Tunnel page opens. 2. Configure the settings as required. 3. Click Save. Step 3. Test the SSL Tunnel To test the SSL tunnel, click the name of the SSL Tunnel your just created or the Launch link associated with it.
The request is added to the My Remote Assistance Requests section. Step 2. Launch the Remote Assistance Request As soon as the helpdesk administrator has contacted you and requests access to your system, 1. Click on your remote assistance request to launch the session. 2. Once the assistance session has started, you can communicate with the assistant. Click the Chat icon on the bottom of the screen to view and send messages. When the session is closed, the request will be deleted from the list.
Create a Request for other Users As a helpdesk administrator, you can also create remote assistance requests for other users if required: 1. 2. 3. 4. Enter a brief summary of the nature of the request in the Name field. Enter the name of the account for which this request is being created in the Username field. In the Email field, enter the user’s email address. Any notifications regarding this request will be sent to the address entered here.
Related Articles How to Create a Static Route Advanced Network Connector Client Configuration Using the Network Connector with Microsoft Windows Using the Network Connector with Linux Using the Network Connector with Mac OS X Configuring a New Network 1. 2. 3. 4. Log into the SSL VPN web interface. Navigate to the RESOURCES > Network Connector page. Click Configure Network to bring up the Create Network Configuration page.
Publish a route that will apply to all clients using this Network Connector server interface. Use an Up Command in the client configuration that configures the route on the client when the network connector is launched. Step 2. Configure the Static Route Option 1: Publish the Static Route To publish a static route for all users of a server interface: 1. Go to the RESOURCES > Network Connector page. 2. Click Edit next to the relevant server interface. 3.
Auto-Launch This setting determines whether a user logging in to the Barracuda SSL VPN will automatically launch the Network Connector. This does not affect the ability of the stand-alone version of the Network Connector from also running with this particular client configuration. Server Interface The server interface identifies the network information that this client configuration is associated with. This should match the server interface that caused the creation of this client configuration.
Down In the Down Commands area, enter the commands that you want the remote system to execute when leaving the secured network. Typically, you will have a corresponding Down command for every Up command that was configured, to reverse any action that was taken. Example 1: Down command to delete a route: Windows clients: route delete 192.168.50.0 mask 255.255.255.0 Linux/Mac clients: route del -net 192.168.50.0 netmask 255.255.255.0 gw 192.168.1.1 Example 2: Down command for Mac clients (example.
Barracuda SSL VPN. Step 2. (optional) Install the Client Configuration File To run the Network Connector in stand-alone mode, without having to log in through the web interface, you must download and install a client configuration file onto the remote system. This file is only required for stand-alone mode. To install the client configuration file on your system: 1. Log in to SSL VPN web interface. 2. Go to the RESOURCES > My Network Connector page. 3.
Step 2. Install the Client Configuration File A client configuration file for the Network Connector is required only when using the Network Connector in stand-alone mode. To be able to run this client in stand-alone mode, or without requiring an explicit login through the web interface, you must install a configuration file for the client on the remote system. 1. Log back into the SSL VPN web interface. 2. Go to the RESOURCES > My Network Connector page. 3.
Step 2. Download Client Configuration File Download and save the client configuration file for the network connector: 1. 2. 3. 4. 5. Log into the SSL VPN web interface. Go to the RESOURCES > My Network Connector page. In the My Network Connector section, click on the More... link next to the client configuration file. Select Download Client Configuration file from the list. Save and extract the downloaded file to the users home directory. E.g., $HOME/SSLVPN. Step 3.
6. This IP range must reside in the network range that is configured in the TCP/IP Configuration of the applicance interface, and MUST NOT be part of any other DHCP range on your LAN. 7. From the Policies list, select the available policies that you want to apply to the IPsec server, and add them to the Selected Policies list. 8. Click Add. The IPsec Server is now created and appears in the IPsec Server section. You can test the configuration by clicking the Launch link associated with the entry. Step 2.
Configure a Windows 8 RT Surface Tablet Configure a Windows Mobile Device Related Article How to Configure IPsec Configure an iOS Device The Barracuda SSL VPN will automatically make the configuration changes required on your iPhone or iPad. To configure the client device, complete the following steps: 1. In a web browser, go to the login page of the Barracuda SSL VPN; for example: https://sslvpn.example.com/ 2.
8. Click OK and exit regedit. 9. Restart Windows 8 RT: a. Swipe in from the right edge of the screen, and tap Settings. b. Tap or click Power, and then tap or click Restart. Create the IPsec Connection Use the following steps to create the IPsec connection: 1. 2. 3. 4. 5. 6. 7. 8. 9. On the Microsoft Surface tablet, swipe in from the right edge of the screen, and tap the Search (magnifying glass) charm. Type VPN to search for it in settings. Select Set up a virtual private network (VPN) connection.
Related Article How to Configure IPsec Configure a Windows 7 Client Device The details of the following steps are specific to Windows 7, but can be adapted for other Windows versions such as XP and Vista by navigating to the corresponding feature on the system. 1. Log into the Barracuda SSL VPN. On your RESOURCES > My Resources page, you will see a Barracuda IPsec resource if the Barracuda SSL VPN has been configured to accept L2TP/IPsec connections. 2. Click on the Barracuda IPsec configuration tool.
8. have to edit the Windows 8 registry to allow access to an L2TP/IPsec server behind NAT-T devices: a. Press the Windows key on your keyboard. b. Type regedit and then run the regedit app. c. Navigate to Computer\HKEY_LOCAL_MACHINE\SYSTEM\CurrentControlSet\Services\PolicyAgent. d. On the Edit menu, point to New, and then click DWORD (32-bit) Value. i. Type AssumeUDPEncapsulationContextOnSendRule, and then press Enter. ii. Right-click AssumeUDPEncapsulationContextOnSendRule, and then click Modify. iii.
On the Barracuda SSL VPN, configure PPTP to allow your remote users to authenticate and connect to the protected network. 1. 2. 3. 4. 5. Log into the SSL VPN Web interface. Navigate to the RESOURCES > PPTP Server page. Verify that you have selected the correct user database on the top right of the page. In the Create PPTP Server section, enter a descriptive name for your PPTP server.
This functionality is supported on client devices running Microsoft Windows, iOS and Mac OS X 10.7 and above and requires Barracuda SSL VPN firmware version 2.4.0.9 or newer The Device Configuration feature allows you to provision resources and other settings configured on the Barracuda SSL VPN directly on a user's device.
Creates a VPN connection on the device using the relevant PPTP settings configured on the RESOURCES > PPTP Server page. PPTP Settings Known Issue: The preshared key has to be entered manually by the user for PPTP and L2TP/IPsec connections on Windows devices. iOS / Mac OS X Devices This table shows the types of items that can be provisioned to iOS and Mac OS X (10.7 and above) devices.
illegal characters and append a numeric value if the alias already exists. You can specify these aliases on the edit pages of the respective resources. To disable aliasing, go to RESOURCES > Configuration > Bookmarking. In this case, the provisioned shortcuts will instead refer to the verbose URL.
8. Enter your message in the Content field. 9. Select one or more Accounts, Groups or Policies to which the message will be sent. 10. Click Send to save this entry. An entry for this message will be displayed in the Messages section below. By default, all available messages are listed in alphabetical order. To display only the messages that begin with certain characters, enter the desired text in the area on the left, and click Apply Filter. Agents There are two agents for the Barracuda SSL VPN.
In this article: Step 1. Install the Server Agent Client Step 2. Authorize Server Agents Step 3. Create Routes Step 1. Install the Server Agent Client For every network you want to connect to the Barracuda SSL VPN with a Server Agent, install the client on a system in the network that can reach all the resources you want to access via the SSL VPN. 1. Log into the SSL VPN web interface. 2. Open the Manage System > ADVANCED > Server Agents page. 3.
The routes are now visible in the Routes section. If you want to move a route to a different Server Agent, edit the Server Agent configuration in the Agents list. How to Configure the SSL VPN Agent The SSL VPN Agent is a small client installed on the client computer to tunnel unencrypted connections. The traffic is intercepted and rerouted through a SSL tunnel created by the SSL VPN Agent. The SSL tunnel creates a secure tunnel into your network.
Web Interface Syslog SNMP Support Related Article SNMP Status and Performance The Status page displays information about the current status of the Barracuda SSL VPN server for the last 24 hours. 1. Log into the SSL VPN Web interface . 2. Go to the BASIC > Status page. The status information is displayed as follows: The graphs displayed on the Status page provide information about session types, user activity, resources and traffic sent through the Barracuda SSL VPN.
Click on the header of a column to sort by that column. You can also filter the list by selecting a category from the Filter drop down list. The User Database column is only visible when the Global View database is selected. System Tasks Overview The Task Manager page provides a list of tasks that are in the process of being performed, and displays any errors encountered when performing these tasks, for example: imports of historical emails, e xports of archived messages and c onfiguration restoration.
7. Select which type of user you want to receive the notification. If you select Administrative User all administrator who have sufficient rights to act on the event will receive the notification. 8. Click Add. The notification is now listed in the Notifications section below. If you want to modify a notification after it has been created, or define the recipients in a more granular way, click Edit next to the notification, make the necessary changes and save your settings.
3. Password – Enter a password. Authentication Method – Select the authentication method supported by your network management software. E.g., SHA Encryption Method – Select the encryption method supported by your network management software. E.g., AES Allowed SNMP IP/Range – Enter the IP addresses or range from which the Barracuda SSL VPN should accept SNMP queries. 4. Click Save Changes.
3. 4. Select the backup file and click Open. 5. After the upload has completed click Finsh. 6. On the top of the page select the Components you want to restore. For a complete restore select Configuration and SSL VPN Configuration/Logs. 7. Click Restore Now. Wait while the Barracuda SSL VPN restored the configuration from the selected backup files. You will be redirected to the login screen once the restore process has been completed.
This is a one-way upgrade; reverting to an earlier firmware version is not recommended; Once you install the EA firmware, you must update each point release up to the final GA release to take advantage of latest fixes. Update your Barracuda SSL VPN Firmware The appliance will reboot when the firmware update is applied. Make sure you do not unplug or manually reset your Barracuda SSL VPN during the update process unless instructed to do so by Barracuda Networks Technical support. 1. 2. 3. 4.
5. If the unit is not the primary unit: a. Navigate to ADVANCED > Linked Management. b. In the Clustered Systems section enter the IP address of the primary unit and click Add System. c. Click Join Cluster. The configuration of this unit will now be overwritten with the configuration from the primary unit. Limited Warranty and License Limited Warranty Barracuda Networks, Inc., or the Barracuda Networks, Inc.
YOU MAY RETURN THE SOFTWARE OR HARDWARE CONTAINING THE SOFTWARE FOR A FULL REFUND TO YOUR PLACE OF PURCHASE. 1. The software, documentation, whether on disk, in read only memory, or on any other media or in any other form (collectively “Barracuda Software”) is licensed, not sold, to you by Barracuda Networks, Inc. (“Barracuda”) for use only under the terms of this License and Barracuda reserves all rights not expressly granted to you.
License. Subject to the terms and conditions of and except as otherwise provided in this Agreement, Barracuda Networks, Inc., or a Barracuda Networks, Inc. subsidiary (collectively “Barracuda Networks”), grants to the end-user (“Customer”) a nonexclusive and nontransferable license to use the Barracuda Networks Energize Update program modules and data files for which Customer has paid the required license fees (the “Energize Update Software”).
any refund of license fees paid and is responsible for paying any and all outstanding invoices. Customer's rights under this License will terminate immediately without notice from Barracuda Networks if Customer fails to comply with any provision of this License. Upon termination, Customer must cease use of all copies of Energize Update Software in its possession or control. Export. Software, including technical data, may be subject to U.S. export control laws, including the U.S.
License is intended to guarantee your freedom to share and change free software--to make sure the software is free for all its users. This General Public License applies to most of the Free Software Foundation's software and to any other program whose authors commit to using it. (Some other Free Software Foundation software is covered by the GNU Library General Public License instead.) You can apply it to your programs, too. When we speak of free software, we are referring to freedom, not price.
In addition, mere aggregation of another work not based on the Program with the Program (or with a work based on the Program) on a volume of a storage or distribution medium does not bring the other work under the scope of this License. 3.
will be similar in spirit to the present version, but may differ in detail to address new problems or concerns. Each version is given a distinguishing version number. If the Program specifies a version number of this License which applies to it and "any later version", you have the option of following the terms and conditions either of that version or of any later version published by the Free Software Foundation.
Ty Coon, President of Vice This General Public License does not permit incorporating your program into proprietary programs. If your program is a subroutine library, you may consider it more useful to permit linking proprietary applications with the library. If this is what you want to do, use the GNU Library General Public License instead of this License. Barracuda Products may contain programs that are copyright (c)1995-2005 International Business Machines Corporation and others. All rights reserved.
1. Definitions. "License" shall mean the terms and conditions for use, reproduction, and distribution as defined by Sections 1 through 9 of this document. "Licensor" shall mean the copyright owner or entity authorized by the copyright owner that is granting the License. "Legal Entity" shall mean the union of the acting entity and all other entities that control, are controlled by, or are under common control with that entity.
Work, provided that such additional attribution notices cannot be construed as modifying the License. You may add Your own copyright statement to Your modifications and may provide additional or different license terms and conditions for use, reproduction, or distribution of Your modifications, or for any such Derivative Works as a whole, provided Your use, reproduction, and distribution of the Work otherwise complies with the conditions stated in this License. 5. Submission of Contributions.