
System information


Step 1. Register Each Exchange Server as a Trusted SMTP Server
To ensure that archiving begins as soon as your Exchange Servers are configured to send journal copies, first
register each Exchange Server that is in a Client Access Server (CAS) role as a Trusted SMTP Server with the
Barracuda Message Archiver on the > page in the web interface.MAIL SOURCES SMTP/IM
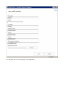
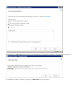
1a. Log into the Barracuda Message Archiver web interface, and go to the page.MAIL SOURCES > SMTP/IM
In the section, enter the details for each Exchange Server that is to journal directly to the1b. Trust SMTP Servers
Barracuda Message Archiver; click after entering the details for each Exchange Server, and then cAdd lick Save
.Changes
Step 2. Create a Remote Domain From the Exchange Management PowerShell
The Remote Domain must be your normal email domain. The remote domain must be a non-existent and non-routable/unresolvable domainnot
from either inside or outside your organization (such as bma.int). This domain must be used for the email address of the Mail Contact that is to be
the journaled message recipient.
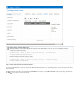
2a. Open . Exchange Server 2013, and click Exchange Management Shell
2b. Execute the following command to create the remote domain; this command ensures TNEF encloding is disabled and auto-forwarding is
enabled :
New-RemoteDomain -DomainName bma.int -Name "Message Archiver Domain"
Get-RemoteDomain | Where {$_.DomainName -eq "bma.int"} | Set-RemoteDomain -TNEFEnabled $false
-AutoForwardEnabled $true
2c. Enter the following command to verify the settings:
Get-RemoteDomain | Where {$_.DomainName -eq "bma.int"} |Format-table Name, DomainName, TNEFEnabled,
AutoForwardEnabled
Step 3. Create a Recipient Mail Contact/Alternate Email Address
The Mail Contact is the account that is to act as a "holding location" for journaled messages. The email address associated with this account is
the designated recipient and must be associated with a non-existent, non-routable dummy Domain Name created above in . Use theStep 2
following steps to create the Mail Contact:
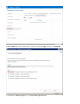
3a. Open Exchange Server 2013, and in the Exchange Admin Center (EAC) click in the left pane, select at the top of therecipients contacts
page, and then click the ( ) icon to create a new mail contact:Add
Remote Domain
In previous versions of Exchange Server, the Exchange Management Console was used to create a Remote Domain; in Exchange
Server 2013 the ECP/EAC has no analogous functionality so you must use PowerShell to create the Remote Domain.
To create a Remote Domain, you must enter a to describe the domain, and the actual to use. Name Domain Name In this example, bm
a.int is the "fake" Domain Name that is used. You can use bma.int or create your own "fake" Domain Name. Note that this Domain
Name is used when creating the in .Mail Contact Step 4