
User`s guide

2.
3.
1.
2.
3.
1.
2.
3.
4.
5.
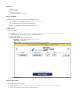
In the section, click .Certificate Generation Create Certificate
In the window, fill in the certificate details and then click .Create Certificate Create
Import External Certificates
If you created the certificate with an external CA, verify that you have the following files:
Certificate authority certificate in PEM format.
Certificate that is signed by the CA in PKCS12 or PEM format.
To import these external certificates:
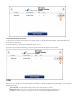
Go to the page.VPN > Certificates
In the section, configure the CA certificate settings, select the CA certificate file (e.g., - -filename Upload Trusted Certificate ca cert . pe
), and then click . The uploaded CA certificate appears in the section at the top of the page. m Upload Now Default Certificate
In the section, configure the certificate file settings, select the certificate file (e.g. certificate-filename ), and thenUpload Certificate , . pem
click . The uploaded certificate appears in the section.Upload Now Saved Certificate
Certificates for Clients iOS
Additional XAUTH certificates are required by . clients iOS Usually, the default certificate is sufficient for providing identity information from the
. For instructions on how to configure and import the. However, there are special requirements for clientsBarracuda Firewall to the client iOS
XAUTH certificates, see .How to Configure Apple Devices for Client-to-Site VPN Connections iOS
Step 4. Configure VPN Access Policy
Configure a VPN policy to specify which clients are allowed to connect. If there is no policy that matches a client or the policy allowing the client is
disabled, the client connection is rejected.
To configure the VPN access policy:
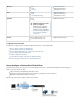
Go to the page.VPN > Client-To-Site VPN
Configure the section. Settings If you are using devices, select the server certificate from the list. Optionally, you iOS Local Certificate
can enter a message and select an image to be displayed when the client connects.
In the section, configure the IPsec Phase 1 and Phase 2 settings. IPsec Settings The Phase 1 encryption settings are global for all
clients that want to connect. Phase 2 is chosen when you create the access policy; ensure that you configure the Phase 2 settings.
In the VPN Access Policies section, add a policy that defines the network settings. To connect to the VPN service, users and user
groups must be included in an access policy. In the policy settings, Allowed Peers defines the type of VPN clients that are allowed to
connect to the Barracuda Firewall. This can either be the Barracuda Network Access Client or any third-party client that uses default
IPsec.
Click .Save Changes
For additional assistance, click on the page.Help Client-To-Site VPN
Step 5. Configure the Client
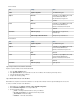
On the IPsec client system, you must enter the following key parameters to establish a connection to the Barracuda Firewall:
Key Parameter Description
VPN Server
The external IP address or DNS hostname of your Barracuda
Firewall.
Encryption
Verifies that the client-side VPN configuration matches the IPsec
Phase 1 and Phase 2 settings on the Barracuda Firewall. If the
incorrect encryption, hash, or DH group , the client can are selected
still reach the VPN server but is unable to communicate. Also, the
tunnel cannot be established. Verify that the lifetimes are identical; a
mismatch can lead to brief tunnel terminations whenever one side
reaches its lifetime. When the lifetimes are correctly configured,
renegotiation occurs transparently.
If you set the when using local authentication, a "Certificate did not match any group" error occurs.Allowed Groups