
User`s guide


How to Set Up a Guest Access Confirmation Page
When setting up a guest network, you can configure the Barracuda Firewall to use a confirmation
page that prompts guests to agree to of Service before they can access the network. ATerms
confirmation page is typically used to grant network access to anonymous users.
Related Articles
How to Configure
Wi-Fi
How to Configure the
DHCP Server
In this article:
Before You Begin
Step 1. Set up the Guest Network Interface
a Wi-Fi InterfaceOn
On a Wired Interface
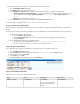
Step 2. Enable the DHCP Server for the Guest Network
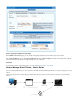
Step 3. (Wired Networks Only) Set up Guest Network
Step 4. (Optional) Configure the Login Page
Before You Begin
Ensure that the Barracuda Firewall has one unused network interface (Wi-Fi, Ethernet, or virtual, e.g., ath3, p3, or p3 100). .
Identify the guest network that you want to use (e.g., 192.168.225.0/24).
Step 1. Set up the Guest Network Interface
You can use Wi-Fi or a wired network for guest access.
On a Wi-Fi Interface
If Wi-Fi is available for your Barracuda Firewall model, you can for guest access.configure a Wi-Fi network
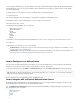
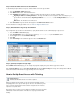
In the section, ensure that you specify the following settings:Static Interface Configuration
Network – The guest network (e.g., ).192.168.225.0/24
Services to Allow – Select .DNS Server
Classification – Click .Trusted
In the section, select from the list.Wi-Fi Link Configuration Confirmation Message Landing Page
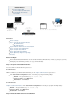
On a Wired Interface
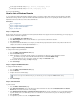
Configure a static network interface. In the , ensure that you specify the following settings:Static Interface Configuration
Network -– The guest network (e.g., ).192.168.225.0/24
Services to Allow – Select .DNS Server
Classification – Click .Trusted