
User`s guide


1.
2.
3.
4.
5.
1.
2.
3.
Configure the Captive Portal
Upload a Certificate
Monitoring and Managing Authentication Users
Configure the Captive Portal
Before you begin:
Verify that the confirmation message and ticketing features are disabled. Go to the NETWORK > IP Configuration page, and edit the
relevant Wi-Fi interface to specify that there is no Landing Page.
Before configuring the captive portal for use with Wi-Fi, s to verify that you have correctly configured Wi-Fi.ee How to Configure Wi-Fi
Also ensure that users to the Wi-Fi network of the Barracuda Firewall.are connected
To configure the captive portal:
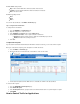
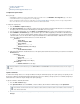
Go to the page.FIREWALL > Captive Portal
In the section, enable the captive portal, specify the networks from which unauthenticated users are redirected toBasic Configuration
the captive portal, select the method of authenticating users, and edit the user access policies.
If you are using local authentication, go to the page to create your list of allowed users and groups.USERS > Local Authentication
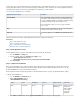
On the page, set up a firewall rule (plus one for Wi-Fi, if applicable) to allow traffic for authenticated users.FIREWALL > Firewall Rules
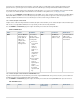
For example, you can create a firewall rule with the following settings to allow successfully authenticated users from a Wi-Fi network at
192.168.201.0/24 to access the Internet. When using the default firewall rules of a Barracuda Firewall, no additional rule is necessary
because the LAN-2-Internet rule allows Internet access from the trusted LAN.
General tab
Action: Allow
Connection: Dynamic SNAT
Service: HTTP+S
Source: 192.168.201.0/24
Destination: (Network Object)Internet
Users/Time tab
Add . All Authenticated Users
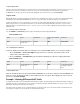
Add a firewall rule that blocks unauthenticated users on the captive portal network. Place this rule under your custom rule or below the L
rule.AN-2-Internet
General tab
Action: Block
Service: Any
Source: 192.168.201.0/24
Destination: (Network Object)Any
Users/Time tab
Authenticated Users must be empty.
Upload a Certificate
To avoid browser warnings because of a self-signed certificate offered by the authentication page of the captive portal, you can upload your own
trusted server certificate to the Barracuda Firewall. Install either the trusted server certificate (self-signed) or the issuer certificate (CA-signed) on
redirected clients to let browsers verify the identity of the captive portal page.
To upload a certificate to the Barracuda Firewall:
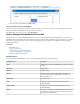
Go to the page.VPN > Certificates
In the section, click , select the certificate (either in PKCS12 or PEM format), and click .Upload Certificate Browse Upload Now
Go to the page, select the newly-installed certificate from the list, and click FIREWALL > Captive Portal Signed Certificate Save
.Changes
Barracuda Networks recommends that you select for the of the network interface that serves the captiveUnclassified Classification
portal.
Ensure that the Common Name field of the certificate contains a DNS-resolvable hostname or an IP address that is reachable
via the Barracuda Firewall.