
User`s guide

1.
2.
3.
1.
2.
a.
b.
i.
ii.
iii.
3.
4.
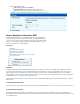
Step 1. Enable Authoritative DNS on the Barracuda Firewall
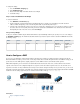
Go to the page and enable . In the table, you can view a list of the links thatNETWORK > Authoritative DNS Authoritative DNS DNS Servers
are configured with the DNS Server service on the page.NETWORK > IP Configuration
Step 2. Create One or More Domains
To define a domain:
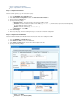
On the page, click .NETWORK > Authoritative DNS Add New Domain
Enter the domain name, and define TTL and zone transfer settings.
Click .Create
The following records are created:
Start of Authority (SOA) – Only one SOA record is allowed per hosted domain or zone.
Name Server – One NS record for each name server in the table is generated.(NS) DNS Servers
Address (A) – One A record is created for each name server in the table. DNS Servers
The DNS records are created with typical default values. To view and edit all of the values for each record, click next to the record in theEdit DN
section.S Records
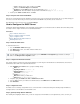
To configure more than one external IP address for a domain:
On the page, edit the A record for the hostname. On the dialog that appears, in the table, specify NETWORK > Authoritative DNS IP Addresses
the IP addresses to be used in response to external DNS queries.
The table IP Addresses is the list of IP addresses which can be used to reach this host name. When asked for the A record, the Barracuda
Firewall rotates through this list of IP addresses, varying which IP address appears first in the returned list in round robin fashion. If an interface is
not available, its IP address is not returned in the list.
Add multiple IP addresses to achieve inbound link balancing and failover. Enter IP addresses, if they exist, for internal DNSLocal Network
queries (more about this in Step 3).
For each external IP address, in the column, select the WAN link from the drop-down list. Enter the address in the field.Links WAN IP Address
Click the plus sign ( ) to add the entry. Save your changes when complete.+
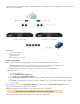
Step 3. Set up DNS for Internal Clients (Split DNS)
The Barracuda Firewall supports a split DNS infrastructure. If you are using the same domain name for internally and externally accessible
resources, internal (trusted) network clients receive the internal IP address of the resource and external clients receive the external address. To
direct internal and external requests to different IP addresses for the same namespace:
On the page, add (or verify that you have added) a static trusted interface with the DNS Server service.NETWORK > IP Configuration
For each hostname that is used both internally and externally, add one or more internal addresses:
On the page, edit the A record for the hostname.NETWORK > Authoritative DNS
On the dialog that appears, in the table, specify the local IP addresses to be used in response to internal DNS IP Addresses
queries. For each local address:
In the column, select to use a local IP address for this host name.Links INTERNAL ONLY
In the column, type the local IP address for this host name.Local Network
Save your changes when complete.
If you have an internal DNS server, configure it to forward queries to the interface in step 1.
Using an internal network client, try to access each hostname and verify that you are directed to the correct site.
Step 4. Add More DNS Records
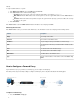
Add more DNS records to your domains to match your configuration. For example, each email server needs an MX record and a corresponding A
record. Each web server needs an A record.
If you have externally reachable IP addresses that are not tied to any interface, such as ARIN networks, create an A record for each one. In the Li
list, select .nks ANY
Step 5. Update Your Domain Registrar
If you have not registered your domain name, register it with a domain name registrar like GoDaddy.com or register.com. Make the NS records of