
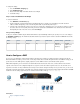
User`s guide

4.
5.
1.
2.
3.
1.
2.
3.
4.
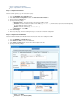
– Add the service objects to redirect (e.g., ).Service HTTP
– Click and add .Source Network Objects Internet
– Click field and enter the WAN address (e.g., ).Destination IP Address 80.90.100.200
– Enter the IP address and port number of the DMZ server (e.g., ).Redirected To 172.16.10.10:8080
At the top of the window, click .Add Access Rule Add
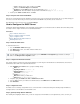
Step 3. Verify the Order of the Firewall Rules
New rules are created at the bottom of the firewall rule set. Because rules are processed from top to bottom in the rule set, you must arrange your
rules in the correct order. Ensure that your rules are placed above the BLOCKALL rule; otherwise, the rules are blocked.
After adjusting the order of rules in the rule set, click .Save Changes
How to Configure the DHCP Server
If enabled, the Barracuda Firewall DHCP server automatically assigns IP addresses to clients that reside in a defined subnet. This article provides
an example of how to configure a DHCP server on the Barracuda Firewall.
In this article:
Step 1. Enable the DHCP Server
Step 2. Configure the DHCP Server Subnet
Step 3. Configure the Client
Step 4. (Optional) Assign Static IP Addresses
Monitoring Active Leases
Step 1. Enable the DHCP Server
To enable the DHCP server:
Go to the page.NETWORK > DHCP Server
In the section, select to enable the DHCP server. DHCP Server Yes
Click .Save Changes
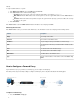
Step 2. Configure the DHCP Server Subnet
This example configures a DHCP server subnet named LAN that uses an IP range from 192.168.200.150 to 192.168.200.160, subnet mask of
255.255.255.0, and an NTP server at ntp.barracudacentral.com.
In the section, specify the following settings:Add DHCP Server Subnet
Name: LAN
Beginning IP Address: 192.168.200.150
Ending IP Address: 192.168.200.160
: Subnet Mask 255.255.255.0
: Gateway 192.168.200.200
DNS Server 1 : Enter your DNS server.
NTP Server 1: ntp.barracudacentral.com
If required, specify the and .Default Lease Time Maximum Lease Time
If you use WINS servers in your network, enter their IP addresses in the and fields.WINS Server 1 WINS Server 2
Click .Add Subnet
Step 3. Configure the Client
The DHCP server is now ready to assign DHCP leases to connected clients. For clients that currently have manually assigned IP addresses,
reconfigure them to receive IP addresses from the DHCP server.
Step 4. (Optional) Assign Static IP Addresses
After enabling and configuring the DHCP server, you can also assign static or fixed IP addresses to designated hosts (such as servers in your
To use the DHCP server within the management network, go to the page and add a secondary IPNETWORK > IP Configuration
address in the section.Management IP Configuration