
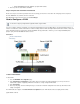
User`s guide

1.
2.
3.
4.
1.
2.
3.
4.
1.
2.
3.
4.
5.
6.
1.
2.
3.
4.
1.
2.
a.
b.
c.
3.
a.
b.
c.
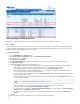
Go to the page.NETWORK > IP Configuration
In the section, select the check box to enable Wi-Fi.Wi-Fi Link Configuration Activate WiFi
From the list, select the country that your Barracuda Firewall is located in.Location
Click .Save Changes
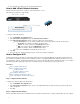
Configure the Radio
To configure the radio channel and transmission rate:
Click and edit the radio settings.Configure Radio
For more transmission power and a bigger range of radio reception, select a higher value from the list.mW Power
For higher data throughput, select a higher value from the list.Mbps Bitrate
To bond two channels for a transmission rate of up to 108 Mbps, set to . When you enable this setting, verify that allSuperG Yes
clients connecting to this access point support SuperG mode.
Click .Save Changes
At the top of the page, click the warning message to execute the new network configuration.
Log into the Barracuda Firewall again.
Configure a Wi-Fi Access Point
To edit a Wi-Fi access point:
Click for the access point you want to enable (WIFI, WIFI2, WIFI3). Edit
In the field, enter the Service Set IDentifier (SSID). This name is displayed to Wi-Fi clients that search for available Wi-Fi signals.SSID
From the list, select one of the following options:Security Level
High – WPA2 (Recommended).
Medium – WPA.
None – No encryption.
From the list, select one of the following options:Authentication
WPA-PSK – Use this option when key management should be done locally on the Barracuda Firewall. Then define a preshared
key.
WPA-RADIUS/EAP – Use this option when key management is done by a RADIUS server. Then enter the RADIUS server
information into the section.RADIUS Configuration
To forward clients to a landing page that displays a or serves a system, enable the feature. To giveConfirmation Message Ticketing
clients direct access to the Wi-Fi network, select .None
Click .Save
Step 3. Enable the DHCP Server
To assign IP addresses to clients that are connected to the Wi-Fi network, enable the DHCP server of the Barracuda Firewall.
Go to the page. Clients with an active lease are listed in the section.NETWORK > DHCP Server Active Leases
In the section, set to .DHCP Server Enable DHCP Server Yes
If you change the network configuration of the default wifi and wifi2 interfaces, modify the available subnets or create a new one.
Click .Save Changes
Step 4. Configure the Firewall Rule for Wi-Fi
There is a predefined firewall rule named that only applies to the first Wi-Fi network (ath0). To allow other networks, you canWIFI-2-INTERNET
either edit a copy of the rule for the other networks or edit the rule directly to include all subnets.
Go to the page.FIREWALL > Firewall Rules
To edit a copy of the WIFI-2-INTERNET rule:
Copy the WIFI-2-INTERNET rule. The rule copy is created at the bottom of the rule set.
Edit the WIFI-2-INTERNET-COPY rule.
Click the tab and change to or .Advanced Interface Group WIFI2 WIFI3
To directly edit the the include all subnets:WIFI-2-INTERNET rule to
Edit rule.the WIFI-2-INTERNET
Click the tab and select from the list.Advanced Matching Interface Group
With firmware version 6.1.0 and above, you can edit the landing page and ticketing settings, as well as add or remove guest networks.
To configure these settings, go to the page.USERS > Guest Access