
User`s guide


3.
1.
2.
3.
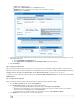
Step 4. Upload a Certificate
It is recommended that you install a CA-trusted root certificate on the Barracuda Firewall, so that web browsers trust the SSL VPN portal and do
not issue a warning to end users when they access the portal. If a certificate is not installed, the SSL VPN portal page delivers the default
self-signed certificate.
To upload a certificate, go to the page. You can upload a new certificate or select one that has already been uploaded fromVPN > Certificates
the list.Certificate
Step 5. Enable the SSL VPN Client
For transparent VPN access, end users can launch the SSL VPN client by clicking the My Network link in the upper right of the SSL VPN portal.
After users are authenticated, they are given access to the target network.
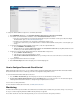
To enable the SSL VPN client:
Go to the page and click the tab.VPN > SSL VPN Client Settings
In the section, set to .SSL VPN Client Settings Enabled Yes
Configure the remaining settings.
Next Steps
After you enable and configure the SSL VPN, end users can access the portal in their web browsers. If an A resource record for the WAN IP
address of your Barracuda Firewall is assigned, end users can access the portal page by opening .https:// example.com
To add resources for your end users to the SSL VPN portal, see .How to Configure SSL VPN Resources for the Barracuda Firewall
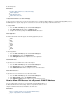
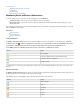
The login page for the portal displays as follows:
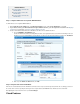
How to Configure SSL VPN Resources for the Barracuda Firewall
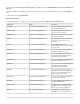
After , you can add Outlook Web Access (OWA), WebDAV shares, applications, and Intranet resources toyou enable and configure the SSL VPN
In the and fields, only ASCII characters are allowed. For an overview of ASCII characters seeWelcome Message Help Text
the page.Wikipedia