
User`s guide


2.
3.
a.
b.
4.
1.
2.
3.
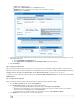
Action: Select Redirect to Service.
Source: Click on and select from the list.Network Object Internet
Destination: Select the network object representing your incoming internet connection.
Redirected To: Select . SSL VPN
To enable access to the SSL VPN portal via a hostname instead of only via the IP address (because the latter may change), you use the
third-party DynDNS service.
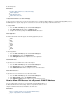
Go to the page.NETWORK > IP Configuration
In the , enable for the required interface. Dynamic Interface Configuration Use Dynamic DNS
Click .Save Changes
Step 2. Configure User Authentication
End users must authenticate themselves before they can access internal resources and applications the SSL VPN. You can manage userwith
authentication either locally on the Barracuda Firewall or externally with MS Active Directory, LDAP, or RADIUS. For instructions on how to
configure local or external user authentication on the Barracuda Firewall, see Managing Users and Groups .
To specify how users are authenticated for the SSL VPN, go to the page and select the method from the VPN > SSL VPN > Authentication User
list.Authentication
Step 3. Configure the SSL VPN Portal
After you enable SSL VPN and specify the authentication method, configure general and appearance settings:
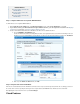
Go to the page and click the tab.VPN > SSL VPN Server Settings
In the , specify the basic settings for the SSL VPN.General Settings section
For increased security, Barracuda Networks recommends that you enable .Enforce Strong Ciphers
By default, the SSL VPN portal does not accept SSLv2 connections because SSLv2 is considered unsafe. If you must allow
SSLv2 connections for compatibility reasons, enable .Allow SSLv2
To prevent browsers from saving SSL VPN session information and cookies, disable .Allow Autocomplete
In the section, customize the look of the SSL VPN portal.Appearance