. Barracuda Firewall - Overview . . . . . . . . . . . . . . . . . . . . . . . . . . . . . . . . . . . . . . . . . . . . . . . . . . . . . . . . . . . . . . . . . . . . . . . . . . . . . . . . . . 1.1 Barracuda Firewall Release Notes Version 6.1.4.005 . . . . . . . . . . . . . . . . . . . . . . . . . . . . . . . . . . . . . . . . . . . . . . . . . . . . . . . . . . . 1.1.1 Barracuda Firewall Release Notes Version 6.1.3.003 . . . . . . . . . . . . . . . . . . . . . . . . . . . . . . . . . . . . . . . . . . .
1.5.6 How to Manage Guest Tickets - User's Guide . . . . . . . . . . . . . . . . . . . . . . . . . . . . . . . . . . . . . . . . . . . . . . . . . . . . . . . . . . . . 1.6 VPN . . . . . . . . . . . . . . . . . . . . . . . . . . . . . . . . . . . . . . . . . . . . . . . . . . . . . . . . . . . . . . . . . . . . . . . . . . . . . . . . . . . . . . . . . . . . . . . . . . 1.6.1 Client-to-Site VPN . . . . . . . . . . . . . . . . . . . . . . . . . . . . . . . . . . . . . . . . . . . . . . . . . . . . . . . . .
Barracuda Firewall - Overview The Barracuda Firewall is an application-aware network firewall appliance that is designed for organizations without dedicated IT personnel to manage firewalls. It leverages cloud resources to extend next-generation security and networking beyond the capabilities of typical security gateways or legacy firewalls. The Barracuda Firewall delivers application control, user awareness, secure VPNs, link optimization, dynamic traffic prioritization, and advanced malware protection.
Web Interface Adding source or destination networks, with netmasks higher than /24, to firewall rules now works as expected. (BNF-2869) The smart pre-submission input validation now also works correctly with DNAT firewall rules. It is now possible to access release notes for the latest general and early release through the ADVANCED > Firmware Updates page. ( BNF-2790) Configuration wizards now successfully finish, even if the Barracuda Firewall receives wrong time information from an NTP server.
What's New with Barracuda Firewall Version 6.1.3.003 Web Interface The Barracuda Firewall User Interface is now fully Japanese localized. Note that entering multi-byte characters is not yet supported. Guest networks for Wi-Fi networks can now only be configured in USERS > Guest Access. (BNF-2650) Barracuda Firewall OS Improved stability due to kernel upgrade and various improvements: Updated underlying Linux kernel to 2.6.28. Time zone upgrades for South Africa and Israel per new 2013 DST settings.
Access to the guest ticketing administration page is now possible from any network segment. A corresponding Redirect to Service targe t was included. [BNF-2603] Firmware Improvements The Session Expiration Length in Advanced > Secure Administration cannot be set to 0 minutes (unlimited) any more. [BNF-2591] Viewing DHCP settings through Barracuda Cloud Control now works as expected.
[BNF-2348] Fixed an issue where under rare circumstances configuration updates failed and login was no longer possible. [BNF-2504] Barracuda Firewall Release Notes Version 6.1.0.016 Please Read Before Upgrading Before installing the new firmware version, back up your configuration and read all of the release notes that apply to the versions that are more current than the version that is running on your system.
SSL VPN is available at no additional cost for an unlimited amount of users. Depending on the performance level of the appliance model, Barracuda Networks recommends the following maximum numbers of users: Model Recommended Max. Users X100, X101 SSL VPN not available X200, X201 25 users X300 50 users X400 100 users X600 200 users Depending on the Firewall and VPN usage of your Barracuda Firewall, the recommended number of maximum users may vary.
High Availability All Barracuda Firewalls can now be deployed as part of a High Availability (HA) cluster. The primary unit handles all network traffic and security functions, while the secondary unit waits in standby mode to take over if the partner unit fails. The secondary unit automatically inherits all configuration changes from the primary unit. You can only set up a HA cluster with two identical Barracuda Firewall models (e.g. two X101, two X200, or two X400) that run the same firmware version.
Configuration Wizards All Barracuda Firewalls now offer the following configuration wizards to guide you through initial setup and configuration: The Test at my Desk wizard for initial activation and deployment in an evaluation and test scenario. This wizard starts automatically during your first login.
Smart Pre-Submission Input Validation All Barracuda Firewalls now offer smart pre-submission input validation. This validation prevents configuration pop-ups from closing and losing entered information before all required fields are filled.
URL Filtering of HTTPS Websites and Web Security Service Exemptions All Barracuda Firewalls can now apply URL filtering provided by the Barracuda Web Security Subscription to websites accessed via HTTPS. Additionally, you can exempt user-defined domains or IP addresses from being forwarded to the Barracuda Web Security Service for HTTP and HTTPS. Guest Access for Non-Wi-Fi Models All Barracuda Firewalls now also support the guest access feature for wired network segments.
Log Streaming All Barracuda Firewalls now support streaming log files to an external syslog server. You can activate syslog streaming per log file on the LOGS > Log Streaming page. Usability Improvements Quick Links to Service Configuration Pages On the BASIC > Status page, you can click the services listed in the Services section to open their configuration pages. For certain services, additional information is displayed when you hover over the service.
Quick Links to Barracuda Labs Reputation Search in Logs, Active Connections, and Recent Connections pages On the LOGS pages, BASIC > Active Connections page, and BASIC > Recent Connections page, you can view information from the Barracuda Labs Reputation Search about an external IP address by clicking the address in the Destination IP column.
Active Routes User Interface Improvement The Active Routes tab previously located in BASIC has been moved to the Network Routes section on the NETWORK > Routing page. You can now edit network routes directly on the page. QoS: Configurable Throughput of Rate Limiting Queues On the FIREWALL > QoS page, the diagram that explains QoS queues was updated to match other graphics in the 6.1 release. Additionally, you can configure the throughput of the rate limiting queues.
Download Barracuda VPN Clients through UI All currently available Barracuda VPN clients can now be downloaded from the Settings section of the VPN > Client-To-Site VPN page. Minor UI brush-up with new Barracuda Networks Logos and Improved Graphics The logos and login screen for Barracuda Firewalls have been updated to match the new Barracuda Networks corporate theme. On the ADVANCED > Appearance page, the new Barracuda Firewall image can still be replaced.
Barracuda Firewalls can now be reloaded and rebooted if the unit is not activated yet. [BNF-2230] Known Issues High Availability: Manually triggering an HA failover is only possible on the currently active Barracuda Firewall unit. This issue does not affect automatic failover of HA clusters. High Availability: Changing the management IP address/network on HA units may lead to firewall service interruptions and loss of traffic flow.
POP3 VNC IMAP4 WebDAV Web forwards (HTTP/HTTPs) All Barracuda Firewall models starting with X200 provide SSL VPN at no additional cost for an unlimited amount of users.
Usability Improvements The following sections describe the usability improvements that are available as of firmware release 6.1.0. Quick Links to Service Configuration Pages On the Status page, links in the Services section are now available to provide quick access to the configuration pages of all available services. Column Sorting for Active Connections Entries on the BASIC > Active Connection page are now sortable by column.
Firewall rule entries can quickly be edited after their firewall rule entries are double-clicked. NAT Objects Tab NAT objects are more intuitively integrated into the user interface and can now be found in a dedicated tab. Active Routes User Interface Improvement The Active Routes window is now consolidated with the network routes configuration window. Network routes are now directly editable. Barracuda Firewall Release Notes Version 6.0.4.001 After installing release version 6.0.4.
Please Read Before Updating Before installing any firmware version, make a backup of your configuration and read all of the release notes that apply to the versions that are more current than the version that is running on your system. Do not manually reboot your system at any time during an upgrade, unless otherwise instructed by Barracuda Networks Technical Support. Depending on your current firmware version and other system factors, upgrading could take up to 10 minutes.
takes longer, please contact Barracuda Networks Technical Support for further assistance. Firmware Improvements Enhancement: It is now possible to disable the SIP Proxy. [BNF-1900] Enhancement: To simplify the firewall rule tester, time settings are no longer available. [BNF-1872] Enhancement: The Active Connections screen now allows performing a Barracuda Labs reputation search for globally routable IP addresses.
DNAT firewall rules can now also be used to perform port address translation (PAT). In the Redirect To field, append the desired port to the IP address. E.g.: 192.168.100.20:8080 [BNF-1582] The default firewall rule LOCALDNSCACHE now also includes TCP port 53 network traffic. [BNF-1584] Applying filters in the VPN > Active Clients page did not work correctly. [BNF-1576] The health status of units connected to Barracuda Cloud Control was not displayed correctly.
User interface rendering of the recent connection page was slow with huge amount of connection entries. [BTN-1492] The firewall log time filter user interface of the Barracuda Cloud Control was not displayed correctly. [BTN-1462] User objects were not saved correctly. [BTN-1447] A permission denied warning was displayed when creating Barracuda Cloud Control Account. [BTN-1264] Automatic warning pop-ups upon wrong configurations in the Barracuda Cloud Control were not displayed correctly.
Log filter for service logs did not work correctly. [BNF-1366] Filtering log files occasionally caused a temporary unavailable message. [BNF-1374] IPsec VPN tunnel status was not displayed correctly. [BNF-1387] Captive Portal was not able to use uploaded certificates. [BNF-1389] Filtering options in recent connections did not work correctly. [BNF-1393] Enabling/Disabling the captive portal did not work correctly. [BNF-1400] The Wi-Fi interface for ticketing administration was occasionally unreachable.
technology—including application control, user awareness, secure VPNs, link optimization, and advanced malware protection—but is designed for unsurpassed ease of use, and priced competitively. The Barracuda Cloud Control centralized management portal makes it easy and intuitive to deploy, configure, and manage the Barracuda Firewall from any location, and is included at no extra cost.
Within any organization, different individuals or groups require access to different resources and applications. For example, marketers may need to use Facebook for their work, while for other groups it will only waste time and bandwidth. To enforce policies that control access to resources and allocation of bandwidth, Barracuda Firewall identifies users based on IP address mapping.
Unlike other firewall products that simply enhance or augment standard Linux firewall packages, the core of every Barracuda Firewall is a specially developed application-controlled packet-forwarding firewall called the phion core. It is based on a combination of stateful packet forwarding, TCP stream forwarding, and application-layer gateways, enhanced by custom application plug-ins that handle complex protocols involving dynamic address or port negotiations.
1. Set up the unit between the management PC and the network. 2. Connect the LAN to port 1 and the management PC to port 3. The management PC can configure the Barracuda Firewall while still being connected to the LAN through the transparent port 1—port 3 bridge. 3. Go to https://192.168.200.200. 4. Continue at the certificate warning and log into the Barracuda Firewall (default username: admin, default password: admin). 5. Follow the instructions in the Test at my desk wizard.
Area Description Subscription Status To verify the status of your licenses, go to the BASIC > Status page and view the Subscription Status section. The status for all purchased licenses displays as Current. While the Barracuda Firewall is connected to the Internet, it automatically downloads licenses. If the Barracuda Firewall cannot be activated, please contact Barracu da Technical Support.
Connect the Barracuda Firewall to your existing authentication service or create a built-in database for user information. Managing Users and Groups If supported by your Barracuda Firewall (models X101 and X201), configure Wi-Fi. How to Configure Wi-Fi Configure a site-to-site VPN. Site-to-Site VPN Configure client-to-site VPN access. Client-to-Site VPN Link the Barracuda Firewall with your Barracuda Cloud Control account for central management and configuration.
Dynamic Interface Dynamic interfaces for DSL, DHCP, or 3G. How to Configure WAN Interfaces Virtual Interface Virtual interfaces for VLANs. You must use properly configured 802.1q capable switches. How to Configure a VLAN Wi-Fi Link If available for your Barracuda Firewall model, you can create up to three different Wi-Fi networks. How to Configure Wi-Fi 3G Network Interface With a Barracuda M10 3G/UMTS USB modem, you can configure 3G connectivity.
dynamic connection besides DHCP (PPTP or PPPoE) on port p2, delete the default DHCP interface. Port p3 – Initially, port p3 is bridged to port p1. Both interfaces are also configured as management ports in the LAN. To use port p3 for another connection, delete the P1-P3 bridge. However you might lose connectivity to the network from your administrative PC. After removing the default configurations for ports p2 and p3, you can reconfigure them as WAN interfaces.
The interface must be configured on port p4 with an IP address of 69.122.23.58 and a netmask of 255.255.255.0 (or /24). The default gateway of the ISP is 69.122.23.254. Configure the static network interface with the following settings: Setting Value Network Interface Select p4. IP Address Enter 69.122.23.58. Netmask Enter 255.255.255.0. Classification Click WAN. Gateway Enter 69.122.23.254.
After you connect the Barracuda M10 USB modem to the Barracuda Firewall, configure the provider settings. Then verify that the default network route and network interface of the 3G WAN link have been successfully introduced and are available. In this article: Step 1. Connect the Barracuda M10 Modem Step 2. Configure the Provider Settings Step 3. Verify the Uplink and Default Network Route Step 1. Connect the Barracuda M10 Modem To connect the Barracuda M10 modem: 1. 2. 3. 4.
How to Configure a DHCP Connection If the IP address is dynamically assigned by your ISP, follow the instructions in this article to configure the interface. Before You Begin If your ISP provides a modem, connect the Ethernet port of the modem to a free network interface on the back of your Barracuda Firewall. Use the Ethernet cable that is delivered with the modem.
10. After committing your changes, log back into the Barracuda Firewall. How to Add a Static Network Interface Follow the instructions in this article to configure a static network interface. You can add a subnet to a free physical or virtual interface. Related Article How to Configure a VLAN To configure a static network interface: 1. Go to the NETWORK > IP Configuration page. 2. In the Static Interface Configuration section, click Add Static Network Interface. 3.
1. 2. 3. 4. Go to the NETWORK > IP Configuration page. In the Wi-Fi Link Configuration section, select the Activate WiFi check box to enable Wi-Fi. From the Location list, select the country that your Barracuda Firewall is located in. Click Save Changes. Configure the Radio To configure the radio channel and transmission rate: 1. Click Configure Radio and edit the radio settings. For more transmission power and a bigger range of radio reception, select a higher mW value from the Power list.
3. c. Click the General tab and change Source to specify the Wi-Fi subnets. 4. At the top of the rule editor window, click Save. Step 5. Verify the Order of the Rules in the Rule Set Because rules are processed from top to bottom in the rule set, arrange your rules in the correct order. Also verify that your rules are placed above the BLOCKALL rule; otherwise, the rules are blocked. After adjusting the order of rules in the rule set, click Save Changes.
Next Steps After adding the virtual interface, you can use it in your network configurations as if it were a physical interface. Continue with any of the following network configuration articles: How to Add a Static Network Interface How to Add a Static Route How to Configure a Bridge How to Configure Bandwidth Policies or QoS How to Add a Static Route Static routes are used to specify a gateway for an unassociated network so that the return traffic can take the correct path.
To configure the bridge: 1. 2. 3. 4. Go to the NETWORK > Bridging page. Click Add Bridged Group. Enter a name for the bridge and add the interfaces to be bridged. Commit this change. Step 2. Create a Firewall Rule for the Bridge To create the firewall rule: 1. Go to FIREWALL > Firewall Rules page. 2. Create a firewall rule to allow the traffic between the bridged networks.
Step 2. Configure the Firewall Rule Step 3. Verify the Order of the Firewall Rules Step 1. Configure the Interface Create a network segment (e.g., 172.16.10.0/24 on port 3). 1. 2. 3. 4. Go to the NETWORK > IP Configuration page. In the Static Interface Configuration section, click Add Static Network Interface. Enter a name into the Name field. Specify the following settings: Network Interface – Select the interface connected to the DMZ (e.g., p3).
Service – Add the service objects to redirect (e.g., HTTP). Source – Click Network Objects and add Internet. Destination – Click IP Address field and enter the WAN address (e.g., 80.90.100.200). Redirected To – Enter the IP address and port number of the DMZ server (e.g., 172.16.10.10:8080). 5. At the top of the Add Access Rule window, click Add. Step 3. Verify the Order of the Firewall Rules New rules are created at the bottom of the firewall rule set.
network). To assign a static IP address to a system: 1. In the DHCP Server Subnets section, click Edit under the Action tab. 2. In the Static Leases section, edit the following settings: Hostname: Enter a name for the system to be assigned a static address. For example, Workstation. MAC Address: Enter the MAC address of the selected system. You can also copy the MAC address from the Active Leases se ction. IP Address: Enter the IP address that you want to assign to the system.
2. Configure the following settings: Web Security: Select Proxy Forwarding. Proxy Forwarding: Enter the IP address of the forward proxy. Port: Enter the port of the forward proxy. Default values are 3128 or 8080. For example, if you are configuring a forward proxy for the setup in the figure above: 3. Click Save Changes.
Every DNS record has a Time to Live (TTL) value, which is the length of time that the DNS record can be cached. For most DNS records, two days is a typical and acceptable value. However, A records should have a very short TTL, such as 30 seconds. If a WAN interface fails, its address is no longer returned. The inbound traffic to this host will not be disrupted because the cached address for the failed interface will time out quickly. Specifying a short TTL for A records also assists in link balancing.
Additional DNS Records After a zone has been created, you can edit its records or add NS records, A records, and any of the following records to the zone: Record Description Mail Exchanger (MX) MX records point to the email servers that are responsible for handling email for a given domain. There should be an MX record for each email server, including any backup email servers. If an email server lies within the domain, it requires an A record for each name server.
Step 1. Enable Authoritative DNS on the Barracuda Firewall Go to the NETWORK > Authoritative DNS page and enable Authoritative DNS. In the DNS Servers table, you can view a list of the links that are configured with the DNS Server service on the NETWORK > IP Configuration page. Step 2. Create One or More Domains To define a domain: 1. On the NETWORK > Authoritative DNS page, click Add New Domain. 2. Enter the domain name, and define TTL and zone transfer settings. 3. Click Create.
the domain point to your static WAN IP addresses. If your domain name is already registered, contact your registrar to update the NS records of the domain to point to your static WAN IP addresses. Remove records that reference any domains that are now delegated to the Barracuda Firewall.
secondary box must also connect port 3 with ISP 1. If you install cabling incorrectly, HA failover does not work properly.
ADVANCED > High Availability NETWORK > IP Configuration > Management IP Configuration NETWORK > IP Configuration > Dynamic Interface Configuration (If 3G is available) NETWORK > IP Configuration > 3G Network Interface Configure Monitoring You can configure the monitoring of additional IP addresses and interfaces. If these IP addresses and interfaces become unreachable, a failover is executed.
Time Interface Additionally, Intrusion Prevention, SYN flood protection, and a limit on the number of sessions per source IP address can be enforced. To create, edit, or change the order of firewall rules, go to the FIREWALL > Firewall Rules page. For more about matching criteria and possible firewall rule actions, see Firewall Rules . If you are new to the Barracuda Firewall, see Pre-Installed Firewall Rules t o review the rules that are already set up in the appliance.
Description – An additional description field for the firewall rule. Action – Specifies how the Barracuda Firewall handles network traffic that matches the criteria of the rule. The following table gives you a detailed overview of each available action: Action Description Allow The Barracuda Firewall passes all network traffic that matches the firewall rule.
Application policies regulate how this session is treated by the Barracuda Firewall if certain network traffic is detected by the application filter. Traffic can be reported, dropped, or throttled. The application filter identifies the type of traffic that you want to limit or control. The application-aware filter detects peer-to-peer client applications (such as IM, peer-to-peer based file sharing, and Skype) that usually cannot be detected by pattern-based intrusion prevention mechanisms.
To change the order of the firewall rules: 1. Go to the FIREWALL > Firewall Rules page. 2. Drag rules up or down in the table. If you want a rule to be executed, drag it above the BLOCKALL rule. 3. After you finish adjusting the order of the firewall rules, click Save Changes. Otherwise, your changes will not take effect. Pre-Installed Firewall Rules The Barracuda Firewall comes with a set of pre-installed firewall rules. Initially, you can use the appliance without any changes to these rules.
Flex or forwarded to a different proxy service. TRANSPARENT-PROXY If enabled, this rule automatically redirects all HTTP requests on TCP port 80 to the local proxy of the Barracuda Firewall. Depending on the proxy configuration (NETWORK > Proxy), web traffic is either scanned by Barracuda Web Security Flex or forwarded to a different proxy service. LAN-2-INTERNET-SIP If enabled, this rule automatically redirects all SIP requests from the trusted LAN to the local SIP proxy.
Connection Timeout The time in seconds to allow before a failing connection skips to the next fallback level. For a faster failover, enter lower values. For congested connections, enter longer values. Default: 30. NAT Type The type of NAT to use. The availability of the following settings depends on the NAT type that you select. This setting lets you specify which source IP address and interface are to be used in case of fallback. This is especially important if you are using multiple ISPs.
Example – HTTP and HTTPS Traffic to the Internet To allow HTTP and HTTPS connections from the local 192.168.200.0/24 network to the Internet, the Barracuda Firewall must perform source-based NAT. Instead of using the source IP address from the client residing in the LAN, the connection is established between the WAN IP address of the Barracuda Firewall and the destination IP address. Reply packets belonging to this session are replaced with the client's IP address within the LAN.
2. In the Custom Service Objects section, click the edit symbol ( ) for the custom service object that you want to edit. 3. In the Edit Service Object window, edit the services for the object. 4. Click Save. Delete a Custom Service Object To delete a custom service object: 1. Go to the FIREWALL > Service Objects page. 2. In the Custom Service Objects section, click the trash can icon ( ) for the custom service object that you want to delete. 3.
You can either register your domain name with an independent entity or configure the Barracuda Firewall as the authoritative DNS resolver for the domain name. To learn more about authoritative DNS on the Barracuda Firewall, see How to Configure Authoritative DNS. Outbound Link Balancing To achieve outbound link load balancing, create a connection object that balances the traffic among multiple links. Then use this connection object in the firewall rules that direct outgoing traffic.
Available Action settings include: Drop – Blocks network traffic where malicious activities were detected. Log Only – Reports network traffic where malicious activities were detected. None – No action is taken. Available Log settings include: Alert Warn Notice You can view detected threats on the BASIC > IPS Events page. Step 3. Configure IPS in Firewall Rules To configure IPS in a firewall rule: 1. 2. 3. 4. Go to the FIREWALL > Firewall Rules page. Open an existing rule or create a new one.
To block, allow, report, or throttle network traffic for specific application types, enable Application Control. It uses Layer 7 deep packet inspection to detect and prioritize traffic for services like instant messaging, social networking, or video streaming. It can even detect applications that try to evade pattern-based detection mechanisms by port-hopping, protocol obfuscation, or traffic encryption.
3. Applications Policy – Select one of the following policies: Default (Default Application Detection Policy) Report All – Report on the BASIC > IPS Events page. Limit Bandwidth (Default Bandwidth Policy) – The Default Bandwidth Policy can be changed using the FIREWALL > Settings page. By default, this is set to Choke, i.e., to give the unwanted applications just enough bandwidth that they will not seek another way to send traffic. Drop – Do not pass the traffic.
4. 5. At the top of the rule editor window, click Add or Save. Step 3. Verify the Order of the Firewall Rules Because rules are processed from top to bottom, ensure that you arrange your rules in the correct order. You must especially ensure that your rules are placed above the BLOCKALL rule; otherwise, the rules are blocked. After adjusting the order of rules in the rule set, click Save Changes. How to Configure Bandwidth Policies or QoS Limited network resources make bandwidth prioritization necessary.
Queues and Rate Limits The following diagram shows how the eight bandwidth policies are divided into queues: The Priority Queues always take precedence. The Regular Queues can use unlimited bandwidth. The Rate Limiting Queues are collectively limited to 5% of the maximum link bandwidth. The rate limits always apply, so even if there is no other traffic, the traffic in the Rate Limiting Queues never uses more than 5% of the bandwidth.
Configure the Captive Portal Upload a Certificate Monitoring and Managing Authentication Users Configure the Captive Portal Before you begin: Verify that the confirmation message and ticketing features are disabled. Go to the NETWORK > IP Configuration page, and edit the relevant Wi-Fi interface to specify that there is no Landing Page. Before configuring the captive portal for use with Wi-Fi, see How to Configure Wi-Fi to verify that you have correctly configured Wi-Fi.
Monitoring and Managing Authentication Users On the BASIC > User Activity page, you can view currently authenticated users. You can also disconnect specific users. Example - Allowing HTTP Traffic When you configure firewall rules to allow network traffic, you can choose to allow traffic only for certain types of traffic that are passing to and from specific networks. You might want to create rules that allow wanted traffic to pass, and then use the BLOCKALL rule to block all other types of traffic.
If your mail server or Barracuda Spam & Virus Firewall is on the public network, you might want to allow your Barracuda Firewall to provide protection and move your mail system onto the internal network. The mail traffic passes through the Barracuda Firewall in both directions. If the advertised method of receiving email is a dynamically -assigned IP address, use a service such as DynDNS to make a permanent identifier for your mail server or Barracuda Spam & Virus Firewall.
DNAT Either the Internet n etwork object or a specific public IP address. For example, the IP address of the hosting provider. The destination depends on the advertised method of receiving email. If it is one or more external static IP addresses, enter those addresses (a CIDR summarization of addresses can also be used). If it is a domain name which maps to a dynamically assigned IP address, select the network object named A ny.
Verify Firewall Rule Order Verify the order of the firewall rule(s) that you created. New rules are created at the bottom of the firewall rule set. Because rules are processed from top to bottom in the rule set, arrange your rules in the correct order. You must especially ensure that your rules are placed above the BLOCKALL rule; otherwise, the rules are blocked. After adjusting the order of rules in the rule set, click Save Changes.
In this article: Step 1. Configure a Firewall Rule for the Connection from the SIP Server to Internet Step 2. Configure a Firewall Rule for the Connection from the Internet to the SIP Server Step 3. Verify the Order of the Rules in the Rule Set Step 1. Configure a Firewall Rule for the Connection from the SIP Server to Internet To let SIP-based VoIP communication pass the firewall, configure a forwarding firewall rule that redirects traffic to the SIP proxy.
3. At the top of the Edit Access Rule window, click Save. Step 2. Configure a Firewall Rule for the Connection from the Internet to the SIP Server Configure a separate forwarding firewall rule to allow connections from the Internet to the SIP server. You can create a new firewall rule or edit an existing rule. This example edits the INTERNET-2-LAN-SIP rule. 1. Go to the FIREWALL > Firewall Rules page. 2. Edit the INTERNET-2-LAN-SIP rule. Ensure that it is enabled.
3. At the top of the Edit Access Rule window, click Add. Step 3. Verify the Order of the Rules in the Rule Set Because rules are processed from top to bottom in the rule set, arrange your rules in the correct order. You must especially ensure that your rules are placed above the BLOCKALL rule; otherwise, the rules are blocked. After adjusting the order of rules in the rule set, click Save Changes.
1. 2. 3. 4. Go to the FIREWALL > Firewall Rules page. Click Add Access Rule to create a new firewall rule. In the Add Access Rule window, enter a name and description for the rule. Specify the following settings: Action Service Source Destination Block FTP Trusted LAN Networks Internet 5. At the top of the Add Access Rule window, click Add. Step 2. Verify the Order of the Firewall Rules New rules are created at the bottom of the firewall rule set.
5. At the top of the Add Access Rule window, click Add. Step 2. Verify the Order of the Firewall Rules New rules are created at the bottom of the firewall rule set. Because rules are processed from top to bottom in the rule set, arrange your rules in the correct order. You must especially ensure that your rules are placed above the BLOCKALL rule; otherwise, the rules are blocked. After adjusting the order of rules in the rule set, click Save Changes.
This example configures a time object named Lunch Time that includes all office hours except 11am to 1pm. 1. Go to the FIREWALL > Time Objects page. 2. In the Time Objects section, click Add Time Object. 3. In the Name field, enter Lunch Time. 4. To terminate existing sessions when the firewall rule is applied, set Terminate Existing Sessions to Yes. 5. To define a date range for this time object, select the Use Date Range check box. 6.
In this article: Step 1. Enable Application Control Step 2. Create a Firewall Rule to Choke Facebook Traffic Step 3. Verify the Order of the Firewall Rules Monitoring Traffic for Detected Applications Step 1. Enable Application Control Enable Application Control and select the Choke policy. 1. Go to the FIREWALL > Settings page. 2. Next to Enable Application Detection, click Yes. 3. Select the following settings: Default Application Detection Policy: Limit Bandwidth Default Bandwidth Policy: Choke 4.
4. Click the Applications/Bandwidth tab and then specify the following settings: Applications Policy: Limit Bandwidth (Choke) Application Filter: STD-FACEBOOK 5. At the top of the Add Access Rule window, click Add.
Step 3. Verify the Order of the Firewall Rules Because rules are processed from top to bottom, arrange your rules in the correct order. You must especially ensure that your rules are placed above the BLOCKALL rule; otherwise, the rules are blocked. After adjusting the order of the rules, click Save Changes. For more information, see Firewall Rules Order. Monitoring Traffic for Detected Applications To view blocked or throttled connections, go to the BASIC > IPS Events page.
ISP Type Service Metric Primary ISP (80 Mbit) Static IP assignment HTTP 100 Secondary ISP (4 0 Mbit) Dynamic assignment FTP 200 In this article: Step 1. Create a Firewall Rule for HTTP Traffic Step 2. Create a Firewall Rule for FTP Traffic Step 3. Verify the Order of the Firewall Rules Step 4. Verify the Routing Configuration Related Articles Connection Objects Example - Creating Connection Objects for Failover and Link Balancing Step 1.
After adjusting the order of rules in the rule set, click Save Changes. Step 4. Verify the Routing Configuration To verify that traffic is routed correctly according to your firewall rules: 1. Go to the BASIC > Active Routes page and check the routing table. By default, routing always prioritizes the interface with the lowest metric configured in the firewall routing settings. 2. Go to the BASIC > Recent Connections page and filter the entries for your service types.
For user and group authentication, you can either administer users locally on the Barracuda Firewall or integrate the Barracuda Firewall with an external authentication server. You can use the information from these authentication services when you configure VPNs, user-aware firewall rules, and the captive portal. To manage guest access to the network, you can use a confirmation page or a guest ticketing system.
RADIUS OCSP Group Filter Patterns Barracuda DC Agent The Barracuda DC Agent runs on either the domain controller or a dedicated Windows PC on the office network. To record authenticated users, it periodically checks the domain controller for login events. The IP addresses of authenticated users are mapped to their username and group context. The list of authenticated users is provided to the Barracuda Firewall, allowing true single sign-on capabilities.
To configure Active Directory: 1. 2. 3. 4. Go to the USERS > External Authentication page. Click the Active Directory tab. In the Basic table, edit or add an Active Directory authentication configuration for one or more domain controllers. In the Patterns table, you can create or delete group filter patterns. For more information, see Group Filter Patterns.
User01 group membership string: CN=xyz, OU=sales, DC=mycompany, DC=com User02 group membership string: CN=SSL VPN, DC=mycompany, DC=com Then only User02 will match. How to Join a Windows Domain To successfully join the Barracuda Firewall to a Windows domain, you must first configure DNS, Active Directory authentication, and NTLM authentication. Joining a domain is required for NTLM or MS-CHAP authentication requests to be accepted by the domain controller.
How to Set Up a Guest Access Confirmation Page When setting up a guest network, you can configure the Barracuda Firewall to use a confirmation page that prompts guests to agree to Terms of Service before they can access the network. A confirmation page is typically used to grant network access to anonymous users. Related Articles How to Configure Wi-Fi How to Configure the DHCP Server In this article: Before You Begin Step 1.
Step 2. Enable the DHCP Server for the Guest Network To automatically assign IP addresses for guests, enable a DHCP server for the guest network. 1. Go to the NETWORK > DHCP Server page. 2. In the DHCP Server section, enable the DHCP server. 3. In the Add DHCP Server Subnet section, configure the DHCP subnet. Ensure that you specify the following settings: Beginning IP Address and Ending IP Address – The range of IP addresses to be assigned to clients. For example, if your guest network is 192.168.225.
Related Articles How to Configure Wi-Fi How to Configure the DHCP Server How to Manage Guest Tickets User's Guide In this article: Before You Begin Step 1. Set up the Guest Network Interface On a Wi-Fi Interface On a Wired Interface Step 2. Enable the DHCP Server for Guest Network Step 3. Set Up the Ticket Administrators Step 4. Set Up the Guest Network Step 5. Add a Redirect Firewall Rule Step 6.
To automatically assign IP addresses for guests, enable a DHCP server for the guest network. 1. Go to the NETWORK > DHCP Server page. 2. In the DHCP Server section, enable the DHCP server. 3. In the Add DHCP Server Subnet section, configure the DHCP subnet. Ensure that you specify the following settings: Beginning IP Address and Ending IP Address – The range of IP addresses to be assigned to clients. For example, if your guest network is 192.168.223.0/24, the Beginning IP Address is 192.168.223.
Step 6. (Optional) Configure the Login Page On the USERS > Guest Access page, you can configure the page that is displayed to guests when they log into the network. In the Login Page Options section, edit the Welcome Message and upload a Welcome Image. The image cannot be larger than 1 MB and must be in JPG, GIF, or PNG format. The suggested image size is 170 x 40 pixels. Next Step For instructions on how to create tickets for guests, see How to Manage Guest Tickets - User's Guide.
In this article: Before You Begin Create a Ticket Delete a Guest Ticket Print Ticket Information for Guests Before You Begin Get the following information from the Barracuda Firewall administrator: The IP address of the ticketing web interface (e.g., 192.168.223.1) The username and password for the ticket administrator (Wi-Fi only) The SSID and passphrase for the Wi-Fi network Create a Ticket To create a guest ticket: 1.
Print Ticket Information for Guests To give guests their username and password for accessing the network, you can print their ticket information. The printed information also specifies when the ticket expires. To print the information for a guest ticket, click the printer symbol next to it. If your guests are accessing a Wi-Fi network, you must also give them the SSID and passphrase for the network. VPN VPNs are a secure, efficient, and economical alternative to dedicated lines or dial-up RAS.
In this Section Client-to-Site VPN Site-to-Site VPN SSL VPN for the Barracuda Firewall How to Allow VPN Access via a Dynamic WAN IP Address Client-to-Site VPN To let remote users access corporate information resources, you can set up a client-to-site VPN. For various VPN client platforms, Barracuda Firewall provides client-to-site IPsec, PPTP, and SSL VPNs.
Mac OS X IPsec PPTP SSL VPN Barracuda VPN Client Native OS X PPTP client Third-party IPsec clients Linux IPsec PPTP SSL VPN (browser only) Barracuda VPN Client Native Linux PPTP client Third-party IPsec clients Apple iOS IPsec PPTP Built-in iOS VPN client Additional Requirement for iOS Version 5.1 and Above For iOS version 5.1 and above, you must configure additional certificates. For more information, see How to Configure Apple iOS D evices for Client-to-Site VPN Connections.
In this article: Step 1. Identify the User Authentication Mechanism Step 2. Configure the Barracuda Firewall VPN Server and Firewall Rule Static WAN IP Address Dynamic WAN IP Address Step 3. Configure the VPN Server Certificates Create a Self-Signed Certificate on the Barracuda Firewall Import External Certificates Certificates for iOS Clients Step 4. Configure VPN Access Policy Step 5. Configure the Client Step 1.
2. In the Certificate Generation section, click Create Certificate. 3. In the Create Certificate window, fill in the certificate details and then click Create. Import External Certificates If you created the certificate with an external CA, verify that you have the following files: Certificate authority certificate in PEM format. Certificate that is signed by the CA in PKCS12 or PEM format. To import these external certificates: 1. Go to the VPN > Certificates page. 2.
Authentication The username is case-insensitive, but the password is case-sensitive. If the client cannot connect because of authentication problems, verify that you entered the correct password. How to Configure a Client-to-Site VPN with PPTP Using VPNs, mobile workers can securely access corporate information and resources. The Barracuda Firewall allows remote clients running iOS , Android, Windows, Mac OS X, and Linux operating systems to connect via a client-to-site VPN.
2. specify a static IP address for the user. 3. Click Save Changes. MS-CHAPv2/NTLM With MS-CHAPv2/NTLM, you can allow access on a per-user or per-group basis. 1. Go to the VPN > PPTP page. 2. In the User and Group Conditions (MS-CHAPv2/NTLM) section, add the users and groups who are allowed to connect to the client-to-site VPN. 3. Click Save Changes. Step 4.
Certificate Requirements Step 1. Create the Required Certificates Example iOS Certificate Settings Root Certificate Server Certificate Client Certificate Step 2. Import Certificates into the Barracuda Firewall Step 3. Add the VPN Connection on the iOS Device Next Step Certificate Requirements Because certificate-based authentication is required, you must have three types of X.509 certificates that come with a valid chain of trust. The following table lists the required X.
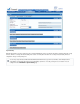
Server Certificate Tab Setting Value Status Signature Algorithm sha1WithRSAEncryption Subject RFC 2253 emailAddress=support@barracuda.com,O U=docu,O=Barracuda Network AG,L=Innsbruck,ST=Tyrol,C=AT Hash cc0460b5 RFC 2253 emailAddress=support@barracuda.com,O U=documentation,O=Barracuda Networks,L=Innsbruck,ST=Tirol,C=AT Hash 7b6d2374 X509v3 Key Usage Digital Signature, Key Agreement, Certificate Sign X509v3 Subject Alternative Name: DNS:vpnserver.yourdomain.
Next Step If you are configuring a client-to-site VPN with IPsec, see How to Configure a Client-to-Site VPN with IPsec. How to Configure TheGreenBow VPN Client For client-to-site VPN connections with the Barracuda NG Firewall and the Barracuda Firewall, you can use TheGreenBow VPN client for Windows. Follow the steps in this article to configure TheGreenBow client for use with the Barracuda Firewall. In this article: Before You Begin Step 1. Configure Phase 1 Step 2. Configure Phase 2 Step 3.
Step 2. Configure Phase 2 To configure Phase 2: 1. In the left menu, right-click the Gateway entry (that you might have renamed to e.g. Phase 1) and select New Phase 2. 2. If you want to rename the Tunnel entry that was created as a child of the Gateway entry, right-click it and select Rename. For example, you can rename it as Phase 2. 3. 4. 5. 6. Click the Tunnel entry and then click the IPSec tab. In the Addresses section, select Subnet address as the Address type.
You can now initiate a connection by navigating to Tools > Connection Panel. For more information, see TheGreenBow's help system.
Configuring Site-to-Site VPNs For instructions on setting up site-to-site VPNs, see the following articles: How to Configure a Site-to-Site VPN with IPsec Example - Configuring a Site-to-Site IPsec VPN Tunnel Troubleshooting Site-to-Site VPNs How to Configure a Site-to-Site VPN with IPsec The Barracuda Firewall can establish IPsec VPN tunnels to any other appliance supporting the IPsec VPN protocol, including another Barracuda Firewall.
The VPN server that runs on the Barracuda Firewall must listen on the appropriate IP address for its peer. Depending on whether the Barracuda Firewall is connected to the Internet through an ISP that statically or dynamically assigns the WAN IP address, complete the steps in the following Static WAN IP Address or Dynamic WAN IP Address section. Static WAN IP Address If the Barracuda Firewall is connected to the Internet through an ISP that statically assigns the WAN IP address: 1.
IP Addresses Location 1 Location 2 Tunnel Settings Location 1 Location 2 Local Networks 10.10.10.0/24 10.10.20.0/24 Tunnel initiation Active Passive Local Address 212.86.0.253 213.47.0.253 Encryption Phase 1&2 AES256 Hash Method Phase 1 & 2 MD5 DH Group Phase 1 &2 Group 1 Lifetime Phase 1 28800 Lifetime Phase 2 3600 Authentication Shared Passphrase In this article: Step 1. Create the IPsec Tunnel on the Barracuda Firewall at Location 1 Step 2.
Remote Address Enter 213.47.0.253. The WAN IP address of location 2. Remote Networks Enter 10.10.20.0/24. The remote LAN. 7. Specify these authentication settings: Setting Value Authentication Select Shared Passphrase. Passphrase Enter the shared secret. 8. Click Add. Step 2. Create the IPsec Tunnel on the Barracuda Firewall at Location 2 To create the IPsec tunnel: 1. 2. 3. 4. 5. Log into the Barracuda Firewall at Location 2. Go to the VPN > Site-to-Site Tunnels page.
Authentication Select Shared Passphrase. Passphrase Enter the shared secret. 8. Click Add. Step 3. Configure the Firewall Rule for VPN Traffic To allow network traffic between both networks, create a firewall rule. You must create the same rule on both Barracuda Firewalls. This example configures a firewall rule to allow traffic between the 10.0.10.0/24 and 10.0.20.0/24 networks. 1. Log into the Barracuda Firewall at Location 1. 2. Go to FIREWALL > Firewall Rules page. 3.
From a client in the local network, ping a host in the remote network. If no host is available, try to ping the management IP address of the remote Barracuda Firewall. If that does not succeed, go to the NETWORK > IP Configuration page on the remote Barracuda Firewall and ensure that Services to Allow: Ping is enabled for the management IP address. View the the BASIC > Recent Connections page to verify that the correct firewall rule matches the traffic.
Disable Use TCP Port 443 for the VPN service to use both SSL VPN and VPN service on the same IP address. In this article: Step 1. Enable the SSL VPN Static IP Address Secondary IP Address Dynamic Network Interface Step 2. Configure User Authentication Step 3. Configure the SSL VPN Portal Step 4. Upload a Certificate Step 5. Enable the SSL VPN Client Next Steps Step 1.
2. Action: Select Redirect to Service. Source: Click on Network Object and select Internet from the list. Destination: Select the network object representing your incoming internet connection. Redirected To: Select SSL VPN. 3. To enable access to the SSL VPN portal via a hostname instead of only via the IP address (because the latter may change), you use the third-party DynDNS service. a. Go to the NETWORK > IP Configuration page. b.
3. In the Welcome Message and Help Text fields, only ASCII characters are allowed. For an overview of ASCII characters see the Wikipedia page. Step 4. Upload a Certificate It is recommended that you install a CA-trusted root certificate on the Barracuda Firewall, so that web browsers trust the SSL VPN portal and do not issue a warning to end users when they access the portal. If a certificate is not installed, the SSL VPN portal page delivers the default self-signed certificate.
the SSL VPN portal. In this article: Configure Outlook Web Access / Outlook Web App Add an Application Add a WebDAV Share Add an Intranet Resource Configure Outlook Web Access / Outlook Web App To give your end users direct access to the corporate email resources, configure an Outlook Web Access / Outlook Web App (OWA) resource. The OWA applet also supports single sign-on so that end users do not need to repeatedly re-authenticate themselves. To configure OWA: 1.
Related Articles How to Configure a Client-to-Site VPN with PPTP How to Configure a Site-to-Site VPN with IPsec How to Configure a Client-to-Site VPN with IPsec Step 1. Configure VPN Access via a Dynamic WAN IP Address To allow VPN access via a dynamic WAN IP address: 1. On the VPN > Site-to-Site Settings page, in the IKE (Key Exchange) section, verify that Use Dynamic IPs is set to Yes. 2. If you want to make your VPN available through a DNS hostname, you can register the hostname with http://dyn.
Barracuda offers two cloud services to centrally manage multiple Barracuda Firewalls and offload processor-intensive tasks: Barracuda Cloud Control Barracuda Web Security Service Barracuda Cloud Control Barracuda Cloud Control is a comprehensive cloud-based service that lets you monitor and configure multiple Barracuda products from a single console. When your Barracuda Firewall is linked to Barracuda Cloud Control, it continuously synchronizes its configuration settings with the service.
To configure the Barracuda Web Security Service on the Barracuda Firewall: 1. On the NETWORK > Proxy page, select Use Barracuda Web Security Service if connected (recommended). 2. To include the user and domain name if available, select the Include User Information check box. For local users, this information is retrieved from the Barracuda DC agent. For information on how to get, install, and configure the Barracuda DC Agent, see About the Barracuda DC Agent.
In this Section Monitoring Active and Recent Connections Viewing Logs Troubleshooting How to Configure Log Streaming Monitoring Active and Recent Connections To monitor network sessions or connections, view the following pages from the BASIC tab: Active Connections – Lists all of the open and established sessions on the appliance. Recent Connections – Lists all of the connections that were established on the Barracuda Firewall or that were trying to access the Barracuda Firewall.
To see if there is still incoming or outgoing traffic for a specific session, click Refresh and then look at its Last or Co unt value. Sometimes, you might need to view ARP-Update traffic to troubleshoot in more detail. To display ARP-Update info, select the Include ARPs chec k box. To delete the whole history, click Flush Entries. Status Code Overview The following table provides more details on the status codes that you might see on the BASIC > Active Connections page.
IFWD-RET TCP Packet Forwarding Inbound Either source or destination are re transmitting packets. The connection might be dysfunctional. IFWD-FFIN-RCV TCP Packet Forwarding Inbound The session source sent a FIN datagram indicating to terminate the session. IFWD-RLACK TCP Packet Forwarding Inbound The session destination answered the FIN packet with a FIN reply and awaits the last acknowledgement for this packet.
IPXY-DST-CLO TCP Stream Forwarding Inbound The socket to the destination is closed or is in the closing process. IPXY-SD-CLO TCP Stream Forwarding Inbound The source and the destination socket are closed or in the closing process IPXY-TERM TCP Stream Forwarding Inbound The session is terminated and will shortly be removed from the session list. UDP-NEW UDP Forwarding Session is validated by the firewall rule set, no traffic was forwarded so far.
LOC-SYN-SND Local TCP Traffic A Local-Out TCP session is initiated by sending a SYN packet. LOC-SYN-RCV Local TCP Traffic A Local-In TCP session is initiated by receiving a SYN packet. LOC-FIN-WAIT1 Local TCP Traffic An established local TCP session started the close process by sending a FIN packet. LOC-FIN-WAIT2 Local TCP Traffic A local TCP session in the FIN-WAIT1 state received an ACK for the FIN packet.
VPN Log The VPN Log displays information for all client-to-site and site-to-site VPN tunnels. Use this log to investigate why VPN tunnels and PPTP connections are disconnecting or not being established. To see the messages for specific VPN connections, you can also filter the log by IP addresses. Service Log The Service Log lists specific errors and warnings for services that are not configured properly or are encountering problems.
ERR_READ_TIMEOUT The remote site or network is unreachable; it may be down. ERR_LIFETIME_EXP The remote site or network may be too slow or down. ERR_NO_CLIENTS_BIG_OBJ All clients went away before transmission completed and the object is too big to cache. ERR_READ_ERROR The remote site or network may be down. ERR_CLIENT_ABORT Client dropped connection before transmission completed. Squid fetches the Object according to its settings for `quick_abort'.
Connection to Barracuda Support Center. Rebooting the System in Recovery Mode If your Barracuda Firewall experiences a serious issue that impacts its core functionality, you can use diagnostic and recovery tools that are available from the reboot menu to return your system to an operational state. Before you use the diagnostic and recovery tools: Use the built-in troubleshooting tools on the ADVANCED > Troubleshooting page to help diagnose the problem.
Replacing a Failed System Before you replace your Barracuda Firewall, use the tools provided on the ADVANCED > Troubleshooting page to try to resolve the problem, or call Barracuda Networks Technical Support. Barracuda Instant Replacement Service If you purchased the Instant Replacement service and the Barracuda Firewall fails, you can call Barracuda Networks Technical Support and arrange for a new unit to be shipped out within 24 hours.
How to Save Configuration Backups How to Update the Firmware on Your Barracuda Firewall How to Restore the Barracuda Firewall with a Saved Configuration Backup How to Recover the Barracuda Firewall How to Save Configuration Backups Barracuda Networks recommends that you regularly back up the latest working configuration, in case you need to restore this information on a replacement Barracuda Firewall or the current system data becomes corrupt.
Applying the update might take several minutes to complete. The Barracuda Firewall automatically reboots after the update is applied. How to Restore the Barracuda Firewall with a Saved Configuration Backup To back up and restore the configuration of your Barracuda Firewall, go to the ADVANCED > Backups page. You can restore your Barracuda Firewall from either locally saved backups or backups stored on a remote server.
(5) EXIT 6. Select a recovery option: If you want to retain all of your data and settings during the repair, enter 1 to select the Barracuda Repair (no data loss) option. If you want to restore the Barracuda Firewall with the default factory settings, enter 2 to select the Full Barracuda Recovery (all data lost) option. With this option, you will lose all of your current data and settings. When you are prompted by the on-screen instructions, confirm that you want to continue with the recovery. 7.
Technical Specifications of the Barracuda Firewall Security Features Central Management Security Options Support Options Firewall Barracuda Control Center (BCC) Barracuda Web Security Energize Updates Stateful packet forwarding Intrusion Prevention System (IPS) Application enforcement (including subtypes) Denial of Service (DOS) / Distributed DoS (DDoS) protection NAT (src,dst,nets), NAPT, PAT Object-oriented rule sets Dynamic rules / timer triggers User/group based firewall rules ARP security Brid
Wi-Fi (802.
Firewall Yes Yes Yes Yes Yes IPsec VPN (client-to-site) Yes Yes Yes Yes Yes IPsec VPN (site-to-site) Yes Yes Yes Yes Yes SSL VPN No Yes Yes Yes Yes Application control Yes Yes Yes Yes Yes Intrusion prevention (IPS) Yes Yes Yes Yes Yes DHCP server Yes Yes Yes Yes Yes DNS cache Yes Yes Yes Yes Yes DNS server (authoritative) Yes Yes Yes Yes Yes SIP proxy Yes Yes Yes Yes Yes Automatic uplink failover Yes Yes Yes Yes Yes Uplink balancing Yes Yes
Notice for the USA Compliance Information Statement (Declaration of Conformity Procedure) DoC FCC Part 15: This device complies with part 15 of the FCC Rules. Operation is subject to the following conditions: 1. This device may not cause harmful interference, and 2. This device must accept any interference received including interference that may cause undesired operation.
Barracuda Networks may change the availability of limited warranties, at its discretion, but any changes will not be retroactive. IN NO EVENT SHALL BARRACUDA NETWORKS LIABILITY EXCEED THE PRICE PAID FOR THE PRODUCT FROM DIRECT, INDIRECT, SPECIAL, INCIDENTAL, OR CONSEQUENTIAL DAMAGES RESULTING FROM THE USE OF THE PRODUCT, ITS ACCOMPANYING SOFTWARE, OR ITS DOCUMENTATION.
BARRACUDA FOR ANY PATENTS OR OTHER INTELLECTUAL PROPERTY RIGHTS UTILIZED IN THE BARRACUDA SOFTWARE WHICH YOU EITHER OWN OR CONTROL. 7. Limitation of Liability.
CUSTOMER IS THE ORIGINAL END USER PURCHASER OR LESSEE OR WHO OTHERWISE HOLDS A VALID LICENSE TO USE THE ENERGIZE UPDATE SOFTWARE WHICH IS BEING UPGRADED; AND (3) USE OF ADDITIONAL COPIES IS LIMITED TO BACKUP PURPOSES ONLY. Energize Update Changes.
DO NOT ALLOW LIMITATIONS ON HOW LONG AN IMPLIED WARRANTY LASTS, THE ABOVE LIMITATION MAY NOT APPLY TO YOU. THIS WARRANTY GIVES YOU SPECIFIC LEGAL RIGHTS, AND YOU MAY ALSO HAVE OTHER RIGHTS WHICH VARY FROM JURISDICTION TO JURISDICTION. General Terms Applicable to the Energize Update Software License Disclaimer of Liabilities.
with modifications and/or translated into another language. (Hereinafter, translation is included without limitation in the term "modification".) Each licensee is addressed as "you". Activities other than copying, distribution and modification are not covered by this License; they are outside its scope.
compliance. 5. You are not required to accept this License, since you have not signed it. However, nothing else grants you permission to modify or distribute the Program or its derivative works. These actions are prohibited by law if you do not accept this License.
If you develop a new program, and you want it to be of the greatest possible use to the public, the best way to achieve this is to make it free software which everyone can redistribute and change under these terms. To do so, attach the following notices to the program. It is safest to attach them to the start of each source file to most effectively convey the exclusion of warranty; and each file should have at least the "copyright" line and a pointer to where the full notice is found.
documentation and/or other materials provided with the distribution. THIS SOFTWARE IS PROVIDED ``AS IS'' AND ANY EXPRESSED OR IMPLIED WARRANTIES, INCLUDING, BUT NOT LIMITED TO, THE IMPLIED WARRANTIES OF MERCHANTABILITY AND FITNESS FOR A PARTICULAR PURPOSE ARE DISCLAIMED.
the Work, but excluding communication that is conspicuously marked or otherwise designated in writing by the copyright owner as "Not a Contribution." "Contributor" shall mean Licensor and any individual or Legal Entity on behalf of whom a Contribution has been received by Licensor and subsequently incorporated within the Work. 2. Grant of Copyright License.
END OF TERMS AND CONDITIONS APPENDIX: How to apply the Apache License to your work. To apply the Apache License to your work, attach the following boilerplate notice, with the fields enclosed by brackets "[]" replaced with your own identifying information. (Don't include the brackets!) The text should be enclosed in the appropriate comment syntax for the file format.