
User`s guide

Setting the System IP Address
14
■ Barracuda Spam Firewall User’s Guide
Setting the System IP Address
The Barracuda Spam Firewall is given a default IP address of 192.168.200.200. You can change this
address by doing either of the following:
■ Connecting directly to the Barracuda Spam Firewall and specifying a new IP address through the
console interface, or
■ Pushing and holding the RESET button on the front panel. Holding the RESET button for 8 seconds
changes the default IP address to 192.168.1.200. Holding the button for 12 seconds changes the IP
address to 10.1.1.200.
To connect directly to the Barracuda Spam Firewall to set a new IP address:
1. Attach a standard VGA monitor and PS2 keyboard to the back panel of the Barracuda Spam
Firewall.
The “Barracuda login:” prompt displays on the monitor.
2. Enter admin for the login and admin for the password.
The User Confirmation Requested window displays the current IP configuration of the system.
3. Using your Tab key, select Ye s to change the IP configuration.
4. Enter the new IP address, netmask and default gateway for the Barracuda Spam Firewall, and select
OK when finished.
5. Select No when prompted if you want to change the IP configuration.
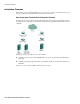
Configuring the Barracuda Spam Firewall
After specifying the IP address of the system, you need to configure the Barracuda Spam Firewall from
the administration interface. Make sure the computer from which you are configuring the Barracuda
Spam Firewall is connected to the same network and the appropriate routing is in place to allow
connection to the Barracuda Spam Firewall’s IP address via a web browser.
To configure the Barracuda Spam Firewall:
1. From a web browser, enter the IP address of the Barracuda Spam Firewall that you specified in the
previous section, followed by port 8000.
Example: http://192.168.200.200:8000
2. If you are prompted for login information, enter admin for the username and admin for the
password.