
User`s guide


Chapter 2 Setting Up the Barracuda Spam Firewall ■ 13
Chapter 2 Setting Up the Barracuda Spam Firewall
To set up your Barracuda Spam Firewall, follow the process below:
1. Install the Barracuda Spam Firewall (in the next section).
2. Set the System IP Address (page 14).
3. Configure the Barracuda Spam Firewall (page 14).
4. Configure your Corporate Firewall and Update the Firmware (page 16).
5. Route Incoming Email by Modifying MX Records (page 17).
6. Post-Installation Steps (page 17).
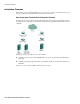
The end of this chapter also provides example installation scenarios you can use as a reference to help
integrate the Barracuda Spam Firewall into your network environment.
Installing the Barracuda Spam Firewall
To physically install the Barracuda Spam Firewall:
1. Install the Barracuda Spam Firewall in a standard 19-inch rack or other stable location.
Warning: Do not block the cooling vents located on the front and rear of the unit.
2. Connect a CAT5 Ethernet cable to the back of the Barracuda Spam Firewall.
The Barracuda Spam Firewall supports both 10BaseT and 100BaseT Ethernet. We recommend a
100BaseT connection for best performance.
Note: The Barracuda Spam Firewall 600 supports Gigabit Ethernet and has two usable LAN ports.
On the 600 model, plug the Ethernet cable into the LAN 2 port.
Do not connect any other cables to the other connectors on the unit. These connectors are for
diagnostic purposes.
3. Connect a power cord to the unit.
4. Press the Power button located on the front of the unit
The power light on the front of the system turns on. For a description of each indicator light, refer to
Understanding the Indicator Lights on page 22.