Barracuda Spam Firewall User’s Guide ■ 1
Copyright Copyright 2004, Barracuda Networks www.barracudanetworks.com All rights reserved. Use of this product and this manual is subject to license. Information in this document is subject to change without notice. Trademarks Barracuda Spam Firewall is a trademark of Barracuda Networks. All other brand and product names mentioned in this document are registered trademarks or trademarks of their respective holders.
Contents Chapter 1 Introduction . . . . . . . . . . . . . . . . . . . . . . . . . . . . . . . . . . . . 7 Overview . . . . . . . . . . . . . . . . . . . . . . . . . . . . . . . . . . . . . . . . . . . . . . . . . . . . . . . 7 Energize Updates Minimize Administration and Maximize Protection . . . . . 8 Understanding Spam Scoring . . . . . . . . . . . . . . . . . . . . . . . . . . . . . . . . . . . . . 9 Barracuda Spam Firewall Models . . . . . . . . . . . . . . . . . . . . . . . . . . . . . . . . . . .
Configuring System IP Information . . . . . . . . . . . . . . . . . . . . . . . . . . . . . . . . . . 32 Controlling Access to the Administration Interface . . . . . . . . . . . . . . . . . . . . . . 33 Changing the Password of the Administration Account . . . . . . . . . . . . . . . . 33 Limiting Access to the Administration Interface. . . . . . . . . . . . . . . . . . . . . . 33 Changing the Web Interface Port and Session Expiration Length. . . . . . . . . 34 Resetting and Shutting Down the System. . . .
Assigning Features to User Accounts . . . . . . . . . . . . . . . . . . . . . . . . . . . . . . 59 Creating New User Accounts . . . . . . . . . . . . . . . . . . . . . . . . . . . . . . . . . . . . 60 Backing Up and Restoring User Settings . . . . . . . . . . . . . . . . . . . . . . . . . . . 60 Enabling SSL . . . . . . . . . . . . . . . . . . . . . . . . . . . . . . . . . . . . . . . . . . . . . . . . . . . 60 Customizing Non-Delivery Reports (NDRs) . . . . . . . . . . . . . . . . . . . . . . . . . . .
■ Barracuda Spam Firewall User’s Guide
Chapter 1 Introduction This chapter provides an overview of the Barracuda Spam Firewall and includes the following topics: ■ Overview (on this page). ■ Barracuda Spam Firewall Models (page 10). ■ Technical Support (page 10). ■ Warranty Policy (page 10). ■ Locating Information in this Document (page 11).
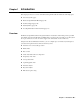
Overview The following figure shows each of these defense layers in action. Energize Updates Minimize Administration and Maximize Protection To provide you with maximum protection against the latest types of spam and virus attacks, Barracuda Networks maintains a powerful operations center called Barracuda Central. From this center, engineers monitor the Internet for trends in spam and virus attacks and post updated definitions to Barracuda Central.
Overview The following figure shows how Barracuda Central provides the latest spam and virus definitions through the Energize Update feature. Understanding Spam Scoring The Barracuda Spam Firewall examines all the characteristics of a message and uses a complex system of scores to determine whether a message is spam. When an email reaches the spam scoring filter, the Barracuda Spam Firewall assigns scores to all the properties of the message.
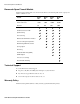
Barracuda Spam Firewall Models Barracuda Spam Firewall Models The Barracuda Spam Firewall comes in four models. Refer to the following table for the capacity and features available on each.
Locating Information in this Document Locating Information in this Document Refer to the following table to locate information for a specific page in the administration interface. Admin Interface Page Refer to...
Locating Information in this Document Admin Interface Page Refer to... ADVANCED Tab Email Protocol Checking Setting Email Protocol Checking on page 47 Rate Controls Configuring Message Rate Control on page 49 Explicit Users Activating Individual Accounts on page 49.
Chapter 2 Setting Up the Barracuda Spam Firewall To set up your Barracuda Spam Firewall, follow the process below: 1. Install the Barracuda Spam Firewall (in the next section). 2. Set the System IP Address (page 14). 3. Configure the Barracuda Spam Firewall (page 14). 4. Configure your Corporate Firewall and Update the Firmware (page 16). 5. Route Incoming Email by Modifying MX Records (page 17). 6. Post-Installation Steps (page 17).
Setting the System IP Address Setting the System IP Address The Barracuda Spam Firewall is given a default IP address of 192.168.200.200. You can change this address by doing either of the following: ■ Connecting directly to the Barracuda Spam Firewall and specifying a new IP address through the console interface, or ■ Pushing and holding the RESET button on the front panel. Holding the RESET button for 8 seconds changes the default IP address to 192.168.1.200.
Configuring the Barracuda Spam Firewall 3. Go to the BASIC-->IP Configuration page and enter the required information. The following table describes the fields you need to populate. Fields Description TCP/IP Configuration The IP address, subnet mask, and default gateway of the Barracuda Spam Firewall. TCP port is the port on which the Barracuda Spam Firewall receives inbound email. This is usually port 25.
Configuring your Corporate Firewall and Updating Firmware 5. Go to the BASIC-->Administration page and do the following: a. Assign a new administration password to the Barracuda Spam Firewall (optional). b. Make sure the local time zone is set correctly. Time on the Barracuda Spam Firwewall is automatically updated via NTP (Network Time Protocol) and therefore requires port 123 to be open for inbound and outbound UDP traffic on your firewall (if the Barracuda Spam Firewall is located behind one).
Routing your Incoming Email by Modifying MX Records 3. Upgrade the firmware on the Barracuda Spam Firewall: a. Go to the ADVANCED-->Firmware Update page. b. Click Download Now to begin downloading the latest firmware version. Updating the firmware may take several minutes. Do not turn off the unit during this process. The Download Now button will be disabled if the system already has the latest firmware version. 4. Backup the system configuration as described in Backing Up System Data on page 42.
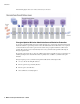
Installation Examples Installation Examples This section provides example installation types you can reference to help you determine the best way to integrate the Barracuda Spam Firewall into your network environment. Barracuda Spam Firewall Behind Corporate Firewall The figure below shows the Barracuda Spam Firewall behind your corporate firewall. In this example, the Mail Server has an IP address of 10.10.10.2 and the Barracuda Spam Firewall has an IP address of 10.10.10.3.
Installation Examples Barracuda Spam Firewall in Front of Corporate Firewall The figure below shows the Barracuda Spam Firewall in front of your corporate firewall. In this example, the Mail Server has an IP address of 10.10.10.2 and the Barracuda Spam Firewall has a public IP address of 64.5.5.5. In this type of setup, you would need to do the following: ■ Assign an available external IP address to the Barracuda Spam Firewall.
Installation Examples 20 ■ Barracuda Spam Firewall User’s Guide
Chapter 3 Managing the Barracuda Spam Firewall This chapter describes how to manage and configure your Barracuda Spam Firewall. The following tasks are discussed: Task Refer to...
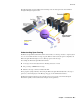
Viewing System Status and Statistics Viewing System Status and Statistics This section contains the following topics: ■ Understanding the Indicator Lights on this page. ■ Viewing System Statistics on page 23. Understanding the Indicator Lights The Barracuda Spam Firewall has five indicator lights on the front panel that blink when the system processes email. The following figure displays the location of each of the lights. The following table describes each indicator light.
Viewing System Status and Statistics Viewing System Statistics The BASIC-->Status page provides email statistics, system environmental conditions and hourly and daily email statistics. Email Statistics The following table describes the email statistics displayed on the BASIC-->Status page. Statistic Description Blocked Number of virus and spam messages blocked by the system. Blocked: Virus Number of virus messages blocked by the system. Quarantined Number of messages quarantined by the system.
Monitoring and Classifying Incoming Messages Monitoring and Classifying Incoming Messages On a regular basis you should monitor incoming messages on the BASIC-->Message Log page, and classify as many messages as you can as spam or not spam, as well as add messages to your whitelist. Classifying messages creates rules in the Bayesian database that determine how the Barracuda Spam Firewall handles similar messages in the future.
Monitoring and Classifying Incoming Messages Classifying Messages from the Administration Interface Classifying messages is one of the easiest ways to set up rules that determine how the Barracuda Spam Firewall handles incoming messages. The following table describes the buttons to use when classifying messages on the BASIC-->Message Log page. Button Description Spam Classifies the message as spam in the Bayesian database.
Monitoring and Classifying Incoming Messages Classifying Messages From Mail Clients End users can classify their own messages as Spam and Not Spam directly from Microsoft Outlook using a client plug-in. This feature is only available with the Barracuda Spam Firewall 300, 400 and 600. To make the Outlook client plug-in available to your users: 1. On the BASIC-->Bayesian/Fingerprinting page, set the Allow Users to Download Plugins field to Yes. 2. Click Save Changes.
Monitoring and Classifying Incoming Messages Understanding the Message Log The following table describes each column displayed in the message log table. Column Description Spam Classification Identifies when a message has been classified as Spam or Not Spam. When you mark a message as Spam or Not Spam using the buttons at the top of the Message Log, that classification is shown in this column. White Listed Identifies if the sender is included in your whitelist.
Configuring the Spam Settings Configuring the Spam Settings The BASIC-->Spam Scoring page lets you modify the global scoring values and specify the subject tag for spam messages. Click Save Changes after making any changes to this page. Configuring the Global Spam Scoring Limits Once a message passes through the block/accept filters, it is then scored for its spam probability. This score ranges from 0 (definitely not spam) to 10 or higher (definitely spam).
Enabling and Disabling Virus Checking and Notification Enabling and Disabling Virus Checking and Notification Virus scanning is automatically enabled on the Barracuda Spam Firewall, and the system checks for definition updates on a regular basis (hourly by default). Use the BASIC-->Virus Checking page to configure the virus checking and notification settings described in the following table. Click Save Changes after making any modifications to this page.
Setting Up Quarantine Specifying the Quarantine Type The Quarantine Type determines if the Barracuda Spam Firewall delivers a quarantined message to the global Quarantine Delivery Address, or to a per-user quarantine box. Note: If you have the Barracuda Spam Firewall 400 or 600, you can specify the quarantine type on a per-domain basis from the ADVANCED-->Advanced Domain Setup page. The following table describes the two quarantine types.
Setting Up Quarantine Specifying the Per-User Quarantine Settings The following table describes the Per-User Quarantine Configuration settings. This section does not appear on the Barracuda Spam Firewall 200. Setting Description Quarantine ReplyTo Address The from address used in all correspondence sent to users about their Per User quarantine area. Any replies to that correspondence are sent to this address.
Configuring System IP Information Overriding the Per-User Quarantine Account Settings The Per-User Quarantine Account Override section on the BASIC-->Quarantine page lets you change the default quarantine configuration on a per-user basis. For example, if the default quarantine configuration is set to disabled, you can enable per-user quarantine functionality for specific users by listing their email addresses in this section. This feature is not available on the Barracuda Spam Firewall 200.
Controlling Access to the Administration Interface Section Description Domain Configuration Default Hostname is the hostname to be used in the reply address for email messages (non-delivery receipts, virus alert notifications, etc.) sent from the Barracuda Spam Firewall. The hostname is appended to the default domain. Default Domain is the domain name used in the reply address for email messages (non-delivery receipts, virus alert notifications, etc.) sent from the Barracuda Spam Firewall.
Resetting and Shutting Down the System Changing the Web Interface Port and Session Expiration Length The following table describes the settings in the Web Interface HTTP Port section on the BASIC-->Administration page. Field Description Web Interface HTTP Port The port used to access the administration interface from your web browser (default is HTTP port 80). To change this value: 1. Enter a new port number in the field. 2. Click Restart Interface.
Automating the Delivery of System Reports Resetting the System Using the Front Panel Pressing the RESET button located on the front panel of the Barracuda Spam Firewall does the following: ■ Reboots the system ■ Resets the firmware version to the factory setting Do not push and hold the RESET button for longer than a few seconds as this changes the IP address of the system. Pushing and holding the RESET button for 8 seconds changes the default IP address to 192.168.1.200.
Subscribing to Blacklist Services Subscribing to Blacklist Services The BLOCK/ACCEPT-->External Blacklist page lets you subscribe to various blacklist services. External blacklists, sometimes called DNSBLs or RBLs, are lists of Internet addresses from which potential spam originates. The Barracuda Spam Firewall uses these lists to verify the authenticity of the messages received.
Using the Block/Accept Filters Using the Block/Accept Filters The IP BLOCK/ACCEPT tab provides a wide range of filters that enhance the default spam and virus detection capabilities of the Barracuda Spam Firewall. The Barracuda Spam Firewall supports the use of regular expressions in the block/accept filters. For more information on using regular expressions, refer to Appendix A. The following table lists the various block/accept filters.
Using the Block/Accept Filters Filtering by Sender Domain The BLOCK/ACCEPT-->Sender Domain Block/Accept page lets you filter messages based on the sender’s email address. The following table describes the parameters on this page. Filter Description Allowed Sender Domain/Subdomain Add any domains or subdomains that you wish to include in your whitelist. Whitelisting a domain automatically whitelists all subdomains. For example, adding customer.com allows messages from joe@customer.
Using the Block/Accept Filters Filtering by Recipient Email Address The BLOCK/ACCEPT-->Email Recipient Domain Block/Accept page lets you filter messages based on a recipient’s email address. The following table describes the parameters on this page. Filter Description Allowed Email Addresses or Domains Add the email address for each recipient you want to include in your whitelist. Recipients added to this list will never have their messages scored for spam.
Using the Block/Accept Filters Filter Description Notify sender of Banned File Interception Select Yes to notify senders when one of their emails has been blocked because it contained a banned file extension. Attachment Quarantine Quarantined Attachment Extensions Add the attachment extensions (without the “.”) to quarantine. The complete email containing the attachment is sent to the quarantine account.
Using the Block/Accept Filters Filtering by Body Contents The BLOCK/ACCEPT-->Body Filtering page lets you filter messages based on the contents of a message’s body. The following table describes the parameters on this page. Click Save Changes after making any changes to this page. Filter Description Message Content Blocking Enter the words, regular expressions, or characters that will cause a message to be blocked if they appear in the message body.
Backing Up and Restoring System Configuration Backing Up and Restoring System Configuration You can backup and restore the following information from the Barracuda administration interface: ■ Barracuda Spam Firewall system configuration that includes all the settings configured on the various pages in the administration interface. ■ Per-user settings such as the allowed and blocked email lists created by each user, the users’ quarantine notification intervals, and the passwords your users have set.
Backing Up and Restoring System Configuration Restoring System Data To restore system configuration from a backup file: Note: You should perform a system restore during non-business hours when there is less email traffic. Performing a restore only takes a few minutes, but the Barracuda Spam Firewall will be out of service during this short amount of time. 1. Restore system configuration as follows: a. From the ADVANCED-->Configuration Backup/Restore page, click Browse. b.
Updating Spam and Virus Definitions Using Energize Updates Updating Spam and Virus Definitions Using Energize Updates The ADVANCED-->Energize Updates page lets you manually update the current spam and virus definitions, as well as change the interval at which the Barracuda Spam Firewall checks for updates. Energize Updates provide the Barracuda Spam Firewall with the latest spam and virus definitions. The following table describes the Spam Definition Updates fields on this page.
Customizing the Appearance of the Administration Interface Customizing the Appearance of the Administration Interface The ADVANCED-->Appearance page lets you customize the default image used on the administration interface and in the email quarantine correspondence sent to users. This tab is only displayed on the Barracuda Spam Firewall 600. The following table describes the fields on this page. Click Save Changes after making any updates to the page.
Configuring Advanced Settings Configuring Advanced Settings This section describes some of the expert settings available on the ADVANCED tab. In most cases you should not need to change any of the default settings described in this section. It is recommended you talk to Barracuda Networks technical support before performing any of these tasks. This section includes the following topics: ■ Changing the Fingerprinting Behavior on page 46. ■ Setting Email Protocol Checking on page 47.
Configuring Advanced Settings 3. Click Save Changes. Field Description Check Email Fingerprints Whether the Barracuda Spam Firewall performs fingerprinting checks on messages. Setting this to Yes lets the Barracuda Spam Firewall check incoming messages against Barracuda Networks known fingerprinting database of spam messages. Intent Analysis Whether the Barracuda Spam Firewall performs intent analysis of messages.
Configuring Advanced Settings Setting Description SPF/Caller ID Configuration Sender Policy Framework/ Microsoft Caller ID: SPF (Sender Policy Framework) and Microsoft Caller ID are checks that can help the Barracuda Spam Firewall distinguish between spam and legitimate messages. How SPF works—Domain owners identify the addresses of their sending mail servers in DNS.
Configuring Advanced Settings Configuring Message Rate Control The ADVANCED-->Rate Controls page lets you configure how many connections are allowed from the same IP address in a half-hour time period. Rate control protects you from spammers or spam-programs that send large amounts of email to your server in a small amount of time. The table below describes each setting on this page. Click Save Changes after making any modifications.
Configuring Advanced Settings 2. Click Download Now. This button will be disabled if the Barracuda Spam Firewall already has the latest firmware version. 3. After downloading the firmware version, activate it by doing the following: a. Log out of the administration interface. b. Log back into the administration interface and go to the ADVANCED-->Firmware Update page. c. Click Apply. When activating the downloaded firmware, the Barracuda Spam Firewall resets.
Configuring Advanced Settings Setting Up Clustered Environments The ADVANCED-->Clustering page lets you link multiple Barracuda Spam Firewall systems together so they can synchronize configuration settings. You can also use this page to specify standby systems to use in case an active system goes down. Clustering is available on the Barracuda Spam Firewall models 400 and 600.
Configuring Advanced Settings Field Description Cluster System List Cluster System lists the other systems in this cluster. Mode specifies whether a system is Standby or Active. Designate a server as Standby if you want a spare system to switch to in the event another system goes down. Only Active servers filter incoming messages. You must manually switch a standby server to Active if you want the standby server to begin filtering messages.
Configuring Advanced Settings Field Description Auth. Type Controls the type of realm that is created. Available options include: • LOCAL (where the Barracuda Spam Firewall controls the password), • LDAP (where the password is maintained in an external LDAP database), • RADIUS (where the password is maintained in the RADIUS database). Auth. Host The name of the LDAP server or RADIUS server that the Barracuda Spam Firewall attempts to connect to for authentication purposes.
Managing and Configuring Domains Managing and Configuring Domains The DOMAINS-->Domain Manager page lets you add new domains and make changes on a perdomain basis. Adding New Domains If your Barracuda Spam Firewall is responsible for filtering messages for more than one email server and domain, you need to enter the domains associated with each server on the DOMAINS-->Domain Manager page.
Preventing Dictionary Attacks Using Barracuda MS Exchange Accelerator Setting Description Realm Name The name of the realm as displayed to users in the Realm Selector as well as in the Domain Settings for administrators. A realm is a database of usernames and passwords that identify valid users, plus the list of roles associated with each valid user. Tag Score, Quarantine Score, Block Score For information on spam scoring, refer to Configuring the Global Spam Scoring Limits on page 28.
Preventing Dictionary Attacks Using Barracuda MS Exchange Accelerator 3. Enter the required information for each listed domain. The following table describes the fields on this page. Field Description LDAP Server The name of the LDAP server for your MS Exchange server. Exchange Acclerator Enabled Whether the Exchange Accelerator feature is enabled for the selected domain. Unify Email Aliases Whether the Barracuda Spam Firewall unifies all email aliases for a single user.
Replacing a Failed System Replacing a Failed System Before you replace your Barracuda Spam Firewall, use the tools provided on the ADVANCED-->Troubleshooting page to try to resolve the problem with your Barracuda system. For more information about these tools, refer to Troubleshooting on page 63.
Managing User Accounts Column Description Admin Actions Click Edit Account to view that user’s quarantine account so you can troubleshoot issues and change the user’s preferences. Click Delete to remove the quarantine account from the system including all of the user’s settings and quarantined messages. Remove All Invalid Accounts Click this button to have the Barracuda Spam Firewall check each user account against the recipient verifier and remove any accounts that are currently invalid.
Managing User Accounts Assigning Features to User Accounts The USERS-->User Features page lets you specify which features your users can control from their quarantine interface. The following table describes the settings on this page. User Features Description Quarantine Enable/Disable Ability Determines whether your users can enable/disable their quarantine inbox.
Enabling SSL Creating New User Accounts The USERS-->User Add/Update page lets you create new user accounts with specific settings. To add a new user account to the system: 1. In the User Account(s) box, enter the email addresses (one per line) of the new user accounts. 2. Specify whether the new user accounts are enabled with the user quarantine feature. For a description of the user quarantine feature, refer to Specifying the Quarantine Type on page 30.
Enabling SSL Field Description Web Interface HTTPS/SSL port The SSL port used by the Barracuda Spam Firewall. Default port for SSL is 443. SSL Certificate Configuration Certificate Type Select one of the following certificates for SSL: • Default (Barracuda Networks) used for SSL connections that will generate browser alerts. The default certificate is signed by Barracuda Networks and provided free as the default type of certificate.
Customizing Non-Delivery Reports (NDRs) Customizing Non-Delivery Reports (NDRs) The ADVANCED-->Bounce/NDR Messages page lets you modify the information in an NDR and select the default language to use in the message. The Barracuda Spam Firewall sends NDRs to email recipients and senders when one of their messages is blocked. The NDR contains a brief explanation of why the Barracuda Spam Firewall blocked the message.
Troubleshooting Macro Description %j The Subject header field body. %s The original envelope sender, rfc2821-quoted and enclosed in angle brackets. %S The address that receives sender notification. This is normally a one-entry list containing sender address (%s), but may be unmangled/reconstructed in an attempt to undo the address forging done by some viruses. %v The output of the (last) virus checking program. %F The list of banned file names.
Troubleshooting 64 ■ Barracuda Spam Firewall User’s Guide
Chapter 4 Using the Barracuda Spam Firewall to Filter Your Emails This chapter describes how end users interact with the Barracuda Spam Firewall to check their quarantined messages, classify messages as spam and not spam, and modify their user preferences. This chapter contains the following topics: ■ Receiving Messages from the Barracuda Spam Firewall in the next section. ■ Using the Quarantine Interface on page 66. ■ Changing your User Preferences on page 68.
Using the Quarantine Interface Click to access the Quarantine interface to set preferences and classify messages Select to deliver, whitelist or delete quarantined messages Using the Quarantine Interface At the end of every quarantine summary report is a link to the quarantine interface where you can set additional preferences and classify messages as spam and not spam. Logging into the Quarantine Interface To log into the quarantine interface: 1.
Using the Quarantine Interface Managing your Quarantine Inbox After logging into the quarantine interface, select the QUARANTINE INBOX tab to view a list of your quarantined messages. When you first start using the quarantine interface, you should view this list on a daily basis and classify as many messages as you can. The Barracuda Spam Firewall has a learning engine that learns how to deal with future messages based on the ones you classify as spam and not spam.
Changing your User Preferences Changing your User Preferences After logging into the quarantine interface, select the PREFERENCES tab to change your account password, modify your quarantine and spam settings, and manage your whitelist and blacklist. Changing your Account Password To change your account password, do one of the following: ■ On the quarantine interface login page, click Create New Password, or ■ After logging into the quarantine interface, go to PREFERENCES-->Password.
Changing your User Preferences Enabling and Disabling Spam Scanning of your Email If you do not want the Barracuda Spam Firewall scanning your emails for spam content, you can disable spam filtering from the PREFERENCES-->Spam Settings page. From this page you can also change the default spam scoring levels that determine when your emails are tagged, quarantined or blocked. When the Barracuda Spam Firewall receives an email for you, it scores the message for its spam probability.
Changing your User Preferences To whitelist or blacklist senders, follow these steps: 1. Go to the PREFERENCES-->Whitelist/Blacklist page. A list of your existing whitelisted and blacklisted addresses appears on this page. 2. To delete a whitelist or a blacklist entry, click the trash can icon next to the address. 3. To add an entry, type an e-mail address into the appropriate field, and click the corresponding Add button.
Appendix A About Regular Expressions The Barracuda Spam Firewall lets you use regular expressions in many of its features. Regular Expressions allow you to flexibly describe text so that a wide range of possibilities can be matched. Note the following when using regular expressions: ■ Be careful when using special characters such as |, *, '.' in your text. For more information, refer to Using Special Characters in Expressions on page 72. ■ All matches are case-insensitive.
Using Special Characters in Expressions The following characters have a special meaning in regular expressions and should be preprended by a backward slash ( \ ) when you want them interpreted literally: . $ [ ( ] ) \ | * ^ ? @ Examples The following table provides some examples to help you understand how regular expressions can be used. Example Matches...
Index A Account View page 57 accounts, activating for individuals 49 accounts, creating 60 activating individual accounts 49 administration interface branding 45 logging in 14 Administration page 33 administrator IP/Range, configuring 33 Advanced Domain Setup page 54 aliases, unifying 56 allow email recipient domains 33 allowed IP range 37 Appearance page 45 Attachment Filtering page 39 B backing up Bayesian database 42 system configuration 42 user settings 42 Barracuda headers, removing 48 Barracuda Spam
F failed system, replacing 57 file attachments blocking 39 quarantining 40 file extensions blocking 39 qaurantining 40 fingerprinting, enabling and disabling 46 firewall, configuring 16 Firmware Update page 49 G global quarantine settings 30 type 30 greeting message 65 H header blocking 41 quarantining 41 tagging 41 whitelisting 41 Header Filtering page 41 headers (Barracuda), removing 48 hourly mail statistics 23 HTTPS access 60 mail statistics 23 mail syslog 50 managing quarantine inbox 67 managing, Ba
R RAID 10 Rate Control page 49 RBLs 36 regular expressions, about 71 removing Barracuda headers 48 replacing failed system 57 RESET button, using 35 resetting Bayesian database 35 system 34 restoring Bayesian database 43 system configuration 43 user settings 43 RFC 821 compliance 47 S scoring, spam 28 Send Bounce field 28 Sender Domain Block/Accept page 38 Sender Policy Framework (SPF) 48 sending email notifications 35 setting up, quarantine 29 shutting down the system 34 single sign-on, enabling 52 SMTP H
■ Barracuda Spam Firewall User’s Guide