
Specifications

1.
2.
3.
4.
5.
6.
7.
8.
9.
10.
11.
12.
13.
How to Back Up Network Addressable Storage - NAS
This article refers to firmware version 4.3 and higher.
In firmware version 5.0 and higher, with CIFS backups, Barracuda Backup is able to back up access
control lists (ACLs).
In this article:
Configure Network Addressable Storage (NAS) Data Sources
Create Backup Schedules
Create Data Retention Policies
Configure Optional Features
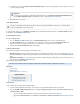
Configure Network Addressable Storage (NAS) Data Sources
Use the following steps to identify the data shares on your server that are to be directly backed up:
Log into Barracuda Backup, and select the Barracuda Backup Server in the left pane that is to back up the data shares.
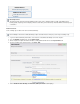
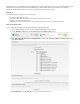
Go to the page, and click .BACKUP > Data Source Add Computer
In the page, enter a description of the data source in the field.Add Computer Computer Description
In the field, enter the IP address or fully qualified domain name (FQDN) for the data source.Computer Name
From the drop-down menu, select , and turn on .Computer Type Microsoft Windows Enable File Share Backups
Specify the file share credentials in the section, and then click .Microsoft Windows Computer Information Test Credentials
Click at the top of the page; the page displays.Save Add Data Source
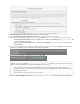
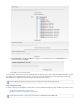
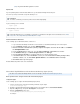
In the section, in the field, enter a label for the data source you are backing up.Backup Data Description
From the drop-down menu, select .Data Type File Share - CIFS
In the section, enter the exact name of the network share on the server, for example, , needed to access theFile Share Information C$
data source from devices on the local network, and then click to test Share connectivity.Test Share
If you wish to view all available network shares on the server, click , and then click toToggle All Shares Fetch Data Sources
automatically populate the list of data sources.
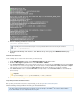
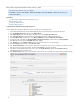
In the section, you can select all folders in the network share, or optionally select specific folders you wish to back up:Folder Selection