
Specifications


1.
2.
1.
2.
3.
4.
Create a Barracuda Cloud Control Account
You must have a Barracuda Cloud Control account to use Barracuda Backup. If you do not already have an account, follow these
steps:
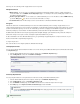
Go to the following URL: http://login.barracudanetworks.com/
Complete the fields on the page, and click .Create New Account Submit
Verify the Equipment
Verify you have the necessary equipment:
Barracuda Backup Server (check that you have received the correct model)
AC power cord
Ethernet cables
VGA monitor (recommended)
Keyboard (recommended)
Barracuda Backup Server serial number and linking code (available on both the side of the Barracuda Backup Server and the Quick Start
Guide card)
Connectivity and access information for servers you want to back up
All necessary cables, e.g., multi-mode fiber optic cable is necessary for models 891, 991, and 1091
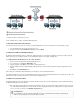
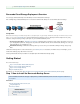
Connect to Network
Fasten the Barracuda Backup Server to a standard 19-inch rack or other stable location.
Connect an Ethernet cable from your network switch to the Ethernet port on the back panel of the Barracuda Backup Server.
Connect the power cord, VGA monitor, and a keyboard to the Barracuda Backup Server. The AC input voltage range is 100-240 volts at
50/60 Hz.
Press the button on the front panel to turn on the unit.POWER
Continue with .Step 2: How to Configure Barracuda Backup
Step 2: How to Configure Barracuda Backup
Before configuring the IP address and network settings, complete .Step 1: How to Install a Barracuda Backup Server
In this article:
Configure the IP Address and Network Settings
Configure Your Corporate Firewall
Link Your Barracuda Backup Server to an Account
Enter Server Name and Location
Define Display Groups
Add a Barracuda Backup Server to a Group
Related Articles
Replacement and Data Migration
How to Link a Barracuda Backup Server
How to Unlink a Barracuda Backup Server
How to Edit Network Settings through the
Barracuda Console
How to Configure Backups
Hardware Specifications
Panel Indicators, Ports, and Connectors
Configure the IP Address and Network Settings
Caution
Do not block the cooling vents located on the front and rear of the unit.