
Specifications


1.
2.
3.
4.
5.
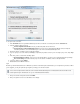
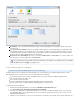
folder, in the main window, click .Barracuda Restore Open Default Destination
- Select to specify an alternate location to which to restoreRestore agent file system data to alternate location (retain ACLs)
the data; note that the user permissions on files and folders are retained.
Restore agent file system data like CIFS (loss of ACLs) - Select to restore the agent file system data, including windows file
sharing-related data. You can identify an alternate location to which to restore the data, and then specify:
Restore only if missing (do not overwrite)
Maintain directory structure back to share
Pub restored files into a "Restores" directory at the destination
Apply to All Agent File System Selections - Turn on if the selected configuration options apply to all files
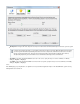
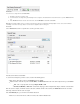
To specify the restore location,
Select from the available restore locations and configuration options.
In the list of items for restoration, select the item on which to set the configuration options, and click .Apply
Once you apply the restore location to an item, verify a check mark displays to the right of the item.
If the configuration options apply to all files, click , and click .Apply to All Agent File System Selections Apply
Click . The window closes and the restoration begins.Restore
Note: You must specify the restore location for all items before you can complete the restore process.
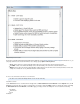
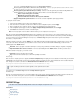
Once the restoration begins, displays in the tool window. As the restore progresses, the overall restoration progress andRestore Progress
individual file restoration progress displays as progress bars including an in-progress counter of total files restored, files per minute, and kilobytes
per second. If errors are encountered during the restore process, click and open the latest restore log for more information.Restore Logs
View, Pause, or Stop Restoration
While the restoration is in progress, click the icon to view realtime important restoration details about restoration progress such as pathDetails
issues and restore failures. This allows you to determine if a restore needs to be canceled and redefined. Additionally, you can turn on the
following options in the window:Details
Rate Limit - Click to specify the restoration rate limit per second; specify as unlimited, or in kilobits, kilobytes, megabits, or megabytes
Open this window at the start of each restore - Turn on to automatically launch the window each time you start a restoreDetails
While the restoration is in progress, you can also select:
Pause/Play - Click to suspend/resume restoration
Stop - Click to end the restoration process and remove partially restored files
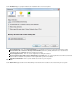
Restore Logs
Once a restore is complete, paused, or stopped, the dialog box displays the restore statistics. From this view you can click Restore Completed R
to view restore details. A restore log is generated each time you perform a restore, and is named based on the restoration date andestore Logs
time. The log file is stored in a sub-folder of the folder. For example, Barracuda Restore for Windows
C://Program Data/Barracuda/Barracuda Restore for Windows/Restore Logs
You can also access the folder from the folder.Restore Logs Help > Restore Logs
View Error Logs
Error logs are generated if an error is encountered during a file or folder search, or during restoration. File naming is based on the date andonly
time of the error, and the error log file is stored in a sub-folder of the folder. For example, Barracuda Restore for Windows
C://Program Data/Barracuda/Barracuda Restore for Windows/Error Logs
REPORTS Page
This article refers to Barracuda Backup firmware release 5.0 and higher, except where noted.
In this article:
Backup Reports
Restore Report
Large Items Report
Audit Log Report
Log files are always stored in this location regardless of the specified restore location.