
Specifications

1.
2.
1.
2.
3.
4.
5.
1.
2.
3.
4.
5.
6.
7.
Create a Barracuda Cloud Control Account
You must have a account to use Barracuda Backup. If you do not already have an account, follow these steps:Barracuda Cloud Control
Go to the following URL: http://login.barracudanetworks.com/
Complete the fields on the page, and click .Create New Account Submit
Configure the IP Address and Network Settings
By default, the Barracuda Backup Server is configured to obtain an IP address on your network using DHCP. If you want to assign it a static IP
address instead, you can configure it using the console administration interface. If not, skip the following steps:
To configure the Barracuda Backup Server to use a static IP address:
Connect a monitor and keyboard to the Barracuda Backup Server.
Use your arrow keys to highlight the field.DHCP/Static
Using the spacebar select for your IP address assignment preference.Static
Enter the IP Address, Netmask, Default Gateway, Primary DNS Server, and Secondary DNS Server (optional) as appropriate for your
network.
Click on the box.Enter Commit Changes
Once changes are committed, the Barracuda Backup server attempts to connect to Barracuda Networks.
The LAN and Internet boxes on the console administration interface are green when the Barracuda Backup Server is determined to be online. The
Barracuda box remains red until it is linked to an account later in the installation process.
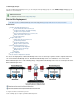
Configure Your Corporate Firewall
If the Barracuda Backup Server is located behind a corporate firewall, you may need to open the following ports to allow communication between
the Barracuda Backup Server and the Internet. In site-to-site deployment, you can specify the ports to use for replication on the BACKUP >
page, or optionally, you can replicate over ports 5120-5129.Replication
Ports 1194 and 5120-5129 outbound for both TCP and UDP traffic. The ports are used to transfer data to either Barracuda Cloud
Storage or to another Barracuda Backup Server over the Internet.
Link Your Barracuda Backup Server to an Account
Your Barracuda Backup Server must be linked to your Barracuda Cloud Control Account before you can initiate data backups.
To link your Barracuda Backup Server:
Go to this URL: http://login.barracudanetworks.com/
Sign in with your and .Username Password
If Barracuda Backup is your default or only Barracuda Networks product, then the Barracuda Backup web interface appears. If not, click
at the top of the screen.Backup Service
Click , and then select the tab.Start Backup Service Setup STATUS
Click .Link a Barracuda Backup Server
Enter your and from the sticker attached to the Quick Start Guide that shipped with your BarracudaSerial Number Linking Code
Backup Server. These values are case sensitive. The Serial Number can also be found on a sticker on the back of the unit. Follow the
on-screen prompts to complete linking and to supply your account information.
The linking process may take a few minutes to complete. Wait until the page appears, indicating that the Barracuda BackupSTATUS
Server is successfully linked to your account. A green light next to the Barracuda Backup Server on the page indicates that yourSTATUS
Barracuda Backup Server has successfully connected.
Add the Server Name and Location
Use the SYSTEM > BBS Settings page to view or modify the Barracuda Backup Server details including server name, time zone, physical
location, and display group:
Backup Server Name - Name used to identify the currently selected Barracuda Backup Server in the web interface
Cloud Replication
If you would like to restrict the outbound network traffic on these ports to Barracuda Cloud Storage, contact Barracuda
Networks Technical Support for a list of the IP addresses to allow.