
User Guide
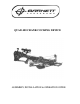


3. THUMB SCREW
6. CRANK HANDLE ASSEMBLY
1. LEFT SIDE STRING SPOOL
2. RIGHT SIDE STRING SPOOL
(THE SPOOL WITH NOTCHES)
4. 1/4-20 SOCKET HEAD
CAP SCREW
5. 1/8” PINS (4 PCS)
NOTE: ANCHORS WILL GO
OVER STRING FROM SPOOLS
TO CONTAIN THEM IN THE
GROOVE
NOTE: BE SURE THE STRING IS AT EQUAL LENGTHS AND THE KNOT HOLE
ON BOTH RIGHT AND LEFT STRING SPOOLS ARE IN LINE WITH
EACH OTHER WHEN CONNECTING THEM TOGETHER (#’s 1 & 2).
Insert 1/8” pins (5) into right side string spool, then insert right side string spool into
middle stock hole. (Note: You may apply a white lithium grease to the spool bushing to
reduce friction.) Insert left side string spool (1) into middle stock hole. It is important
to keep the string spools position the same way on either side to allow even take up of
string during use (see note below). Once spools are connected, insert the 1/4-20 X. 5/8”
(4) socket head cap screw into right side string spool (2) and thread into left side string
spool (1). To tighten, align crank handle (6) with left side string spool (1) and thread in
thumb screw (3). Using supplied allen wrench tighten 1/4-20 x 5/8” socket head cap
screw (4).
CRANK ASSEMBLY STEP 1