
Owner Manual


HOW TO INSTALL THREE-LAYER
HARDWOOD FLOORBOARDS WITH 5Gc
LOCKING SYSTEM – FLOATING /
GLUEDOWN / STAPLE-DOWN INSTALLATION
1. GENERAL GUIDANCE – BEFORE STARTING
Floor storage
The packs containing floorboards must be handled carefully during transport and unloading to
avoid any mechanical damage. Floorboards in the original packaging should be kept in adry
place, in ahorizontal position, on pallets or wooden beams to provide free space of at least
75 mm (3”) between the boxes and the subfloor. Before the floor is delivered to abuilding
provided with doors and windows, all “wet” works must be completed, e.g. plastering, con-
struction of partition walls, screed application, skimming, painting, etc. These works must
be finished and any wet materials must be at the same humidity level as during the normal
use of the area. If there are any cellars below the floor installation area in the building, they
must be dry and well ventilated. Multi-layer hardwood flooring should be kept in the original
packaging in the room where it is to be laid for at least 48 hours to ensure floor is acclimated.
Additional air-conditioning systems installed in the house or dwelling should be activated at
least 14 days before, during and after the installation of the floor. The relative humidity in
the area where the hardwood flooring is stored and installed should be kept between 45%
and 60%. The air temperature should be between +64.4°F and +75.2°F (+18°C to +24°C).
Themoisture content of the wooden substrate (wood-based panels) should not exceed 9%.
The moisture content of the concrete substrate should not exceed 2% and that of the anhy-
drite substrate – 0.5%. The moisture content of the substrate should be measured using the
carbide method. The measurement results should be recorded.
Responsibility
Before fitting the multi-layer hardwood floor, the developer/fitter or technician must ensure
that the installation site meets all the applicable standards. Always comply with the rec-
ommendations of the building industry and local regulations. The manufacturer accepts no
liability for improper working conditions on the installation site. Before installation the de-
veloper/fitter or technician should inspect the multi-layer hardwood floorboards and confirm
that they comply with the purchase order. The floorboards should be inspected for the grade,
quality, finish, gloss, color, mechanical damage and class of the top layer (all the information
is provided on the label and/or in the purchase order). The developer/fitter or technician is
fully responsible for the final quality control of the multi-layer floorboards. Before installation,
all the multi-layer hardwood floorboards should be checked. If in doubt, the developer/fitter or
technician should not use any of the boards considered to be unsuitable for installation and
he/she should contact the seller immediately.
When ordering the floor, awaste factor of up to 7% should be taken into account. If the boards
are to be laid diagonally or connected along acurved line with other floor types, awaste factor
of up to 10% should be taken into account. The manufacturer accepts no responsibility if the
floor is laid outdoors, in bathrooms, in areas exposed to relative humidity levels other than
from 45% to 60%, in areas exposed to direct contact with water or other liquids, in areas
where the temperature is other than from +64.4°F to +75.2°F (+18°C to +24°C).
The final inspection by the end user should be carried out while in the standing position.
Important for fitters
Sawing, sanding and processing of hardwood products and wood-based materials can pro-
duce wood dust. Airborne wood dust can cause irritation of the respiratory system, eyes and
skin. The International Agency for Research on Cancer (IARC) has classified wood dust as
ahuman carcinogen.
Precautions
If electric saws are used for cutting boards or wood-based materials, they must be provided
with dust extractors. The fitter should always use an appropriate NIOSH-certified dust mask
and safety goggles during cutting operations. Always protect your eyes and skin against con-
tact with wood dust. In case of irritation from wood dust, rinse the eyes or skin with clean
water for at least 15 minutes.
If you have any questions about the installation and maintenance of the floor or you would like
to receive aSafety Data Sheet, please contact the distributor or retailer where you purchased
the material, or visit our website.
IMPORTANT HEALTH INFORMATION ALL OF OUR NORTH AMERICAN PRODUCTS MEETS
CURRENT TSCA TITLE VI STANDARDS AND ARE CARB 2 COMPLIANT.
THESE CONSTRUCTION MATERIALS CAUSE FORMALDEHYDE EMISSIONS. EXPOSURE TO
FORMALDEHYDE HAS BEEN REPORTED TO CAUSE IRRITATION OF THE EYES, NOSE AND
THROAT, HEADACHE, SICKNESS AND AVARIETY OF ASTHMA-LIKE SYMPTOMS, INCLUDING
SHORTNESS OF BREATH. THE ELDERLY, OLDER AND YOUNGER CHILDREN, AND ANYONE WITH
AHISTORY OF ASTHMA, ALLERGIES OR LUNG PROBLEMS MAY BE AT HIGHER RISK. RESEARCH
INTO THE POSSIBLE EFFECTS OF LONG-TERM EXPOSURE TO FORMALDEHYDE ARE ONGO-
ING. INSUFFICIENT VENTILATION MAY CAUSE THE ACCUMULATION OF FORMALDEHYDE AND
OTHER AIRBORNE CONTAMINANTS INDOORS. FORMALDEHYDE LEVEL IN THE AIR TENDS TO
INCREASE WITH HIGH TEMPERATURES INDOORS AND HIGH HUMIDITY. IF YOUR HOUSE IS EX-
POSED TO EXTREME TEMPERATURES IN THE SUMMER, YOU MAY USE AN AIR-CONDITIONING
SYSTEM TO CONTROL THE TEMPERATURE INDOORS. OTHER UNITS AND SYSTEMS DESIGNED
FOR CONTROLLED MECHANICAL VENTILATION MAY ALSO BE USED TO REDUCE THE LEVEL OF
FORMALDEHYDE AND OTHER AIRBORNE CONTAMINANTS INDOORS.
IF YOU HAVE ANY QUESTIONS ABOUT THE HEALTH EFFECTS OF FORMALDEHYDE, PLEASE
CONSULT YOUR DOCTOR OR ALOCAL HEALTH CARE CENTRE.
WARNING:
IF THERE ARE ELASTIC FLOOR COVERINGS AND ASPHALT-BASED ADHESIVES IN THE HARD-
WOOD FLOOR INSTALLATION AREA, AVOID GRINDING, DRY SWEEPING, DRY SCRAPING,
DRILLING, SAWING, SHOT-BLASTING AND USING MECHANICAL METHODS FOR REMOVING
THE EXISTING FLOOR COVERINGS, FLOOR SUBSTRATES, ASPHALT-BASED ADHESIVES OR ANY
OTHER ADHESIVES!
The existing materials may contain asbestos fibers and/or crystalline silica. Avoid the forma-
tion of dust. Inhalation of dust creates the risk of cancer and respiratory problems. If aproduct
is not known to be free of asbestos, it should be presumed to contain asbestos. Smoking
by people exposed to contact with asbestos fibers significantly increases the risk of serious
injuries. Under regulations of law it may be required to test materials for the asbestos content
as well as to follow specific procedures for their removal and disposal. For guidance on the
removal of resilient floor coverings, see the current edition of the guidebook published by the
Resilient Floor Covering Institute (RFCI): Recommended Work Practices for Removal of Resil-
ient Floor Coverings’ or contact your distributor or retailer where you purchased the material.
Hardwood floorboards delivered in this pack, DO NOT CONTAIN ABSESTOS.
2. STANDARDS REQUIREMENTS FOR SUBSTRATE
The purpose of the recommendations for the quality of the substrate is to ensure the correct
installation of multi-layer floorboards. They are in no way intended to replace any federal,
state or local building regulations.
Multi-layer floor can be laid on substrates which meet the following standard requirements:
Flat – the maximum unevenness of the substrate should not exceed 1/8” (3 mm) over 6.56 ft
(2 m) when measured with a level. Any recesses or uneven areas should be filled with special
materials designed for this purpose. The maximum horizontal offset over the entire floor area
must not exceed 3/16” (5 mm).
Dry – concrete substrates should be cured for at least 60 days. The moisture content of the
concrete substrate should be tested using the calcium carbide test (carbide method) and
the result must not exceed 2 % for concrete substrates and 0.5% for anhydrite substrates.
The moisture content of the wooden substrate (wood-based panels) should not exceed 9%.
The measurement results should be recorded.
Clean – free of dirt, cement, putty, plaster, paint, oil, glue, plaster or other residues. Floors are
not suitable for installation on substrates cleaned by chemical methods.
WOODEN SUBSTRATE – REQUIREMENTS
Multi-layer boards can be fixed to the wooden substrate such as solid wood boards, OSBs
or other boards specified below. This substrate should be permanently fixed to the subfloor
(e.g. wooden beams) using staples or nails. Any “squeaky” areas should be fixed by nailing
or screwing them down. The spacing between the fasteners fixing the wooden substrate to
the beams should be about 6” (15 cm). Any delaminated, swollen and damp panels should be
replaced with new ones. The spacing between the beams under wood-based panels should
be in accordance with the relevant building regulations. The moisture content of the wooden
substrate should not exceed 9% when measured with needle meter. As amanufacturer of
multi-layer hardwood floors, we are not able to assess every underlay on which the floor is
to be installed. The responsibility for choosing the spacing and distances, and assessing the
substrate lies with the developer, engineer, architect or consumer, who are in abetter position
to evaluate the expected result based on test results for the floor installation area.
Hardwood plywood should be at least CDX class (display 1) and meet the US Voluntary
Product Standard PS1 or Canadian CAN/CSA 0325-0-92 performance standards. The opti-
mum thickness is 3/4” (19 mm) for the substrate [at least 5/8” (16 mm)] and 7/16” (11 mm)
for the floor underlay.
OSBs should meet the US Voluntary Product Standard PS2 or Canadian CAN/CSA 0325-0-92
performance standard for structural coatings. Check the panel code on the underside. When
used as the floor underlay, the panels should be tongue-and-groove boards laid with the
impregnated side facing down. The minimum thickness is 23/32” (18 mm) for the substrate
and 7/16” (11 mm) for the underlay.
Waferboards and chipboards should meet the US Voluntary Product Standard PS2 or Cana-
dian CAN/CSA 0325-0-92 performance standards. The minimum thickness is 3/4” (19 mm)
for the substrate and 7/16” (11mm) for the underlay.
Chipboards should have adensity of at least 40 pounds/cubic feet. (641 kg/m
3
), approved
underlay class, and 3/4” (19 mm) thickness (floating floors only).
Solid wood underlay should be fitted using glue-down or staple-down installation. Thickness
min. 3/4” (19 mm) and width max. 6” (15 cm) at 45° with respect to the beams. Coniferous
wood from density group 1 (pine, larch, green Douglas, etc.) No. 2 common dried wood, all
board ends on beams.
A7/16” (11mm) floor panel of the approved type can be added for the glue-down installation
procedure.
CONCRETE SUBSTRATE – REQUIREMENTS
The glue-down procedure is not recommended for installation of multi-layer floor on light-
weight concrete substrate. To check if the substrate is made of lightweight concrete, scratch
the substrate surface with steel stylus (Fig. 1). If the surface is easy to scratch and the edg-
es of the line crumble, the concrete does not have sufficient strength for gluing multi-layer
boards. If this case, you should lay afloating floor.
The glue-down procedure should only be used with concrete grades 3,000 psi or higher.
Gluedown installation on lightweight concrete (less than 3,000 psi) is not permitted.
Always perform the glue bonding test before starting glue-down installation.
The moisture content of the substrate should not exceed 2% when measured using the car-
bide method. The measurement should performed out in areas which are most exposed to
increased humidity – under stairs, in corners or areas with no direct exposure to sunlight.
Installation over water underfloor heating
When fitting multi-layer floorboards over water underfloor heating, the screed heat-up pro-
cedure should be performed. The procedure involves heating up the floorboards at regular
intervals to eliminate any residual moisture from the screed and to avoid the risk of hazardous
stress in the underlay.
For the screed heat-up procedure, see www.hardwood-installation.eu.
Following the underlay heat-up process, you can start laying the floor.
Two installation procedures can be used for fitting floor over underfloor heating: floating and
glue-down installation.
Glue-down installation over water underfloor heating
When fitting aglued floor, make sure that the glue retains its properties and flexibility even
when exposed to significant temperature differences. Glue is not produced by the flooring
manufacturer, and therefore you should use products designed for floor installation. There are
special pictograms and information on the packaging to indicate if the specific glue can be
used for floor installation over underfloor heating. Manufacturer recommends hiring aprofes-
sional floor company for glue-down floor installation.
Attention!
When checking the underlay using a2-m level, the offset of the underlay from the horizontal
must not exceed 1/8” (3 mm) over 6.56 ft (2 m) at any point on the surface.
Floating installation over water underfloor heating
When fitting afloating floor, the heat transfer coefficient of the underlay should be as low
as possible. Manufacturer recommends using an underlay with heat transfer coefficient
of R < 0.05 m
2
K/W, e.g. regular corrugated cardboard of thickness 1/8” (3 mm), or other
professional underlay materials.
Before installation see “Subfloor Heat-up Specifications” available on the website
www.hardwood-installation.eu.
After performing the screed heat-up procedure and selecting the appropriate underlay, start
laying multi-layer floorboards using the procedure for installation without underfloor heating.
When fitting afloating floor, Manufacturer recommends using insulation foil which should be
laid with an overlap of about 7.8” (20 cm) and connected with sealing tape.
The three-layer hardwood floorboards can be laid over water or electric underfloor
heating system..
Installation of floor over electric heating
Electric floor heating can be installed using different solutions:
Heating cables laid inside special panels made of foamed polystyrene or extruded polysty-
rene foam with ready-made grooves for laying heating cables. Such panels have avery high
thermal resistance coefficient, which means that they can used instead of thermal insula-
tion. Boards to be installed under hardwood subfloor do not require any subsequent screed
application. If the developer, fitter or technician decides to lay screed over heating cables,
multi-layer floor can be installed in two ways: as afloating floor or glued floor. The installation
procedure is the same as for installation over water underfloor heating.
Heating mats laid immediately under multi-layer floorboards. These are ready-to-use units
which are fitted immediately under the floorboards. Such heating mats (foil) are installed
over thermal insulation of thickness from 1/8” (3 mm) to 1/4” (6 mm), e.g. XPS boards, wood
fiber boards. The heating mats (foil) are covered with 0.2 mm thick PVC foil to protect them
against damage.
Attention!
Read the installation guide carefully before fitting the electric heating system and have it
installed by aprofessional company.
Guidelines for fitters and users of hardwood floors over electric or water underfloor
heating
1. To ensure the optimum floor covering for installation over underfloor heating, use ready-
made three-layer hardwood boards connected by aglue-free click locking system.
2. If you opt for aglued floor, make sure that the glue you have chosen to use will retain
its properties and flexibility throughout many years, even when exposed to significant
temperature differences.
3. Installation of floorboards over underfloor heating can only be started after the heating
subfloor heat-up report has been prepared and signed by aproperly qualified installation
team. If the heating system is turned off during the screed heat-up process, the heating
system should be set to 70°F (21°C) for several days before starting the installation and
the floor should laid at this temperature. The screed heat-up process should also be per-
formed in the summer. The screed heat-up procedure should only be used when laying
floor over water underfloor heating.
4. To ensure the correct installation of the floor, make sure that the humidity level does not
exceed the acceptable levels when the floor is being laid or later when it is used. The
appropriate humidity level for Manufacturer boards is 7% ± 2%.
5. To achieve the optimum temperature, it should be kept at 21°C (70°F) during the first
48 hours after installation, and then increased by 1-2 degrees per day. The heating level
should not exceed 84°F (29°C) at the surface of the floorboards. The relative humidity
in the area must be maintained at 45-60% throughout the year, whether the heating
system is on or off.
6. The moisture content of the screed must not exceed:
• 1.8% for cement screed when measured using the carbide method (CM),
• 0.5% for anhydrite screed when measured using the carbide method (CM).
7. To prevent uneven expansion/contraction of wood, the entire floor area should be provided
with heating. This will also help to ensure the best possible comfort of use (without any
‘cold spots’ over the floor surface).
8. Hardwood floor installed over underfloor heating must not be covered with carpets. All
furniture placed over underfloor heating, such as sofas, should have legs at least 4” (10
cm) high.
9. When fitting afloating floor, insulation foil should be laid immediately on the screed. Insu-
lation foil should laid with an 8” (20-cm) overlap and then connected with tape.
10. Small gaps may be observed between the boards during the heating season due to the
minimum expansion/contraction of wood.
11. At the end of the heating season, the temperature should be gradually reduced by about
33.8°F (1°C) or 35.6°F (2°C) per day. CAUTION: The temperature at the floor surface
must never exceed 85°F (29°C).
3. GLUE-DOWN INSTALLATION
Recommended tools and materials for floor installation:
• Safety goggles
• NIOSH-certified dust mask
• Wood/concrete moisture meter
• Appropriate glue for fitting multi-layer boards
• Primer system for glue – if required by the glue manufacturer
• Roller for primer application
• Putty knife for removing residues from the substrate
• Appropriate steel trowel recommended by the glue manufacturer
• Steel hammer (800 g to 1000 g)
• Vacuum cleaner or sweeping brush
• Expansion wedges
• Tapping block
• Tape measure
• Pencil
• Mitre saw or table saw
• Trimmer
• Trowel for glue application
• Glue remover
• Cleaning cloths
• Knee pads
• Protective gloves
• Floor shunting tool
• Carpenter’s square
General requirements:
Before starting the floor installation, the central heating and air-conditioning systems should
remain switched on for 14 days.
The boards in the original packaging should be acclimated in the room where they will be
laid for at least 48 hours.
The floor should be laid at room temperature from +64.4°F to +75.2°F (+18°C to +24°C) and
relative humidity between 45% and 60%.
Do not install the floor if the moisture content of the underlay and the relative humidity exceed
the acceptable levels!
Always follow the instructions of the glue manufacturer during the installation. The glue cover-
age rate, the correct primer and trowel should be indicated by the glue manufacturer.
Choose the direction of boards in the installation area.
Work out of several boxes at atime to ensure an even color and shade distribution over the
whole floor.
Do not use boards which show visible signs of damage! Return them to your retailer for
replacement!
Complaints concerning boards with visible damage which have been installed will not be
accepted!
When working in rooms being renovated, remove all existing skirting boards or plinths. Make
an off-cut in the door frames. Remove the existing thresholds and strips from the frames. You
can replace these elements after the floor has been installed.
When making an off-cut in the door frame, the fitter should make sure that there is the rec-
ommended expansion gap. The floor must have aclearance of 1/16 inch under the door frame
to allow free lifting without vertical restrictions. The fitter should ensure that the board under
the door frame can move freely.
Do not directly use rubber hammers on the installed floorboards to avoid non-removable
marks on the surface of the boards! Avoid walking on recently installed boards for at least 12
hours. Avoid walking on recently installed boards for at least 24 hours.
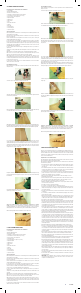
Floor installation procedure:
Before installation use putty knife to remove any residues from the substrate. Vacuum or
sweep the surface.
Cut off the tongue in the boards to be installed in the first row.
According to the manufacturer’s instructions, apply the glue using anotched trowel recom-
mended by the glue manufacturer. Glue should be distributed over amaximum of two rows
of boards. The interval between applying the glue and laying the boards should not exceed
40 minutes. When fitting boards using expansion wedges, use expansion gaps at least 7/16”
(11mm) wide. An expansion gap should be made along the perimeter of the room and around
any other obstructions. Start the installation at the left side of the wall and continue towards
the right side.
Fit in another board next to the first board. The boards should touch each other along the
shorter edge. Begin the second row, starting with the off-cut from the first row. The rec-
ommended minimum length for the board starting the next floor row is 12” (300 mm). The
recommended offset of connections between the boards along the shorter edge is 20” (500
mm). Continue laying the floor across the room. Lay the boards at an angle about 30° along
the longer edge.
During the installation use atapping block and ahammer to fit in the boards together along
the longer edge. Take care not to spread glue to the tapping block and the top layers of the
boards. If the topping bar and boards are dirty, remove the glue residues using the agent rec-
ommended by the glue manufacturer. Glue hardened on the floor surface can cause damage
to the walk-on floor layer.
Fit the last board against the wall by tapping it with floor shunting tool. Remember to leave an
expansion gap of at least 7/16” (11mm).
REMOVE ALL EXPANSION WEDGES BEFORE STARTING THE INSTALLATION OF SKIRTING
BOARDS. If the floor is to be covered/secured, use breathable material such as regular or
corrugated cardboard. Do not cover the floor with plastic materials, e.g. foil. For the floor care
and maintenance guide, please visit www.hardwood-installation.eu
After the skirting boards have been installed, the floor is ready for use.
v20200320
Lacey Act