
User Manual

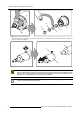


2. Xenon bulb lamp replacement process
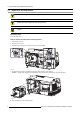
Image 2-12
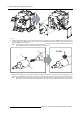
8. Reinstall the UV bloc ker asse mbly as illustrated. Make sure that the xenon bulb lamp is properly supp orted by the lamp supporting
mechanism in the centre of the UV b locker. Use the opening at the side of the lamp house to guide the supporting pin of the
xenon bulb lamp into the anod e supporting mechanism .
Image 2-13
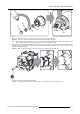
9. Secure the U V blocker by fastening the four thumbscrews as illustrated.
Note: Please ensure that the thumb screws turning wire s are flash with the cover or interference w ill occur w hile inserting the
lamp hous e into the projector.
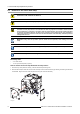
Image 2-14
10.Fas ten the cathode side of the xenon bulb lam p using a hexagon s ocket hea d screw M6 x 40 and a plane washer as illustrated.
Use a torque of 2,5 Nm to fasten the hexagon socket head screw. Use for that a torque wrench with a 5 mm Allen socket.
Caution: Make sure that the both pins (reference A of image 2 -15) of the cathode a dapter remain engaged in the foreseen
slots. Therefor, use one hand to keep the x enon bulb lamp into position while inserting the hexagon socket head
screw.
16
R59770175 XENON BULB LAMP REPLACEMENT 24/09/2008