
User Manual

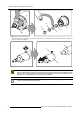


2. Xenon bulb lamp replacement process
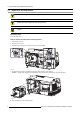
Image 2-8
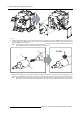
3. Install the lamp cathode adaptor (A ) up on the xenon bulb lamp (L) as illustrated. Use
torque 2,5 N m to fasten the fix ation screw
(S)oftheadapter. Useforthatatorquewrenchwitha5mmAllensocket. Makesurethatthereisfullcontactbetweenthe
cathode adapter an d the lamp base.
Note: The cathode lamp adaptor is delivered in a s eparate bag with t
he projector. In ca se of a lamp replacem ent you have to
reuse the adaptor from the xeno n bulb lam p which you want to replace.
S
L
A
2,5 Nm
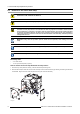
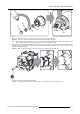
Image 2-9
4. Install the anode wire lug (L) upon the anode socket (S). Hold fast the nut N1 with an open-end wrench while fastening the nut N2
with a torque of 9Nmusing a torque wrench. Ensure that at b oth sides of the wire lug L a plane washer (W1 & W2) is present.
Note: The ano de socket is located just below the UV blocker and can easily be removed from the lamp house. In case of a lam p
replacement y ou have to reuse the anode socket whic h is connected t o the xenon bulb lamp which you want to replace.
14
R59770175 XENON BULB LAMP REPLACEMENT 24/09/2008