PGXG-61B / PGWX-61B / PGWU-61B User manual
Doc. Revision: 00 Barco nv Projection Division Noordlaan 5, B-8520 Kuurne Phone: +32 56.36.89.70 Fax: +32 56.36.88.24 Support: www.barco.com/esupport Visit us at the web: www.barco.
Changes Barco provides this manual ’as is’ without warranty of any kind, either expressed or implied, including but not limited to the implied warranties or merchantability and fitness for a particular purpose. Barco may make improvements and/or changes to the product(s) and/or the program(s) described in this publication at any time without notice. This publication could contain technical inaccuracies or typographical errors.
Table of Contents TABLE OF CONTENTS 1. SAFETY................................................................................................................................................................................... 6 1.1 General considerations..................................................................................................................................................... 6 1.2 Important safety instructions.........................................................................
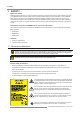
1. Safety 1. SAFETY About this chapter Read this chapter attentively. It contains important information to prevent personal injury while installing and using your PRESENT series projector. Furthermore, it includes several cautions to prevent damage to your PRESENT series projector. Ensure that you understand and follow all safety guidelines, safety instructions and warnings mentioned in this chapter before installing and using the PRESENT series projector.
1. Safety Do not look into the projector’s lens when the lamp is on. The bright light may hurt and damage your eyes. Notice on safety This equipment is built in accordance with the requirements of the international safety standards IEC60950-1, EN60950-1, UL60950-1 and CAN/CSA C22.2 No.60950-1, which are the safety standards of information technology equipment including electrical business equipment.
1. Safety yy Do not immerse or expose this projector in water or other liquids. yy Do not spill liquid of any kind on this projector. yy Should any liquid or solid object fall into the cabinet, unplug the set and have it checked by qualified service personnel before resuming operations. yy Do not disassemble this projector, always take it to an authorized trained service person when service or repair work is required. yy Do not use an accessory attachment which is not recommended by the manufacturer.
1. Safety medical attention if unusual health conditions occur after a lamp rupture, explosion, such as headache, fatigue, shortness of breath, chest-tightening coughing or nausea. To prevent fire hazard yy Do not place flammable or combustible materials near the projector! yy Barco large screen projection products are designed and manufactured to meet the most stringent safety regulations.
1. Safety yy To ensure the highest optical performance and resolution, the projection lenses are specially treated with an anti-reflective coating, therefore, avoid touching the lens. To remove dust on the lens, use a soft dry cloth. Do not use a damp cloth, detergent solution, or thinner. yy Rated maximum ambient temperature, ta= 40 °C (104 °F). yy The lamp house shall be replaced if it has become damaged or thermally deformed.
1. Safety To prevent battery explosion yy Danger of explosion if battery is incorrectly installed. yy Replace only with the same or equivalent type recommended by the manufacturer. (AAA LR03,1.5V) yy For disposal of used batteries, always consult federal, state, local and provincial hazardous waste disposal rules and regulations to ensure proper disposal.
2. Introduction 2. INTRODUCTION About this chapter Read this chapter before installing PRESENT series projector. It contains important information concerning installation requirements for the PRESENT series projector, such as minimum and maximum allowed ambient temperature, humidity conditions, required safety area around the installed projector, required power net, etc.
2. Introduction Projector Power requirements PGXG-61B AC INPUT 100-240V, 6.5A, 50/60Hz PGWX-61B AC INPUT 100-240V, 6.5A, 50/60Hz PGWU-61B AC INPUT 100-240V, 6.5A, 50/60Hz The power cord required to connect the projector with the power net is delivered with the projector. Projector weight Do not underestimate the weight of the projector. The projector weights about 17±0.5 kg without lens.
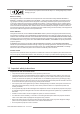
2. Introduction 2.3 Product Overview 2.3.1 Main Unit Component Location 1 2 4 5 6 3 1 Projection Lens 2 Lamp Cover 3 Tilt-Adjustment Feet 4 Input/Output (I/O) Panel 5 Power Switch 6 Power Socket (AC Input: AC100-240V~, 50-60Hz) Note: The Projection Lens is optional item not a standard accessary in the package.
2. Introduction 2.3.
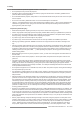
2. Introduction 2.3.3 Remote Control Button Location 10 1 On/Off 2 Home 3 OK 5 4 Arrow Right 6 5 Arrow UP 7 6 Arrow Left 7 Arrow Down 8 LED Indication 9 Battery Compartment 10 1 8 4 3 2 IR LED’S 9 Use the remote control to control these functions.
3. Installation 3. INSTALLATION Overview yy RCU Battery Installation yy Installing the Lens yy Connecting the Projector yy Powering On/Off the Projector yy Adjusting the Projected Image yy Ceiling Mount Installation 3.1 RCU Battery Installation Procedure: 1. Remove the cover by sliding it in the direction indicated by the arrow. 2. Insert two new AAA batteries (observe the polarity). 2 3. Replace the cover.
3. Installation 3.2 Installing the Lens Warning: This procedure may only be performed by qualified technical service personnel. Procedure: 1. Turn the projector off and unplug the power cord. 2. Allow the projector to cool down for at least 1 minute then start the lens replacement. 3. Remove the lens ring cover. 1 4. Remove the lens cap counterclockwise. 2 5. Pull the bar to release the lock. 3 6. Be sure the label of lens is upward and then push the lens into the position. 4 7.
3. Installation Lens Specification Projection Lens P/N R9832755 R9832753 R9832754 R9832756 Lens Type Wide Zoom Standard XGA/WXGA Standard WUXGA Long Zoom Throw Ratio (XGA) 0.99-1.26 1.26-1.58 --- 1.58-3.00 Throw Ratio (WXGA) 1.00-1.28 1.28-1.61 --- 1.60-3.07 Throw Ratio (WUXGA) 0.95-1.22 --- 1.22-1.53 1.52-2.92 Zoom Ratio 1.28X 1.25X 1.25X 1.9X 3.3 Connecting the Projector 3.3.1 Removing the rear cover Procedure 1. Unscrew the three crews on the cover. 1 2.
3. Installation 3.3.
3. Installation 3.3.
3. Installation 3.4 Powering On/Off the Projector 3.4.1 Powering On the Projector Procedure: 1. Ensure that the power cord and signal cable are securely connected. Power on the switch and the Status LED is solid red. 2. Turn on the lamp by pressing “ ” on the remote control. The Status LED is off. The startup screen displays in approximately 10 seconds. 3. Turn on your source. Select an input source by the remote control (HDMI, VGA, BNC, DVI or Video).
3. Installation 3.5 Adjusting the Projected Image Adjusting the Projector’s Position To determine where to position the projector, consider the size and shape of your screen, the location of your power outlets, and the distance between the projector and the rest of your equipment. Here are some general guidelines: -- Position the projector on a flat surface at a right angle to the screen. -- Position the projector to the desired distance from the screen.
3.
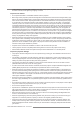
3. Installation 3.6 Ceiling Mount Installation Requirements: Ensure the screws used to attach a mount to the projector meet the following specifications: -- Screw type: M6*10 155.11 184.79 -- Mounting dimension 95.00 160.00 216.20 241.20 Mounting Holes Note: Damage resulting from incorrect installation will void the warranty.
4. User Controls 4. USER CONTROLS Overview yy On-Screen Display Menus 4.1 On-Screen Display Menus The projector has On-Screen Display (OSD) menus that allow you to make image adjustments and change a variety of settings. 4.1.
4.
4. User Controls 4.1.2 Using the Advanced OSD Menus Procedure: 1. Select the Advanced button in OSD Lite Menus then press the sequential key : LEFT > LEFT > RIGHT > DOWN buttons to enter advanced menu. 2. When the advanced OSD displays, use the arrow keys to navigate in the menu and enter to a desired item. 3. Use the UP/DOWN buttons to select the desired item in the submenu and adjust the settings with the LEFT/RIGHT buttons or press ENTER to go to another submenu. 4.
4. User Controls 4.1.2.1 Input Menu Input Select Select the active source, include the following options: yy HDMI yy DVI yy 5BNC yy Video yy VGA Auto Power Off Switch off after a while when no sync detected. yy Off: Default value. Disable auto power off function. yy On: Projector will switch off automatically when no signal for 20 minutes. Auto Power On The projector turns on automatically when switch on projector after connecting power. yy Off: Default value.
4. User Controls 4.1.2.2 Image Menu Brightness Adjust the brightness of the image. yy Press the ◄ to darken image. yy Press the ► to lighten the image. Contrast Adjust the contrast of the image. yy Press the ◄ to decrease the contrast. yy Press the ► to increase the contrast. Saturation Adjust the color saturation of the image. Note: Saturation function supported sources: Composite, Sync on Green. yy Press the ◄ to decrease the amount of saturation in the image.
4. User Controls Sharpness Adjust the sharpness of the image. yy Press the ◄ to decrease the sharpness. yy Press the ► to increase the sharpness. Noise Reduction Reduce temporary and/or spatial noise in the image. yy Press the ◄ to decrease the noise. yy Press the ► to increase the noise. Color Temp Adjust the color temperature of the image. yy Native: Default value. Native is about 5500K. yy 3200K: Apply about 3200K color temperature. yy 5400K: Apply about 5400K color temperature.
4. User Controls 4.1.2.3 Layout Menu Main Size Set the size of the main window. This function is zoom out/cropping image, the location of image will be kept in center. yy Press the ◄ to decrease the main size. yy Press the ► to increase the main size. Main Select Select the source for the main window. yy HDMI yy DVI yy 5BNC yy Video yy VGA PIP Select Select the source for the PIP window. This function is grey when PIP is Off.
4. User Controls 4.1.2.4 Lamps Menu Mode Set lamp mode of the projector. yy Normal: Default value. When set to normal mode, the wattage of the lamp will be at 330W. yy Eco: When set to eco mode, the wattage of the lamp will be at 280W. yy Power: Enable lamp power adjust. High Altitude When “On” is selected, the fans will spin faster. This feature is useful in high altitude areas where the air is thin. yy Off: Default value. yy On: Set high altitude mode on. Power Set lamp power level of the projector.
4. User Controls 4.1.2.5 Alignment Menu Rear Projection Reverse the image horizontally when the setup is with the projector at the rear of the screen. yy Off: Default value. Projector is in front projection mode. yy On: Projector is in rear projection mode. Ceiling Mode Reverse the image vertically when the setup is with the projector which is mounted with a ceiling mount. yy Off: Default value. Projector is in the table mode. yy On: Projector is in ceiling mode.
4. User Controls yy yy yy yy Green Weighting of White yy Blue Weighting of White Press the ◄ to decrease the custom color space. Press the ► to increase the custom color space. Reset to default: Resets all color points to default value. Enable yy Off: Default value. yy On: CCN enable. Auto Test Pattern yy Off: Set auto test pattern off yy On: Default value. Lens to Midposition Set the lens in the center/on axis position.
4. User Controls 4.1.2.6 Control Menu Eco Network Power Switch on/off the network power to save power. yy Off: Default value. Network is enable in standby. yy On: Network is not available in standby. RS232 Baudrate Select RS232 baudrate. yy 115200: Default value for this function. yy 9600/19200: Other options. Network View the relevant network information. yy IP Address: Default value is 192.168.0.100. yy Subnet Mask: Default value is 255.255.255.0.
4. User Controls 4.1.2.7 Service Menu Model The designated model number of the projector. Serial No The designated serial number of the projector. Soft Version The version of software installed on the projector. Main/PIP Source Display the current main and PIP sources. Active Resolution Display the current resolution of the current source. Pixel Clock Display the pixel clock of the current input signal. Vert. Refresh Display the current vertical refresh rate of the current source. Hor.
4. User Controls Projector Runtime Display the projector’s total operating hours. Factory Reset Set all persistent settings back to default values. This function will not apply to items including No Signal, Network, Language, Lamp Hours and Projector Hours.
5. Troubleshooting 5. TROUBLESHOOTING Overview yy Image Problems yy LED Indication Chart yy Warning Messag Note: If you experience a problem with your projector, please refer to the following information. If a problem persists, please contact your local reseller or service center. 5.1 Image Problems yy No image appears on-screen -- Ensure all the cables and power connections are correctly and securely connected as described in the “Installation” section. -- Check if all pins are ok in the connector.
5. Troubleshooting yy Image is unstable or flickering -- Use “TIMINGS\H PHASE” to correct it. -- Change the monitor color setting on your computer. yy Image has vertical flickering bar -- Use “AUTO IMAGE” to make an adjustment. -- Check and reconfigure the display mode of your graphic card to make it compatible with the projector. yy Image is out of focus -- Adjust lens focus to fit. -- Make sure the projection screen is between the required distance.
5. Troubleshooting 5.3 Warning Message Message Description Filter Error: When you see the warning message, it means the filter is failed to operate. Overheating: When you see the warning message, it means the temperature is over operational temperature.
6. Maintenance & Service 6. MAINTENANCE & SERVICE Overview yy Replacing the Lamp yy Replacing the Air Filter yy Replacing the Lens 6.1 Replacing the Lamp Warning: This procedure may only be performed by qualified technical service personnel. Lamp life: The projector automatically detects the lamp life. When the lamp life is nearing the end of use, you can see the lamp REPLACE information in “Lamp INFO” of OSD lite menu.
6. Maintenance & Service 6.2 Replacing the Air Filter Warning: This procedure may only be performed by qualified technical service personnel. Procedure: 1. 2. 3. 4. 5. 6. 7. Turn the projector off and unplug the power cord. Allow the projector to cool down for at least 30 minutes. Unscrew the sixscrews on the cover. 1 Lift up and remove the cover. Lift up the air filter slowly and carefully. 2 Clean or replace the air filter. 3 To install the air filter, reverse the previous steps.
6. Maintenance & Service 6.3 Replacing the Lens Warning: This procedure may only be performed by qualified technical service personnel. Procedure: 1. Turn the projector off and unplug the power cord. 2. Allow the projector to cool down for at least 1 minute then start the lens replacement. 3. Remove the lens ring cover. 1 4. Remove the lens cap counterclockwise. 2 5. Pull the bar to release the lock. 3 6. Be sure the label of lens is upward and then push the lens into the position. 4 7.
7. Specifications 7. SPECIFICATIONS Overview yy PGXG-61B yy PGWX-61B yy PGWU-61B yy Dimensions yy Compatibility Modes 7.1 PGXG-61B Specifications PGXG-61B Projector type single-chip DLP projector Technology 0.
7. Specifications Specifications PGXG-61B Optical dowser n/a Advance Picture in Picture Yes Orientation table - ceiling WARP n/a Integrated web server n/a 3D Yes, TI DLP-Link Keystone Correction Yes Ease of Use Simplified OSD menu + Remote control Inputs G/Y, B/Pb, R/Pr, H/C, V; VGA; CVBS; HDMI-1 v1.
7. Specifications 7.2 PGWX-61B Specifications PGWX-61B Projector type single-chip DLP projector Technology 0.65" DMD Color Wheel 6S standard (RGBYCW) Resolution WXGA 1280x800 Brightness* 6200 ANSI lumen Brightness (eco-mode)* 4500 ANSI lumen Contrast ratio 1100:1 Contrast ratio (Dynamic contrast mode) 4000:1 Brightness uniformity ANSI 85% Aspect Ratio 16:10 Lens type G LENS Lens range 1.28-1.60:1 (1.25X) 1.00-1.28:1 (1.28X) 1.61-3.07:1 (1.
7. Specifications Specifications PGWX-61B Keystone Correction Yes Ease of Use Simplified OSD menu + Remote control Inputs G/Y, B/Pb, R/Pr, H/C, V; VGA; CVBS; HDMI-1 v1.
7. Specifications 7.3 PGWU-61B Specifications PGWU-61B Projector type single-chip DLP projector Technology 0.67" DMD Color Wheel 6S standard (RGBYCW) Resolution WUXGA 1920x1200 Brightness* 5900 ANSI lumen Brightness (eco-mode)* 4250 ANSI lumen Contrast ratio 1100:1 Contrast ratio (Dynamic contrast mode) 4800:1 Brightness uniformity ANSI 85% Aspect Ratio 16:10 Lens type G LENS Lens range 1.22-1.53:1 (1.25X) 0.95-1.22:1 (1.28X) 1.52-2.92:1 (1.
7. Specifications Specifications PGWU-61B Keystone Correction Yes Ease of Use Simplified OSD menu + Remote control Inputs G/Y, B/Pb, R/Pr, H/C, V; VGA; CVBS; HDMI-1 v1.
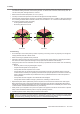
7. Specifications 7.4 Dimensions Projector Outer Dimensions 6.16 126.07 259.82 475.22 Front View Top View Rear View 155.11 112.68 184.79 364.00 160.00 95.00 293.00 216.20 241.20 Left Side View Right Side View Bottom View Dimensions given in millimeters. WARNING: yy Be sure to use the correct screw size. Screw size will vary depending on the thickness of the mounting plate. yy Be sure to keep at least 10 cm gap between the ceiling and the bottom of the projector.
7. Specifications 7.5 Compatibility Modes Signal Resolution NTSC PAL/SECAM Frequency H. (KHz) V. (Hz) Video Digital Analog -- 15.734 60 -- 15.625 50 640×350 31.5 70.1 640×400 37.9 85.1 640×480 31.
7. Specifications Signal HDTV Resolution Frequency H. (KHz) V. (Hz) Video Digital Analog 1920×1080 33.8 30 1920×1080 28.1 25 1920×1080i 28.125 50 1920×1080i 33.75 60 ○ ○ -------○ --○ --○ --- --○ ○ ○ ○ ○ ○ ○ -○ ○ -○ ○ -○ ○ --○ ○ ○ ○ ○ ○ ○ -○ ○ -○ ○ -○ ○ 1920×1080p 24 1920×1080p 25 1920×1080p 30 1920×1080p 50 1920×1080p 60 1280×720 SDTV 45 60 1280×720p 50 1280×720p 60 720×576 31.3 50 720×576i 15.625 50 720×576p 50 720×480 31.5 60 720×480i 15.
8. Environmental information 8. ENVIRONMENTAL INFORMATION Overview yy Disposal information yy RoHS compliance 8.1 Disposal information Disposal Information Waste Electrical and Electronic Equipment This symbol on the product indicates that, under the European Directive 2002/96/EC governing waste from electrical and electronic equipment, this product must not be disposed of with other municipal waste.
8. Environmental information 中国大陆RoHS (Information for China ROHS compliance) 根据中国大陆《电子信息产品污染控制管理办法》( 也称为中国大陆RoHS),以下部份列出了本产品中可能包含的有 毒有害物质或元素的名称和含量。 10 Table of toxic and hazardous substances/elements and their content, as required by China’s management methods for controlling pollution by electronic information products.
Production Address No.20, 3rd Ave, Kunshan Free Trade Zone, Jiangsu, P.R.