
User Guide


F-16290-7 © Copyright 2008 TAC All Rights Reserved. 7
8. Restore power to thermostat.
9. Recheck calibration about 30 minutes later to be sure heat from handling did not result
in erroneous setting.
Adjustments
Concealed Control
Dial
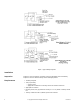
Knurled Dial Removal
See Figure-4.
1. Remove the thermostat cover.
2. Secure the control dial with your hand so that the dial does not rotate.
3. Place needle nose pliers on the knurled ring of the control dial at the points where the
knurled ring is attached to the control dial.
4. Twist the pliers at each knurled ring attachment point until the entire knurled ring of the
control dial is removed.
Figure-4 Knurled Dial Removal.
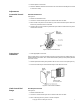
Cover Insert
Installation
1. Select appropriate cover insert.
Note: If blank insert is used, the knurled ring must be removed from the setpoint dial. See
Knurled Dial Removal section. Also, remove dial window by sliding and/or pressing window
from front of cover.
2. Remove protective backing and protective skin on face of cover insert (see Figure-5).
3. Press insert uniformly on thermostat with logo in lower left hand corner.
Figure-5 Cover Insert Installation.
Limit Control Dial
Range
Dial Stop Pin Insertion
See Figure-6.
1. Remove thermostat cover.
2. Secure the control dial with your hand so that the dial does not rotate.
3. Place a dial stop pin in the jaws of a needle nose pliers.