
User Guide


F-27169-6 © Copyright 2008 TAC All Rights Reserved. 9
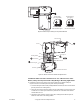
Installation: Mx51-710x Series Actuator to 1/2" to 2" VB-7xxx Series Valve
Bodies, 2-Way Stem-Up Closed and 3-Way Mixing or Diverting Applications
A. Preload the valve to insure proper close-off according to the numbered steps in
Figure-10 and the text below. (Remove power before proceeding.)
1. Locate the steel jam nut that came packaged with the actuator. (Do not re-use the brass
jam nut present on an existing valve.)
2. Screw the nut onto the valve stem all the way as far as it will go (you may need to use
a TOOL-20-1 or a 5/16” open-end wrench). At least 1/2” of the valve stem should
extend above the nut.
3. Thread the stem extension onto the valve stem, making contact with the jam nut.
Raise the valve stem to the full up position.
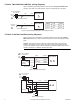
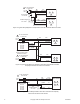
Actuator extends
with increased signal.
Direct Acting
(pins connected)
Actuator retracts
with increased signal.
Reverse Acting
(pins open)
Figure-9 RA/DA Jumper Setting for Proportional Models
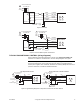
*Not included with actuator.
Valve Body*
Hex Mounting Nut*
Stem Extension
Mounting Bracket
Rack
Actuator
Manual Override
Connecting Pin
Jam Nut
Valve Stem*
Crank
5
3
4
6
1
2
Figure-10 Mx51-710x Series Actuator Exploded View