
Product Overview


F-15070-14 Copyright 2008 TAC All Rights Reserved. 7
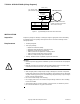
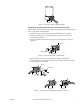
Figure-4 Connection of Wire Leads (No Conduit).
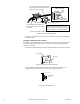
Installing 3/8" Flexible Conduit Onto One or Both Sides of Actuator
Flexible conduit may be installed onto one or both sides of the actuator (refer to Figure-6 and
Figure-7). Install each conduit as follows:
1. Determine the side of the actuator to which the flexible conduit is to be attached.
2. Remove the knockout (e.g., with channel lock pliers) on the selected side of the
actuator. Refer to Figure-5.
3. Make the required connections. Refer to Figure-1 for a wiring diagram of a typical
application.
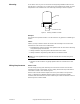
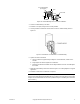
Figure-5 Removal of Knockout on Actuator Base.
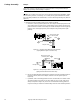
4. Slip the conduit onto the base, over the ribs. Refer to Figure-6 and Figure-7.
5. If flexible conduit is to be installed on both sides of the actuator, repeat the preceding
steps to install the second conduit.
Figure-6 Flexible Conduit Installation to Either Side of Actuator.
Base
Knockout
Ribs
Cover Plate
Base
or