
Installation Guide

Installation and Operating Instructions
Duct and Outside Air Humidity with Optional Temperature Sensor
Building Automation Products, Inc., 750 North Royal Avenue, Gays Mills, WI 54631 USA
Tel:+1-608-735-4800 • Fax+1-608-735-4804 • E-mail:sales@bapihvac.com • Web:www.bapihvac.com
49483_ins_duct_OSA_humidity
1 of 4
rev. 11/17/22
Overview
Duct and Outside Air Humidity Transmitters come in ±2%RH or ±3%RH accuracies and an optional temperature sensor.
The temperature sensor can be either a Thermistor or RTD. It can be ordered with a Weatherproof (WP), BAPI-Box (BB)
or BAPI-Box 2 (BB2) Enclosure. The transmitter can be wired for 0 to 5, 1 to 5, 0 to 10 or 2 to 10 VDC output or a loop
powered 4 to 20mA output.
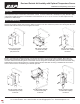
Duct Unit Mounting
Mount at least 3 duct diameters from humidiers in the center of the duct wall. Drill a 1 inch hole for the probe in the duct
and use two number 8 sheet metal screws to attach the sensor to the duct. Center the probe in its mounting hole. Be sure
that the foam seals the hole, do not over tighten the screws.
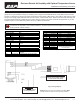
Mount in a permanently shaded area away from windows and doors. Do not mount in direct sunlight. Mount with the
sensor probe pointed down. Drill a hole large enough for your sensor cable through your mounting surface. Mount the
unit to the surface with the wiring knock out centered over the wiring hole. Pull the wiring into the unit and terminate using
sealant lled connectors. Best practice is to seal the wiring hole with caulk after the wiring is installed. Be sure that the
foam on the back of the unit makes a good weather tight seal.
Fig. 1: Duct Humidity
in a Weatherproof
(WP) Enclosure
Fig. 4: Outside Humidity
in a Weatherproof (WP)
Enclosure
Fig. 5: Outside Humidity
in a BAPI-Box (BB)
Enclosure
Fig. 6: Outside Humidity
in a BAPI-Box 2 (BB2)
Enclosure
Fig. 2: Duct Humidity
in a BAPI-Box (BB)
Enclosure
Fig. 3: Duct Humidity
in a BAPI-Box 2 (BB2)
Enclosure
Outside Air Mounting