
User guide


96815 v.3.0 15
3. Attach the window mount to your
Banks iQ. See Figure 5. Align and place
the two (2) lower tabs on the window
mount to the corresponding slots on the
bottom of Banks iQ first then snap the
top of Banks iQ into place.
NOTE: There may be a snug fit when
installing the Banks iQ into the window
mount. Take care not to force this
process.
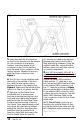
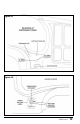
4. Find a suitable place on the
windshield for ease of access and
viewing of Banks iQ. Use location
shown in Figure 6 as a reference
for mounting Banks iQ in your
vehicle. Loosen the knob and move
the swivel suction plate to achieve
desired viewing angle of the Banks
iQ screen. Do a test fit and note the
angle necessary to achieve the correct
viewing angle.
5. Make sure the suction cup and the
mounting area on the windshield are
clean and dry. With the suction lever
in the up position, ensure the suction
cup is flat against the windshield, and
then push the suction lever down to
secure in place.
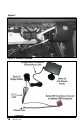
6. Next, remove and set the fuse
access panel aside. See Figure 6.
7. NOTE: This step completed in
Section 1 step 8 by 2001 thru 2004
(early) LB7 truck owners.
Locate the Banks OBD II Interface
Cable in your kit. This cable has
three connection points. Connect the
RED OBD II connector on the Banks
interface cable to the vehicle OBD II
connector. Use a cable tie as shown in
Figure 7 to secure the Banks interface
cable to the vehicle OBD II connector.
Next, connect the 6-pin connector on
the Banks OBD II interface cable to the
6-pin connector on the Six-Gun Tuner
harness.
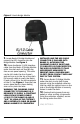
8. Locate the RJ12 Cable (similar to
telephone connector) on your Banks
OBDII interface cable. See Figure 8.
Figure 6 Mounting location for Banks iQ, Chevy LMM Shown