
Instruction Manual

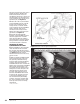


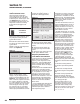

11. Connect the RJ12 cable into the
left-most receptacle on the bottom of
the Docking Station.
Warning: The charging cable on
the Docking Station is designed
to supply a constant low-
voltage power source (+5VDC)
to the Banks PowerPDA Vehicle
Command Center and is “live”
as long as the system’s OBD II
interface cable is completely
installed and the RJ12 connector
is plugged into the Docking
Station. Although this charging
cable is short and its circuitry
is fuse-protected, the user is
expected to take appropriate
measures to prevent small
children and/or pets from contact
with any part of this system.
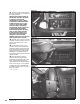
12. Refit the dash panel by carefully
snapping it back into place. Tuck any
excess cable behind it for a clean
appearance.
13. Your Docking Station is now
installed and is ready for the Banks
PowerPDA Vehicle Command Center.
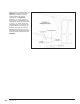
Install the Banks PowerPDA into the
Docking Station. Be sure the Banks
PowerPDA is completely seated in
the Docking Station against the lower
support bracket.
14. Plug the Docking Station’s
charging cable into the charging
receptacle on the lower edge of the
Banks PowerPDA. Reconnect the
ground cables to the vehicle batteries.
NOTE: There may be a snug fit when
installing the Banks PowerPDA into
the Docking Station. Take care not to
force this process.
-END, SECTION 6-
Figure 42
Figure 43
Figure 44
34 96776 v.11.0