
Instruction Manual

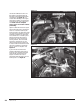


35. Check that the engine cooling
fan can freely spin without contacting
the lower fan shroud. If the fan
contacts the shroud, the shroud must
be realigned with the radiator. The
correct alignment is shown in
Figure 21. Each side of the shroud
should overlap the radiator headers,
and the mounting tabs should fit into
their respective bosses as shown in
Figure 21.
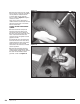
36. Secure the radiator to the Banks
CAC with the
5
⁄16”-18 by 1.0” long
bolts and large OD washers that were
supplied with the Banks system.
Tighten to 10-12 ft-lbs.
37. Install the lower driver side
radiator-retaining clamp that was
removed from the stock CAC and
secure with the
5
⁄16”-18 by 0.5” long
bolts and the smaller OD washers
that were supplied with the Banks
system. Tighten to 10-12 ft-lbs. The
passenger side clamp will contact
the battery support bracket, and is
optional to reinstall.
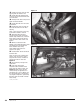
38. Tighten the 6 radiator cross
brace bolts to 80 in-lbs. Install the
diagonal fender support brace and
tighten the bolts.
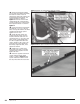
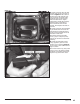
39. Insert the supplied round metal
spacers into the rubber shroud
gasket as shown in Figure 22. The
spacers should be inserted so that
the step mates with the cross brace.
Figure 22 Metal spacers installed in the shroud gasket
Figure 21 Lower fan shroud fitment with the radiator
22 96776 v.11.0