
Instruction Manual


EXHAUST SYSTEM INSTALLATION
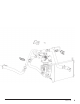
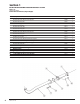
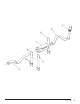
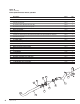
Use the Bill of Materials Chart
and Figure 1a or 1b to reference
component nomenclature and
location. Use caution when working
in the engine compartment. Make
sure the engine has been OFF for
several hours and cool.
1. Disconnect the ground of the
battery (if there is more than one
battery, disconnect both).
2. Raise the vehicle and support it
with properly weight rated safety
stands, ramps or a commercial hoist.
Follow the manufacturer’s safety
precautions. Take care to balance
the vehicle to prevent it from slipping
or falling. When using ramps, be
sure the front wheels are centered
squarely on the topsides; place the
transmission in park; set the parking
brake and place blocks behind the
rear wheels.
CAUTION: DO NOT WORK UNDER
ANY VEHICLE SUPPORTED ONLY
BY A JACK. SEVERE INJURY MAY
RESULT.
CAUTION: The following step
involves cutting a stainless steel
tube. Safety glasses should
be worn during any cutting
operation and care should be
taken to avoid injury due to sharp
edges and burrs.
3. Removal of the factory exhaust
can be simplified by cutting the
factory exhaust pipe behind the
muffler. This will allow the tailpipe to
be removed as a separate piece.
4. Remove the four (4) nuts from the
factory exhaust flange located at the
back side of the factory head pipe
(retain for re-use).
5. Remove the factory tailpipe
from the vehicle by disengaging the
exhaust system hanger pins from
the rubber grommets using a large
screw-driver or pry bar.
Note: Lubricating the rubber hangers
with WD-40 or similar lubricant will
ease removal of the hanger pins.
6. Remove the factory muffler
from the vehicle by disengaging
the hanger pins from the rubber
grommets using a large screwdriver
or pry bar.
Step 7 thru 10 for vehicles with no
catalytic converters only.
7. Spray penetrating oil such as WD-40
on the T-bolt of the factor V-band
clamp to prevent galling. Remove
factory
V-band clamp and save for re-use.
8. Remove factory head pipe from
the vehicle by disengaging the
exhaust system hanger pins from
the rubber hangers using a large
screwdriver or pry bar.
9. Install Banks head pipe in vehicle
and insert the hanger pin in the
rubber exhaust hanger.
NOTE: Be sure to install the hanger
pin in the same location as the
previously removed factory head
pipe.
10. Loosely install V-band clamp on
head pipe flange and only tighten
the T-bolt on the clamp to the point
that the pipe is snug but can still be
rotated in the clamp for adjustment/
alignment.
NOTE: Do not completely tighten the
V-band clamp at this point.
11. If the system is being installed
on an extended-cab vehicle, the
Banks flanged intermediate pipe
(53717) must be trimmed prior
to installation in the vehicle. For
extended-cab models, trim 9-
1
⁄2”
from the outlet of the intermediate
pipe such that 10” including the
flange is remaining. Once the cut has
been performed, debur the cut end
with a file or sandpaper. (See Figure
2).
12. Install the Banks flanged
intermediate pipe and 4-bolt gasket
onto the headpipe. Loosely assemble
with the four (4) factory nuts. Slide
the Banks 4-inch band clamp on
the outlet of the Banks 4-bolt flange
pipe.
Figure 2
Figure 3
10 96776 v.11.0