BeoLink Wireless 1 Guide
This class B digital apparatus meets all requirements of the Canadian Interference-Causing Equipment RISK OF ELECTRIC SHOCK Regulations. DO NOT OPEN The internal antennas used for this mobile transmitter must provide a separation distance of at least 20 cm CAUTION: To reduce the risk of (8") from all persons, and must not be co-located or electric shock, do not remove operating in conjunction with any other antenna or cover (or back). transmitter. No User-serviceable parts inside.
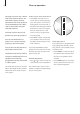
Contents Introduction, 4 This chapter provides you with an overview of the Wireless 1 system in the main room and the link room and describes the Master Link and Power Link setups. Close-up operation, 6 Find out how to switch on the Timer Play function and ‘listen in’ on a source playing on the main room system. Beo4 remote control, 7 Find out how to use the Beo4 remote control to access main room sources in a link room.
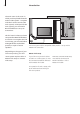
Introduction 4 The main room is the room in which you have placed the audio and/or video system – complete with their various sources (the main system). Connected to the main system, you will need a BeoLink Wireless 1 set up as transmitter. The link room is where you have set up another BeoLink Wireless 1 as receiver. To complete the link room setup, you will need either a Bang & Olufsen audio/video product, or a pair of active speakers.
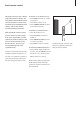
For information about installation of the BeoLink Wireless 1 system, refer to ‘Set up BeoLink Wireless 1’ (pp. 9–15) in this Guide. For information about how to set up the main room system and the link room products, refer to the Guides enclosed with the products. Link room system with active speakers and an ’IR-eye’ – set up with a Power Link connection . Power Link setup If your link room product is a pair of active speakers, they must be connected to BeoLink Wireless 1 with Power Link cables.
Close-up operation 6 This page concerns only a Power Link setup with an ‘IR-eye’. For information about close-up operation of link room products set up with Master Link cables, refer to the Guides enclosed with the products. The small circular ‘IR-eye’ has buttons for close-up operation. You can use the buttons to listen-in on a source currently playing on the main system. You can also use the buttons to adjust the sound volume.
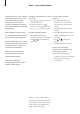
Beo4 remote control This page concerns only a Power Link setup with an ‘IR-eye’. For information about Beo4 remote control operation of link room products set up with Master Link cables, refer to the Guides enclosed with the products. With the Beo4 remote control you can switch on the sources from your main audio or video system you wish to listen to, and you can control functions for those sources – just as if you were operating your main system directly.
Beo4 – Sound adjustments 8 This page concerns only a Power Link setup with an ‘IR-eye’. For information about sound adjustments of link room products in Master Link setups, refer to the Guides enclosed with the products. To adjust sound volume or mute the sound … > Press or to adjust the sound volume up or down. > Press the middle of the button to mute the sound, and press or to restore the sound. With the Beo4 remote control you can adjust the sound coming out of the link room speakers.
Set up BeoLink Wireless 1 On the next pages is Before you start … explained how to install a set of – Make sure that Wireless 1 is set up BeoLink Wireless 1 – both in the in accordance with the instructions main room and in a link room. in this Guide.
>> Set up BeoLink Wireless 1 Wireless 1 – Transmitter/ receiver … Wireless 1 must be set up as either transmitter or receiver. Before fastening the transmitter and receiver to the wall, you must establish connection between them. This must be done while the units are located in the same room. The connection procedure described here must be performed for each receiver in a setup – one at a time.
Wireless 1 – wall mount Wireless 1 can be fastened to a wall (or ceiling) with one of the two enclosed brackets – in either a horisontal or a vertical position. It can be placed on the bracket so that the cables may be run either to the left or to the right. However, if you place Wireless 1 vertically on a wall, the cables must be run downwards – otherwise the bracket will not hold Wireless 1 safely! Use two screws and wall anchors, each with a minimum load rating of 1.6 kg (3.5 lbs.).
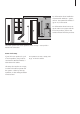
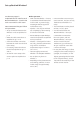
>> Set up BeoLink Wireless 1 Connections – Master Link In the main room: Connect the transmitter to the Master Link socket on the main system. Then connect both the main system and transmitter to the mains supply. Master Link connection R In the link room: Connect the audio or video product to the Master Link socket on the receiver. Then connect both the audio or video product and the receiver to the mains supply.
Master Link connection R ML IR PL PL Connections – Power Link In the main room: Connect the transmitter to the Master Link socket on the main system. Then connect both the main system and transmitter to the mains supply. T Receiver/Transmitter switch Main room Connection button Light indicator Link room Check the indicator light in the receiver to ensure that connection is still intact. If the connection is lost, the units must be moved.
>> Set up BeoLink Wireless 1 ‘IR-eye’ – cable connections The small circular ‘IR-eye’ is available from a Bang & Olufsen retailer. An ‘IR-eye’ must be used in each link room with a Power Link setup. Use the cable supplied with the ‘IR-eye’ and connect it as explained here: > Cut the cable to the required length (from the receiver to the ‘IR-eye’) and strip it as shown. > Insert the cable end through the cable clamp (A) and connect the leads to the terminals inside the ‘IR-eye’ in the order indicated.
D C D C B B B B C D ‘IR-eye’ – wall mount If the ‘IR-eye’ is placed next to a door and at a suitable height, you can easily switch on or off by closeup operation when entering or leaving the room. Likewise, if it is placed near your telephone, you can switch off the speakers while you are on the phone. > Use the wall plate as a template to mark up the holes on the wall. Insert the screws and wall anchors, but let the two screw heads protrude from the wall as shown (C/D).
Ready for use … 16 Option settings When you have made all the connections as described on the previous pages or in the Guides enclosed with your link room products, you may start to use the system. However, in order for your setup to function properly, you must Option program your link room products. On this page you can find out which Options to use in your Power Link setup.
Use a Beo4 remote control to set the Option. The entire system must be switched to standby: > While holding down the • button, press LIST. > Let go of both buttons. > Press LIST repeatedly until OPTION? is shown in the Beo4 display, and press GO. > Press LIST repeatedly until L.OPT is shown in the Beo4 display, and then key in the appropriate number (0, 4, 5, or 6).
Waste Electrical and Electronic Equipment (WEEE) – Environmental protection The European Parliament and the Products and equipment which Council of the European Union must be collected for reuse, have issued the Waste Electrical recycling and other forms of and Electronic Equipment Directive. recovery are marked with the The purpose of the Directive is the pictogram shown.
This product is in conformity with the provisions of the Directives 1999/5/EC and 2006/95/EC. This product may be used in member states of the EEU and EFTA.
www.bang-olufsen.