Beo4 Guide
Contents Using your Beo4 remote control, 4 Beo4 buttons in detail, 6 • Daily and advanced operation with Beo4 buttons Customise Beo4, 9 • Set up Beo4 • Add an extra ‘button’ • Move extra ‘buttons’ • Remove an extra ‘button’ • Configure Beo4 for use with another audio or video system Maintenance, 16 • Cleaning the Beo4 • Changing the batteries Technical specifications, features and the use thereof are subject to change without notice.
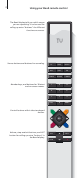
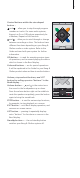
Using your Beo4 remote control The Beo4 display tells you which source you are operating. It is also used for calling up extra “buttons” for different functions or sources. Source buttons and buttons for recording. Number keys; and buttons for Teletext and on-screen menus. TV LIGHT RADIO DTV DVD CD V MEM RECORD A MEM 7 8 9 4 5 6 1 2 3 TEXT 0 MENU Control buttons within the star-shaped button.
The Beo4 is a hand-held remote control which gives easy access to remote operation of your Bang & Olufsen audio and/or video system. Daily operations are carried out by pressing a single button on the Beo4, or by pressing a few buttons in a logical and straightforward sequence.
Beo4 buttons in detail … TV LIGHT RADIO DTV DVD CD V MEM RECORD A MEM 7 8 9 V MEM RECORD A MEM 7 8 9 4 5 6 1 2 3 TEXT 0 MENU Daily and advanced operation with Beo4 buttons The buttons on the Beo4 remote control are conveniently grouped for daily operation … Source buttons … TV, DTV (SAT*), V MEM (V TAPE*), RADIO, DVD, CD, A MEM (A TAPE*), and LIGHT are used for switching on your Bang & Olufsen audio and video products, other audio/video integrated systems and the Bang & Olufse
Control buttons within the star-shaped button … and … allow you to step through program numbers or tracks. On some audio systems, they act as On or Off buttons respectively for a Random, Repeat or Edit function. and … allow you to wind through or change between recordings or discs. The buttons have different functions depending on your Bang & Olufsen audio or video system. Refer to the Guide enclosed with your system for further information.
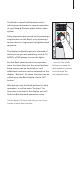
Customise Beo4 … The Beo4 buttons give direct remote control of a large number of functions, and the Beo4 display gives you access to even more functions. Whenever a source is displayed on Beo4 (TV, RADIO, etc.), you can press the LIST button and bring up extra functions in the display to help you operate that source, just as if you were calling up extra buttons. You can also switch on extra equipment connected to your television.
>> Customise Beo4 … Set up Beo4 If you buy a new Beo4 you can set it up for your television or also. > Press and hold the standby button down. > Press LIST to get access to the Beo4 setup function. > Let go of both buttons. ADD? appears in the display. > Press LIST repeatedly to display CONFIG? on Beo4. > Press GO to be able to select the type of configuration. > Press LIST repeatedly to display VIDEO? on Beo4. > Press GO to get access to the video configuration.
Add an extra ‘button’ to Beo4, either to the top of the list or to a specific position. GO 3 Add an extra ‘button’ When you add a new function to the Beo4 list, you can then bring up this new ‘button’ in the Beo4 display. > Press and hold the standby button down. > Press LIST to get access to the Beo4 setup function. > Let go of both buttons. ADD? appears in the display. > Press GO to bring up the list of available ‘buttons’ to add from.
>> Customise Beo4 … Move extra ‘buttons’, either to the top of the list or to a specific position. GO 3 Move extra ‘buttons’ You can rearrange the order in which the extra ‘buttons’ appear when you press LIST. > Press and hold the standby button down. > Press LIST to get access to the Beo4 setup function. > Let go of both buttons. ADD? appears in the display. > Press LIST repeatedly to display MOVE? on Beo4. > Press GO to bring up the list of extra ‘buttons’.
Remove an extra ‘button’ You can remove any of the extra ‘buttons’ that are available when you press LIST. > Press and hold the standby button down. > Press LIST to get access to the Beo4 setup function. > Let go of both buttons. ADD? appears in the display. > Press LIST repeatedly to display REMOVE? on Beo4. > Press GO to bring up the list of extra ‘buttons’. The first ‘button’ appears in the display. > Press or to move forwards or backwards in the list of extra ’buttons’.
>> Customise Beo4 … Configure Beo4 for use with another audio or video system Your Beo4 is configured for VIDEO4 from the factory, but you can configure Beo4 for use with any type of Bang & Olufsen audio or video system. To be able to reconfigure Beo4 … > Press and hold the standby button down. > Press LIST to get access to the Beo4 setup function. > Let go of both buttons. ADD? appears in the display. > Press LIST repeatedly to display CONFIG? on Beo4.
VIDEO1: BeoVision 9, BeoVision 5, BeoVision 4, BeoSystem 1, BeoVision 3 – 32inch screen, BeoVision Avant, BeoCenter AV5, BeoCenter AV 9000, Earlier BeoVision MX models VIDEO2: BeoVision 6, BeoVision 3 – 28-inch screen, BeoVision 1, BeoVision 1 Link, BeoCenter 1, BeoVision MX4200/8000 VIDEO3: Video products for the American Taiwanese markets VIDEO4: BeoVision 8, BeoSystem 3 AUDIO1: Audio systems other than BeoSound 9000 AUDIO2: BeoSound 9000 AUDIO BASIC: all audio systems other than BeoSound 9000 BS9000
Maintenance … Cleaning the Beo4… Wipe the Beo4 remote control with a soft, lint-free, wet cloth which is wrung firmly. 2 1 Changing the batteries When BATTERY appears in the Beo4 display, it is time to change the batteries in the remote control. 3 2 1 CAUTION! Do not expose batteries to excessive heat such as sunshine, fire or the like! The Beo4 requires three batteries (placed under the lid on the back). We recommend that you use 1.5 volt (size AAA) Alkaline batteries only.
English (English) Electrical and electronic equipment, parts and batteries marked with this symbol must not be disposed of with normal household wastage, it must be collected and disposed of separately to protect the environment. Your Bang & Olufsen retailer will advise you of the correct way of disposal in your country. If a product is too small to be marked with the symbol, it will appear in the User Guide, on the Guarantee certificate, or on the packaging.
3501025 0912