ΕΓΧΕΙΡΙΔΙΟ ΧΡΗΣΗΣ USER MANUAL BENUTZERHANDBUCH MANUEL D’UTILISATION GR Αφού διαβάσετε το παρόν εγχειρίδιο φυλάξτε το σε άμεσα προσβάσιμο μέρος για μελλοντική χρήση. EN After reading this manual, keep it in an immediately accessible place for future reference. DE Nachdem Sie dieses Handbuch gelesen haben, bewahren Sie es zum späteren Nachschlagen an einem sofort zugänglichen Ort auf. FR Après avoir lu ce manuel, conservez-le dans un endroit immédiatement accessible pour référence future.
ΕΛΛΗΝΙΚΑ GR ΠΙΝΑΚΑΣ ΠΕΡΙΕΧΟΜΕΝΩΝ 1. ΕΙΣΑΓΩΓΗ .................................................................................................................5 2. ΜΕΤΑΦΟΡΑ...............................................................................................................5 3. ΕΓΚΑΤΑΣΤΑΣΗ...........................................................................................................6 3.1. ΧΩΡΟΣ ΕΓΚΑΤΑΣΤΑΣΗΣ ...............................................................................
GR 4
ΕΛΛΗΝΙΚΑ ΕΓΧΕΙΡΙΔΙΟ ΧΡΗΣΗΣ GR 1. ΕΙΣΑΓΩΓΗ ΣΑΣ ΕΥΧΑΡΙΣΤΟΥΜΕ για την εμπιστοσύνη που μας δίνεται με την αγορά της συσκευής ψύξης. Το παρών εγχειρίδιο έχει δημιουργηθεί για την ασφάλεια του χρήστη και για να διασφαλίσει τη σωστή χρήση και συντήρηση των ψυγείων. Πριν προχωρήσετε σε οποιοδήποτε χειρισμό, τόσο ο τεχνικός εγκατάστασης όσο και ο χρήστης της συσκευής, θα πρέπει να λάβουν υπόψη τα σημεία που επεξηγούνται στο παρών εγχειρίδιο.
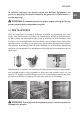
3. ΕΓΚΑΤΑΣΤΑΣΗ GR 3.1. ΧΩΡΟΣ ΕΓΚΑΤΑΣΤΑΣΗΣ Τοποθετήστε την συσκευή σε ένα χώρο καλά αεριζόμενο και μακριά από πηγές θερμότητας. Για καλή λειτουργία του ψυγείου, αποφύγετε την τοποθέτηση του σε χώρο με χαμηλότερή θερμοκρασία περιβάλλοντος των +10 °C και υψηλότερη των +40 °C. Προσέξτε κατά την τοποθέτηση οι περσίδες εξαερισμού της συσκευής να παραμένουν ανοιχτές.
ΕΛΛΗΝΙΚΑ Τα καλώδια παροχής στα ψυγεία πάγκοι και θάλαμοι βρίσκονται στο χώρο της μηχανής (στα ψυγεία πάγκους θα χρειαστεί να ξεβιδώσετε το καπάκι μηχανής) ΠΡΟΣΟΧΗ: Ο κατασκευαστής δεν φέρει καμία ευθύνη αν δεν τηρείται κάποιο από τα παραπάνω σημεία. 3.3. ΠΡΙΝ ΤΗ ΛΕΙΤΟΥΡΓΙΑ Πριν την εκκίνηση λειτουργίας βιδώστε τα πόδια της συσκευής στις υποδοχές που βρίσκονται στη βάση της. Αλφαδιάστε τα πόδια ξεβιδώνοντας το κάτω μέρος στο επιθυμητό ύψος ώστε η συσκευή να είναι σταθερή.
4. ΛΕΙΤΟΥΡΓΙΑ GR 4.1 ΣΩΣΤΗ ΛΕΙΤΟΥΡΓΙΑ ΤΗΣ ΣΥΣΚΕΥΗΣ Đ Đ Đ Đ Đ Đ Đ Đ Đ Đ Κάθε συσκευή έχει σχεδιαστεί για ένα συγκεκριμένο εύρος θερμοκρασίας. Μην τοποθετείτε θερμά προϊόντα μέσα στο ψυγείο. Μην τοποθετείτε συσκευές θέρμανσης (ψησταριές– φούρνους και άλλες συσκευές υγραερίου η ηλεκτρικές) επάνω στη συσκευή εάν αυτές δεν έχουν ποδαρικά τουλάχιστον 5cm ύψος. Ψησταριές τύπου καρβουνιέρας δεν πρέπει να τοποθετούνται επάνω στη συσκευή χωρίς να έχει τοποθετηθεί θερμομονωτική επιφάνεια στο ενδιάμεσο.
ΕΛΛΗΝΙΚΑ ΠΡΟΣΟΧΗ: Μην αποθηκεύετε ηλεκτρικές συσκευές μέσα στο χώρο ψύ- GR ξης. ΠΡΟΣΟΧΗ: Μην αποθηκεύετε εκρηκτικές ουσίες, όπως δοχεία αεροζόλ με εύφλεκτο προωθητικό, σε αυτήν τη συσκευή. ΠΡΟΣΟΧΗ: Μην κάνετε ζημιές στο ψυκτικό κύκλωμα. ΠΡΟΣΟΧΗ: Μην χρησιμοποιείτε ηλεκτρικές συσκευές μέσα στο χώρο αποθήκευσης τροφίμων της συσκευής, εκτός αν είναι τύπου που συνιστά ο κατασκευαστής. ΠΡΟΣΟΧΗ: Η πρίζα στην οποία συνδέετε τη συσκευή σας πρέπει να διαθέτει απαραίτητα γείωση.
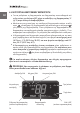
4.2 ΛΕΙΤΟΥΡΓΙΑ ΗΛΕΚΤΡΟΝΙΚΟΥ ΘΕΡΜΟΣΤΑΤΗ GR Đ Đ Đ Đ Για να ρυθμίσετε τη θερμοκρασία του θερμοστάτη στα επιθυμητά επίπεδα πιέστε το πλήκτρο SET μέχρι οι ενδείξεις της θερμοκρασίας °C (ή °F) στην οθόνη να αναβοσβήσουν. Μετέπειτα για να πετύχετε την επιθυμητή θερμοκρασία πιέστε το πλήκτρο για αύξηση της θερμοκρασίας και αντίστοιχα το πλήκτρο για μείωση της θερμοκρασίας. Όταν ρυθμίσετε την θερμοκρασία του θερμοστάτη στα επιθυμητά επίπεδα περιμένετε μέχρι η ένδειξη °C να σταματήσει να αναβοσβήνει.
ΕΛΛΗΝΙΚΑ ΗΛΕΚΤΡΟΛΟΓΙΚΗ ΣΥΝΔΕΣΜΟΛΟΓΙΑ ΘΕΡΜΟΣΤΑΤΗ XR03CH GR ΗΛΕΚΤΡΟΛΟΓΙΚΗ ΣΥΝΔΕΣΜΟΛΟΓΙΑ ΘΕΡΜΟΣΤΑΤΗ XR06CH BMB 11
5. ΣΥΝΤΗΡΗΣΗ GR ΠΡΟΣΟΧΗ: Πριν από κάθε διαδικασία συντήρησης βγάζουμε την συσκευή από το ρεύμα. Η συντήρηση της συσκευής είναι πολύ σημαντική για να διασφαλίζεται η σωστή της λειτουργία και η αντοχή της συσκευής στο χρόνο. Đ Đ Đ Καθαρίζουμε τακτικά το εσωτερικό του ψυγείου ώστε να αποφύγουμε τη δημιουργία δυσάρεστων οσμών. Καθαρίζουμε το συμπυκνωτή του ψυγείου κάθε 6 μήνες από σκόνες και σκουπίδια που τυχόν μαζεύτηκαν σε αυτόν.
ΕΛΛΗΝΙΚΑ Για καλύτερη απομάκρυνση της σκόνης καθαρίστε τον συμπυκνωτή με σπρέι πεπιεσμένου αέρα. Έπειτα μπορείτε να χρησιμοποιήσετε κάποια ηλεκτρική σκούπα για την απομάκρυνση της σκόνης από το χώρο της μηχανής. Μετά το τέλος του καθαρισμού ελέγξτε με ένα φακό τον συμπυκνωτή για τυχόν εναπομείναντες βρομιές. GR ΚΑΘΑΡΙΣΜΟΣ ΣΥΜΠΥΚΝΩΤΗ ΓΙΑ ΨΥΓΕΙΟ / ΚΑΤΑΨΥΞΗ ΘΑΛΑΜΟΣ Στα όρθια ψυγεία θάλαμοι ο συμπυκνωτής βρίσκεται στο επάνω μέρος (μηχανή επάνω) ή στη βάση του (μηχανή κάτω).
GR Για βίντεο με οδηγίες καθαρισμού και συντήρησης επισκεφτείτε το κανάλι μας στο YOUTUBE ( ) bambas frost ΠΡΟΣΟΧΗ: Η σκόνη συσσωρεύεται στο πίσω μέρος του συμπυκνωτή. Μετά από κάθε καθαρισμό ελέγξτε εάν απομακρυνθήκαν όλες οι σκόνες στο εσωτερικό πίσω μέρος του συμπυκνωτή. 6. ΚΛΙΜΑΤΙΚΗ ΚΛΑΣΗ Συνθήκες περιβάλλοντος κλιματικών κλάσεων 3, 4 και 5 Κλιματική κλάση χώρου δοκιμής Θερμοκρασία ξηρού βολβού, °C Σχετική υγρασία, % 3 25 60 4 30 55 5 40 40 7.
ΕΛΛΗΝΙΚΑ 8. ΤΕΧΝΟΛΟΓΙΑ SMART GR Στις Νέες συσκευές με τεχνολογία smart μπορείτε να ελέγχετε το επαγγελματικό σας ψυγείο μέσω της εφαρμογής που έχετε στο κινητό σας. Đ Σας δίνεται η δυνατότητα να παρακολουθείτε τη θερμοκρασία της συσκευής σε πραγματικό χρόνο. Đ Σας παρέχει ιστορικό και καταγραφή των θερμοκρασιών. Đ Σας αποστέλλει ειδοποίηση για υψηλή θερμοκρασία στη συσκευή. Đ Ελέγξτε πολλές συσκευές μέσω της ίδιας εφαρμογής Đ Σας αποστέλλει ειδοποίηση σε περίπτωση διακοπής ρεύματος.
8.1 ΕΓΚΑΤΑΣΤΑΣΗ ΣΥΣΚΕΥΗΣ ΣΕ ΔΙΚΤΥΟ WI-FI GR Βήμα 1: Εγκαταστήστε στο κινητό σας τηλέφωνο μέσω του google play την εφαρμογή bambasfrost. Βήμα 2: Δημιουργήστε ένα λογαριασμό την εφαρμογή. Βήμα 3: Επιλέξτε add device και with camera έπειτα σκανάρετε τον κωδικό QR που βρίσκεται κολλημένος στη συσκευή σας και συνδέστε τη συσκευή στο Wi-Fi σας βάζοντας τον κωδικό του Wi-Fi. Πλέον η συνδεδεμένη συσκευή βρίσκεται στο μενού My devices και σε λίγα λεπτά θα έχετε ενδείξεις καταγραφής.
ΕΛΛΗΝΙΚΑ 9. ΕΠΙΣΚΕΥΕΣ ΚΑΙ ΒΛΑΒΕΣ GR Κάποιες φορές δεν χρειάζεστε υποχρεωτικά τεχνικό για να διορθώσετε κάποια προβλήματα που τυχόν να προκύψουν στην συσκευή. Παρακάτω παραθέτουμε μερικά προβλήματα και τις λύσεις τους. Βλάβες δεν θεωρούνται ζημιές σε γυάλινες επιφάνειες, σε λάμπες, καθώς επίσης και στο μηχανολογικό μέρος από υπαιτιότητα διανομής ρεύματος και αυξομειώσεις τάσης.
GR Η συσκευή κάνει θόρυβο Η συσκευή χάνει νερά Đ Đ Đ Đ Đ Αλφαδιάστε τη συσκευή. Ελέγξτε εάν έρχεται σε επαφή με άλλες συσκευές και προκαλούν ακουστικό συντονισμό. Έχει καεί η αντίσταση της λεκάνης εξάτμισης (ψυγεία θάλαμοι). Σκουπίδια έχουν βουλώσει το σωληνάκι της αποχέτευσης του στοιχείου. Φυσήξτε με σπρέι αέρα μέσα σε αυτό για να καθαρίσει, μόνο για νερά στο εσωτερικό. (ψυγεία πάγκοι).
ΕΛΛΗΝΙΚΑ ΗΜΕΡΟΛΟΓΙΟ ΣΥΝΤΗΡΗΣΗΣ GR Η συντήρηση της συσκευής είναι πολύ σημαντική για να διασφαλίζεται η σωστή της λειτουργία και η αντοχή της συσκευής στο χρόνο. Η διαδικασία της συντήρησης πρέπει να εκτελείται ανά 6 μήνες και στον παρακάτω πίνακα μπορείτε να καταγράφετε τη διαδικασία. Για να δείτε λεπτομέρειες για τον τρόπο συντήρησης ανατρέξτε στην ενότητα 5. Συντήρηση του παρόντος εγχειρίδιου. ΠΡΟΣΟΧΗ: Πριν από κάθε διαδικασία συντήρησης βγάζουμε την συσκευή από το ρεύμα.
Ημερομηνία συντήρησης GR 20 Καθαρισμός συμπυκνωτή Καθαρισμός χώρου μηχανής Καθαρισμός / Επιθεώρηση λάστιχα πόρτας
ENGLISH EN TABLE OF CONTENTS 1. INTRODUCTION ....................................................................................................23 2. TRANSPORT ...........................................................................................................23 3. INSTALLATION .......................................................................................................24 3.1. LOCATION REQUIREMENTS ..........................................................................24 3.
EN 22
ENGLISH USER MANUAL EN 1. INTRODUCTION THANK YOU for your confidence by buying this product. This manual has been prepared to safeguard the security of the user and ensure the correct use and maintenance of the refrigerated units. Before carrying out any operation, whether as installation technician or as the user of the unit, you should be aware of the points explained in this manual. At the delivery you should always check for any damages may be caused during the transport.
3. INSTALLATION 3.1. LOCATION REQUIREMENTS EN Place the product in a well aired area and far from warm sources. Do not install the refrigerator in a location where the temperature will fall below +10 °C (50 °F) and exceed +40 °C (104 °F). Be careful at the final installation of the refrigerator, the ventilation grilles should not be covered. Do not leave the appliance exposed at the sun, if it is installed in external place, it should be protected from the weather circumstances.
ENGLISH The power cord of the counter refrigerators and cabinets is placed in the inside motor area. (in counter refrigerators you should first unscrew the motor door). ATTENTION: The manufacturer disclaims all liability if any of the above points are not followed. EN 3.3. BEFORE USE Before use you should screw the feet of the appliance in the sockets underneath the appliance. Level the feet by unscrew in the desire height until to stabilize the appliance.
4. REFRIGERATOR OPERATION 4.1 CORRECT USE OF THE APPLIANCE Đ Đ EN Đ Each appliance is designed for a certain temperature range. You should not place warm food or drinks that are not in sealed packages. Do not place any hot devices (ovens – liquid gas or electric appliances) above the product, unless they have 5cm height feet. Barbeques – should not be placed above the product without insulating surface in the middle. Đ Keep the electrical parts of the refrigerator safe and dry.
ENGLISH WARNING: Do not use electrical appliances inside the food storage WARNING: Do not store explosive substances such as aerosol cans with a flammable propellant in this appliance WARNING: Do not damage the refrigerant circuit WARNING: Do not use electrical appliances inside the food storage compartments of the appliance, unless they are of the type recommended by the manufacturer. WARNING: The power socket that your appliance will be connected must be provided with ground (earth) wire.
4.2 TEMPERATURE CONTROLLER OPERATION Đ Đ EN Đ Đ To adjust set point temperatures to the desired level, press and hold the SET button until the indications °C (or °F) at the temperature display blink. Then press the button to increase the temperature and the button to decrease the temperature. When you adjust the controller at the desired temperature, wait until the indication °C stops blinking or press set button to set up. The settings will be saved automatically.
ENGLISH ELECTRICAL WIRING FOR CONTROLLER XR03CH EN ELECTRICAL WIRING FOR CONTROLLER XR06CH BMB 29
5. MAINTENANCE ATTENTION: Before of any act of maintenance, remove the plug from the power supply. The maintenance of the appliance is very important in order to ensure correct function of the machine and its durability in time. EN Đ Đ Đ Clean regularly the internal of the refrigerator to avoid buildup of odors. To ensure maximum efficiency, clean the condenser every 6 months from any dust or garbage that has been collected in it.
ENGLISH For better dust removal, clean the condenser with compressed air spray. Then you may use a vacuum cleaner to remove the dust from the motor area. At the end of any act, check the condenser for any persistent dust. EN CLEANING OF CONDENSER FOR CABINET REFRIGERATOR / FREEZER At the upright refrigerators, the condenser area is on the top or below part of the cabinet (depending on the models).
( For more information regarding the cleaning, please visit YOUTUBE ) bambas frost ATTENTION: The dust is usually accumulated in the back of the condenser. After every cleansing, please check if the back surface of the condenser is all clean. EN 6. CLIMATE CLASS Ambient conditions of climate classes 3, 4 and 5 Test room climate class Dry bulb temperature, °C Relative humidity, % 3 25 60 4 30 55 5 40 40 7.
ENGLISH 8. SMART TECHNOLOGY The new generation appliances are smart technology appliances, the professional refrigerators can be monitored by a smart phone app.
8.1 DEVICE INSTALLATION IN WI-FI Step 1: Install the application ‘’bambas frost’’ via google play. Step 2: Create an account. EN Step 3: Choose ‘’add device’’ and ‘’with camera’’then scan the QR code which is on the appliance and make the Wi-Fi connection by entering the Wi-Fi code. After these steps your device should be in menu My devices at the following minutes you will have recording data. ATTENTION: The device is compatible only with Android devices.
ENGLISH 9. TROUBLESHOOTING A technician is not always needed to solve some problems. First, try the solutions suggested below to possibly avoid the cost of a service call. Damages and losses are not considered this which concern broken glasses and lamps, mechanical damages caused by voltage fluctuation or by problems in the electricity.
Appliance is very noisy Appliance has leak Đ Đ Đ Đ EN Đ Level the appliance. Check if the appliance is flat with other appliances and provokes acoustic tuning. Resistance has burned out (call the technician). Garbage has stopped in the tube of the evaporator drainage system. Use compressed air to clean the tube (only for internal leak) Empty the small basin which collects water under the machine and put it back.
ENGLISH SERVICE CALENDAR The maintenance of the appliance is very important to insure the appliance proper operation and low energy consumption. Maintenance should be done every 6 months. For maintenance instructions check the section 5. The table below will help you to truck and record the maintenance schedule. ATTENTION: Before of every maintenance remove the appliance from the power supply.
Maintenance date EN 38 Condenser clean Engine department cleaning Cleaning and inspection of doors gaskets
DEUTSCH INHALTSVERZEICHNIS 1. EINLEITUNG...........................................................................................................41 2. TRANSPORT ...........................................................................................................41 3. MONTAGE ..............................................................................................................42 3.1. ANFORDERUNGEN AN DIE AUFSTELLUNG .................................................42 3.
DE 40
DEUTSCH BENUTZERHANDBUCH 1. EINLEITUNG WIR BEDANKEN uns für Ihr Vertrauen beim Kauf dieses Produkts. Dieses Handbuch wurde erstellt, um die Sicherheit des Benutzers zu gewährleisten und die ordnungsgemäße Verwendung und Wartung der Kühlgeräte sicherzustellen. Bevor Sie als Montagetechniker oder als Verwender des Geräts Arbeiten an diesem Gerät vornehmen, sollten Sie sich mit den in dieser Anleitung erläuterten Punkten vertraut machen.
3. MONTAGE 3.1. ANFORDERUNGEN AN DIE AUFSTELLUNG Stellen Sie das Produkt an einem gut belüfteten Ort und fern von Wärmequellen auf. Stellen Sie den Kühlschrank nicht an einem Ort auf, an dem die Temperatur unter +10 °C (50 °F) fallen oder +40 °C (104 °F) überschreiten könnte. Achten Sie bei der endgültigen Montage des Kühlschranks darauf, dass die Lüftungsgitter nicht verdeckt werden. Das Gerät darf nicht der Sonne ausgesetzt sein.
DEUTSCH Das Stromkabel der Thekenkühlschränke und der Schränke befindet sich im Innenraum des Motors. (bei Thekenkühlschränken müssen Sie zuerst die Tür zum Motor abschrauben). ACHTUNG: Der Hersteller lehnt jegliche Haftung ab, wenn einer der oben genannten Punkte nicht beachtet wird. 3.3. VOR DER ERSTEN VERWENDUNG Vor der ersten Verwendung sollten Sie die Füße des Geräts in die Gewinde unter dem Gerät einschrauben.
4. BETRIEB DES KÜHLSCHRANKS 4.1 ORDNUNGSGEMÄSSE VERWENDUNG DES GERÄTS Đ Đ Đ Đ DE Đ Đ Đ Đ Đ Đ Jedes Gerät ist für einen bestimmten Temperaturbereich ausgelegt. Sie sollten keine warmen Speisen oder Getränke in nicht verschlossenen Verpackungen hineinstellen. Stellen Sie keine heißen Geräte (Öfen - Flüssiggas- oder Elektrogeräte) über dem Produkt auf, es sei denn, sie haben Füße, die mindestens 5 cm hoch sind. Grills - dürfen nicht ohne eine isolierende Oberfläche über dem Produkt aufgestellt werden.
DEUTSCH WARNUNG: Verwenden Sie keine elektrischen Geräte im Inneren des Bereichs für die Lebensmittellagerung WARNUNG: Bewahren Sie keine explosiven Stoffe wie Spraydosen mit brennbarem Treibmittel in diesem Gerät auf WARNUNG: Beschädigen Sie den Kältemittelkreislauf nicht WARNUNG: Benutzen Sie keine elektrischen Geräte in den für die Lebensmittelaufbewahrung bestimmten Fächern des Geräts, wenn diese nicht vom Hersteller empfohlen wurden.
4.2 BETRIEB DES TEMPERATURREGLERS Đ Đ Đ DE Đ Um die Soll-Temperaturen auf die gewünschte Stufe einzustellen, halten Sie die SET-Taste gedrückt, bis die Angaben °C (oder °F) auf der Temperaturanzeige blinken. Drücken Sie dann die Taste , um die Temperatur zu erhöhen. Drücken Sie die Taste , um die Temperatur zu senken. Wenn Sie den Regler auf die gewünschte Temperatur eingestellt haben, warten Sie, bis die Anzeige °C nicht mehr blinkt, oder drücken Sie die SET-Taste, um die Einstellung vorzunehmen.
DEUTSCH STROMVERSORGUNG FÜR DIE STEUERUNG XR03CH DE STROMVERSORGUNG FÜR DEN REGLER XR06CH BMB 47
5. WARTUNG ACHTUNG: Ziehen Sie vor jeder Wartungsmaßnahme den Stecker aus der Steckdose. Die Wartung des Geräts ist sehr wichtig, um die ordnungsgemäße Funktion des Geräts und seine Langlebigkeit zu gewährleisten. Đ Đ Đ DE Reinigen Sie das Innere des Kühlschranks regelmäßig, um Geruchsbildung zu vermeiden. Zur Gewährleistung maximaler Effizienz sollten Sie den Kondensator alle 6 Monate von Staub und Abfällen reinigen, die sich darin angesammelt haben.
DEUTSCH Für ein besseres Entfernen von Staub reinigen Sie den Kondensator mit einem Druckluftspray. Anschließend können Sie einen Staubsauger verwenden, um den Staub aus dem Motorbereich zu entfernen. Prüfen Sie den Kondensator am Ende jeder Reinigung auf hartnäckigen Staub. REINIGUNG DES KONDENSATORS BEI KÜHL-/GEFRIERSCHRÄNKEN DE Bei den aufrecht stehenden Kühlschränken befindet sich der Kondensator im oberen oder unteren Teil des Gehäuses (je nach Modell).
Für weitere Informationen zur Reinigung des Geräts besuchen Sie ) bambas frost bitte YOUTUBE ( ACHTUNG: Der Staub sammelt sich meist auf der Rückseite des Kondensators. Prüfen Sie nach jeder Reinigung, ob die Rückseite des Kondensators vollständig gereinigt ist. 6. KLIMAKLASSE Umgebungsbedingungen der Klimaklassen 3, 4 und 5 DE Testraumklima-Klasse Trockenkugeltemperatur, °C Relative Luftfeuchtigkeit, % 3 25 60 4 30 55 5 40 40 7.
DEUTSCH 8. INTELLIGENTE TECHNOLOGIE Die Geräte der neuen Generation sind Geräte mit intelligenter Technologie, die professionellen Kühlschränke können über eine Smartphone-App kontrolliert werden.
8.1 INSTALLATION DES GERÄTS IM WLAN Schritt 1: Installieren Sie die App „bambas frost“‚ über Google Play. Schritt 2: Erstellen sie ein Konto. Schritt 3: Wählen Sie „Gerät hinzufügen“ und „mit Kamera“, scannen Sie dann den QR-Code auf dem Gerät und stellen Sie die Wi-Fi-Verbindung her, indem Sie den WLAN-Code eingeben. Nach diesen Schritten sollte Ihr Gerät im Menü „Meine Geräte“angezeigt werden. Nach wenigen Minuten werden die Daten aufgezeichnet.
DEUTSCH 9. STÖRUNGSBESEITIGUNG Für die Lösung von Problemen ist nicht immer ein Techniker erforderlich. Probieren Sie zunächst die nachfolgend vorgeschlagenen Lösungen aus, um eventuell die Kosten für einen Technikerbesuch zu vermeiden. Nicht berücksichtigt werden Schäden und Verluste, die durch zerbrochene Gläser und Lampen, mechanische Schäden durch Spannungsschwankungen oder durch Probleme in der Stromversorgung entstehen.
Innenbeleuchtung funktioniert nicht Đ Đ Das Gerät ist sehr laut Gerät hat ein Leck Đ Đ Đ Đ DE Đ Prüfen Sie, ob der Ein/Aus-Schalter der Beleuchtung eingeschaltet ist (falls vorhanden). Die Glühbirne ist durchgebrannt (trennen Sie das Gerät von der Stromversorgung und ersetzen Sie die Glühbirne). Stellen Sie das Gerät gerade auf. Prüfen Sie, ob das Gerät direkt neben anderen Geräten steht und dadurch Geräusche hervorgerufen werden Die Sicherung ist durchgebrannt (rufen Sie einen Techniker).
DEUTSCH WARTUNGSKALENDER Die Wartung des Geräts ist sehr wichtig, um den ordnungsgemäßen Betrieb des Geräts und einen niedrigen Energieverbrauch zu gewährleisten. Wartungen sollten alle 6 Monate durchgeführt werden. Hinweise zur Wartung finden Sie in Abschnitt 5. Mit der nachstehenden Tabelle können Sie Ihren Wartungsplan erstellen und Wartungen protokollieren. ACHTUNG: Trennen Sie das Gerät vor jeder Wartung von der Stromversorgung.
Maintenance date DE 56 Condenser clean Engine department cleaning Cleaning and inspection of doors gaskets
FRANÇAIS TABLE DES MATIÈRES 1. INTRODUCTION ....................................................................................................59 2. TRANSPORT ...........................................................................................................59 3. INSTALLATION .......................................................................................................60 3.1. EXIGENCES EN MATIÈRE D’EMPLACEMENT.................................................60 3.2 EXIGENCES ÉLECTRIQUES...
FR 58
FRANÇAIS MANUEL D’UTILISATION 1. INTRODUCTION MERCI de votre confiance en achetant ce produit. Ce manuel a été préparé pour garantir la sécurité de l’utilisateur et assurer une utilisation et un entretien corrects des groupes frigorifiques. Avant d’effectuer toute opération, que ce soit en tant que technicien d’installation ou en tant qu’utilisateur du groupe, vous devez prendre connaissance des points expliqués dans ce manuel.
3. INSTALLATION 3.1. EXIGENCES EN MATIÈRE D’EMPLACEMENT Placez le produit dans un endroit bien aéré et loin de sources de chaleur. N’installez pas le réfrigérateur dans un endroit où la température sera inférieure à +10 °C (50 °F) et supérieure à +40 °C (104 °F). Faites attention lors de l’installation finale du réfrigérateur, les grilles de ventilation ne doivent pas être couvertes. Ne laissez pas l’appareil exposé au soleil, s’il est installé à l’extérieur, il doit être protégé des intempéries.
FRANÇAIS Le cordon d’alimentation des réfrigérateurs et armoires de comptoir est placé dans la zone intérieure du moteur. (dans les réfrigérateurs de comptoir, vous devez d’abord dévisser la porte du moteur). ATTENTION: Le fabricant décline toute responsabilité si l’un des points ci-dessus n’est pas respecté. 3.3. AVANT UTILISATION Avant utilisation, vous devez visser les pieds de l’appareil dans les cavités situées sous l’appareil.
4. FONCTIONNEMENT DU RÉFRIGÉRATEUR 4.1 UTILISATION CORRECTE DE L’APPAREIL Đ Đ Đ Đ Đ Đ Đ FR Đ Đ Đ Chaque appareil est conçu pour une certaine plage de température. Vous ne devez pas placer d’aliments ou de boissons chauds qui ne sont pas dans des emballages hermétiques. Ne placez pas d’appareils chauds (fours - appareils à gaz liquide ou électriques) au-dessus du produit, sauf s’ils ont des pieds de 5 cm de hauteur.
FRANÇAIS AVERTISSEMENT: N'utilisez pas d'appareils électriques dans les compartiments de stockage des aliments. AVERTISSEMENT: Ne stockez pas de substances explosives, telles que des bombes aérosols contenant un gaz propulseur inflammable, dans cet appareil. AVERTISSEMENT: N'endommagez pas le circuit de réfrigérant. AVERTISSEMENT: N'utilisez pas d'appareils électriques dans les compartiments de stockage des aliments de l'appareil, à moins qu'ils ne soient du type recommandé par le fabricant.
4.2 FONCTIONNEMENT DU RÉGULATEUR DE TEMPÉRATURE Đ Đ Đ Đ Pour régler les températures de consigne au niveau souhaité, appuyez sur la touche SET et maintenez-la enfoncée jusqu’à ce que les indications °C (ou °F) de l’affichage de la température clignotent. Appuyez ensuite sur la touche pour augmenter la température et sur la touche pour l’abaisser. Lorsque vous réglez le régulateur à la température souhaitée, attendez que l’indication °C cesse de clignoter ou appuyez sur la touche SET pour régler.
FRANÇAIS CÂBLAGE ÉLECTRIQUE POUR RÉGULATEUR XR03CH CÂBLAGE ÉLECTRIQUE POUR RÉGULATEUR XR06CH BMB FR 65
5. ENTRETIEN ATTENTION: Avant tout acte d’entretien, débranchez la prise de l’alimentation électrique. TL’entretien de l’appareil est très important afin d’assurer le bon fonctionnement de l’appareil et sa longévité dans le temps. Đ Đ Đ Nettoyez régulièrement l’intérieur du réfrigérateur pour éviter l’accumulation d’odeurs. Pour garantir une efficacité maximale, débarrassez le condenseur, tous les 6 mois, de toute poussière ou tous déchets qui s’y sont accumulés.
FRANÇAIS Pour un meilleur dépoussiérage, nettoyez le condenseur avec un jet d’air comprimé. Vous pouvez ensuite utiliser un aspirateur pour enlever la poussière de la zone motrice. À la fin de chaque acte, vérifiez que le condenseur ne contient pas de poussière persistante. NETTOYAGE DU CONDENSEUR DE L’ARMOIRE FRIGORIFIQUE / DU CONGÉLATEUR Dans les réfrigérateurs verticaux, la zone du condenseur se trouve sur la partie supérieure ou inférieure de l’armoire (selon les modèles).
Pour plus d’informations sur le nettoyage, veuillez visiter YOUTUBE ( ) bambas frost ATTENTION: La poussière s’accumule généralement à l’arrière du condenseur. Après chaque nettoyage, veuillez vérifier si la surface arrière du condenseur est propre. 6. CLASSE CLIMATIQUE Conditions ambiantes des classes climatiques 3, 4 et 5 Classe de climat de la chambre d'essai Température du thermomètre sec, °C Humidité relative, % 3 25 60 4 30 55 5 40 40 FR 7.
FRANÇAIS 8. TECHNOLOGIE INTELLIGENTE Les appareils de nouvelle génération sont des appareils à technologie intelligente les réfrigérateurs professionnels peuvent être surveillés par une application smart phone.
8.1 INSTALLATION DU DISPOSITIF EN WI-FI Etape 1: Installez l’application «bambas frost» via Google Play. Etape 2: Créez un compte. Etape 3: Choisissez «ajouter un appareil» (add device) et «avec appareil-photo» (with camera), puis scannez le code QR qui se trouve sur l’appareil et effectuez la connexion Wi-Fi en entrant le code Wi-Fi. Après ces étapes, votre appareil devrait se trouver dans le menu Mes appareils (My devices) et dans les minutes qui suivent, vous pourrez enregistrer des données.
FRANÇAIS 9. DÉPANNAGE Un technicien n’est pas toujours nécessaire pour résoudre certains problèmes. Tout d’abord, essayez les solutions suggérées ci-dessous pour éviter éventuellement le coût d’un appel de service. Les dommages et les pertes ne sont pas pris en compte, à savoir les verres et les lampes cassés, les dommages mécaniques causés par une fluctuation de la tension ou par des problèmes d’électricité.
Les lumières intérieures ne fonctionnent pas L’appareil est très bruyant L’appareil a une fuite Đ Đ Đ Đ Đ Đ Đ FR Vérifiez si l’interrupteur marche/arrêt de l’éclairage est allumé (s’il y en a). L’ampoule est grillée (débranchez l’appareil de l’alimentation électrique et remplacez l’ampoule). Mettez l’appareil à niveau. Vérifiez si l’appareil est à plat avec d’autres appareils et provoque un accord acoustique. La résistance est grillée (appelez le technicien).
FRANÇAIS CALENDRIER D’ENTRETIEN L’entretien de l’appareil est très important pour assurer le bon fonctionnement de l’appareil et une faible consommation d’énergie. L’entretien doit être effectué tous les 6 mois. Pour les instructions d’entretien, consultez le paragraphe 5. Le tableau ci-dessous vous aidera à déterminer et à enregistrer le programme d’entretien. ATTENTION: Avant chaque entretien, débranchez l’appareil de l’alimentation électrique.
Entretien date FR 74 Condenseur propre Nettoyage du compartiment moteur Nettoyage et inspection des joints de portes
ΣΗΜΕΙΩΣΕΙΣ - NOTES - ANMERKUNGEN - REMARQUES 75
Model name US 50 R290 0,9 34,3 B 328 ― ― 250 L – 5 3 UK 50 R290 3,4 46,2 C 1250 ― ― ― 250 L 5 3 US 70 R290 1,2 32,6 B 438 ― ― 507 L ― 5 3 UK 70 R290 5,2 47,8 C 1898 ― ― ― 507 L 5 3 UST 70 R290 1,2 32,6 B 438 ― ― 507 L ― 5 3 UKT 70 R290 5,2 47,8 C 1898 ― ― ― 507 L 5 3 USK 70 R290 without energy label ― ― 320 L 280 L 5 3 USKS 70 R290 without energy label ― ― 320 L 280 L 5 3 Roll 90 R290 without energy label ― ― 106
ANNEX IV Model name PM6 155 R290 1,9 31,3 B 694 ― ― 166 ― 5 3 PM6 185 R290 2,1 32,9 B 766 ― ― 210 ― 5 3 PM6 216 R290 3 44,8 C 1095 ― ― 255 ― 5 3 PM7 155 R290 2,1 33,2 B 766 ― ― 202 ― 5 3 PM7 185 R290 2,2 32,2 B 803 ― ― 275 ― 5 3 PM7 216 R290 3,2 45 C 1168 ― ― 315 ― 5 3 PS 139 R290 1,9 33 B 693 ― ― 116 L ― 5 3 PS 185 R290 2 34 B 730 ― ― 178 L ― 5 3 PS 239 R290 2,4 37,2 C 876 ― ― 220 L ― 5 3 PGK 139
VARIOUS PRODUCTS 79
3rd km Κozani - Thessaloniki NR I. A. Kasla 50100 - Kozani GREECE Tel: +30 24610 29059, +30 24610 38898 Fax: +30 24610 29884 sales@bambasfrost.gr www. bambasfrost.