
Installation Sheet


3
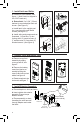
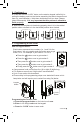
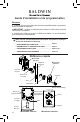
b. Important, once the connector has passed through the center hole, tuck the
wire harness out of the way by pressing it into the notch hole as shown in gure 9.
c. Slide wires through the notch until mounting plate sits ush against door.
d. Making sure that exterior assembly and cylinder are pressed ush
against exterior door, with Baldwin cylinder logo horizontal, insert mounting
bolts and tighten.
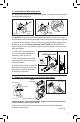
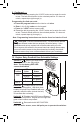
e. Check the vertical alignment
for mounting plate and exterior
assembly. (See gure 10.)
f. Test. Using the key, retract and
extend the bolt a few times to test
for smooth action.
g. If action feels rough, loosen the
screws and re-align the mounting
plate and the exterior assembly.
h. Repeat as required.
a. Carefully insert the connector of the wire harness - through the center hole of the
mounting plate (see gure 8).
5. Attach the Connector to the Interior Assembly.
Continued
4. Install Interior Mounting plate.
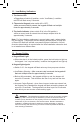
a. Align the connector with the connector port of the interior assembly,
matching notch to slot.
Important Note: To prevent damage, always handle the wire harness
at the connector (do not pull wires).
Fig. 8
Mounting
Plate
Connector
Notch
Hole
Fig. 10
Bolt
KEEP PARALLEL
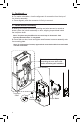
Fig. 9
Connector Port
Connector
Connector
Notch
Slot
Interior
Assembly
Top view
horizontal