
Electric Company Computer Drive User Manual


www.supportme.net
6-2 Configuration MN1942
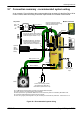
6.2 Starting the MicroFlex e100
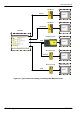
If you have followed the instructions in the previous sections, you should now have connected all
the power sources, inputs and outputs, and the Ethernet cable or USB cable linking the PC to the
MicroFlex e100.
6.2.1 Preliminary checks
Before you apply power for the first time, it is very important to verify the following:
H Disconnect the load from the motor until instructed to apply a load. If this cannot be done,
disconnect the motor wires at connector X1.
H Verify that the AC line voltage matches the specification of the MicroFlex e100.
H Inspect all power connections for accuracy, workmanship and tightness.
H Verify that all wiring conforms to applicable codes.
H Verify that the MicroFlex e100 and motor are properly earthed/grounded.
H Check all signal wiring for accuracy.
6.2.2 Power on checks
If at any time the Status LED flashes red, the drive has detected a fault - see section 7.
1. Turn on the 24VDC supply.
2. Turn on the AC supply.
3. Within approximately 20-30 seconds, the test sequence should complete and the Status
LED should illuminate red. If the Status LED is not lit then re-check the power supply
connections. If the Status LED flashes red, this indicates that the MicroFlex e100 has
detected a fault - see section 7. Note that after downloading firmware, startup may take more
than 1 minute.
4. If the motor wires were disconnected in section 6.2.1, turn off the AC supply and reconnect
the motor wires. Turn on the AC supply.
5. To allow the Commissioning Wizard to function, the drive enable signal will need to be
present on connector X3 to allow the MicroFlex e100 to be enabled (see section 5.2.1.). If
you do not wish to enable the MicroFlex e100 yet, the Commissioning Wizard will inform you
when this step is necessary.
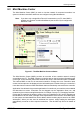
6.2.3 Installing the USB driver
It is now necessary to install the USB driver . When the MicroFlex e100 is powered, Windows
(2000 or XP only) will automatically detect the controller and request the driver . The driver
consists of two files, USBmotion.inf and USBmotion.sys. Both files must be present for
installation.
1. Follow the on-screen instructions to select and install the driver. The driver files are available
on the supplied Baldor Motion Toolkit CD. If you are using a copy of the driver located on the
hard disk, a floppy disk or another CD, the two driver files must be in the same folder.
2. During installation, Windows XP may report that the driver is ‘unsigned’. This is normal for the
MicroFlex e100 driver, so click the Continue Anyway button to continue with the installation.
When installation is complete, a new USB Motion Controller device will be listed in the
Universal Serial Bus controllers section of Windows Device Manager.