
Installation Manual


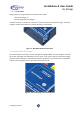

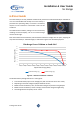


Table Of Contents

SL Range User Guide
Installation & User Guide
SL Range
10
Note that the voltage sensed by the DC-DC charger when it is charging, will be slightly different to the
voltage measured at the vehicle alternator / start battery. This is because of the voltage drop along
the cable from the alternator / start battery to the Baintech battery. If this voltage drop is too high, a
thicker and/or shorter cable may be required.
1. After connecting the DC source via the blue Anderson plug, the vehicle engine can be started.
2. The green LED status light should illuminate if the battery is charging. If the battery is not
charging, check the:
a. Cable size which may be too small with excessive voltage drop; and
b. Voltage on the blue Anderson plug from the vehicle alternator / battery.
3. The DC-DC charger typically begins charging at 13.3V, and then the green light turns on.
4. If you need to adjust the VSR setting, you will need a small Phillips screwdriver to adjust the
trim pot adjacent to the LED light.
5. Remove the clear plastic sticker before adjusting.
6. Turning the trim pot in a clockwise direction reduces the voltage setting and turning it in an
anti-clockwise direction increases the voltage setting. Use the LED status light to determine
the correct setting.
7. If the trim pot voltage is too high the charger never turns on. However, if it is too low it could
stay on too long and drain the start battery.
8. Put the clear plastic sticker back in place. Once the trim pot is set it should never require
adjusting again.