
Installation Guide

First InterComm
™
System VCA100 Installation Guide
A29799 rev A Page 19
PROPRIETARY INFORMATION: This document contains trade secrets and commercial or financial information that is the property of BAE
Systems Electronics and Integrated Solutions (E&IS). Further dissemination or disclosure of this information is strictly prohibited without
the written permission of BAE Systems.
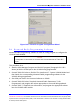
6.2 VCA100 Update Procedure
1. Perform the update in two parts: VCA MANAGER program and Kenwood Radio
software.
2. Follow the steps as listed in Table 8. Correct any problems encountered before
proceeding to the next step.
3. Place check mark in Verified box after successful completion of test step.
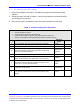
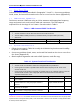
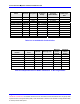
Table 8. VCA100 Configuration Procedure
Required Items:
a. VCA100 Installed in vehicle
b. User Parameters (Table 7 of this document).
c. Installer’s WiFi Laptop configured using BAE Systems’ software CD
d. Serial IP and Kenwood Radio programming software installed on laptop
Step Procedure
Expected
Result
Verified
1 Turn on VCA100. Wait one minute for boot up to complete. Booted
2 Turn on the laptop and connect to First_InterComm_Network. Connected
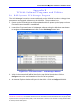
3
Execute VCA
MANAGEMER program (see Appendix B in this
document) and input specific User Parameters. VCA100 will
reboot after committing changes.
Updated and
Rebooted
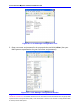
4 Launch Serial IP program. (see Appendix B in this document) Running
5
Use Serial IP program to enable a virtual COM port between
COM2 and the VCA100. (see Appendix B in this document)
Enabled
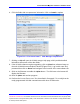
6
Launch the appropriate Kenwood Radio programming software for
the VCA100 and set COM port to COM2. (see Table 1, First
InterComm™ System VCA100 Models)
Running,
COM2
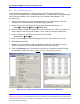
7
Program VCA100 Radio module with specific User LMR
frequencies and PL Codes.
Programmed
8
Close Kenwood, S
ERIAL IP and VCA MANAGER program. Prepare
to run System Functional Test of the Unit Test Plan to verify
updates.
Closed