
User guide


Table Of Contents
- Introduction
- Overview of ReadCenter Analytics and Analytics Mobile
- Program Startup
- Main Screen
- System Outline
- Fixed and Mobile Reading Cycles
- Save/Clear Reads
- Read Input File
- Apply Gateway Readings to the Customer Account Records
- Load Collectors
- Unload Collectors
- Route Reading Reports / Run Reports
- Write Output File
- Gateway Reading Reports
- Custom Reports
- Analytics
- Accounts and System Settings
- System Requirements
- Software Function Detailed Description
- Codes
- Using the Tool Bars
- Radix Handheld File Transfer
- ReadAll Handheld File Transfer
- Mini Mobile Interrogator (MMI) File Transfer
- Backup Operation
- Troubleshooting
- Technical Support
Defining Gateway Schedules
ReadCenter Analytics
Gateway Reading> Gateway Setup
ReadCenter Analytics Mobile
n/a
To retrieve reading data from the newly added gateway, create the recommended gateway schedules.
Adding a Schedule
Follow the steps below to add each of the four schedules.
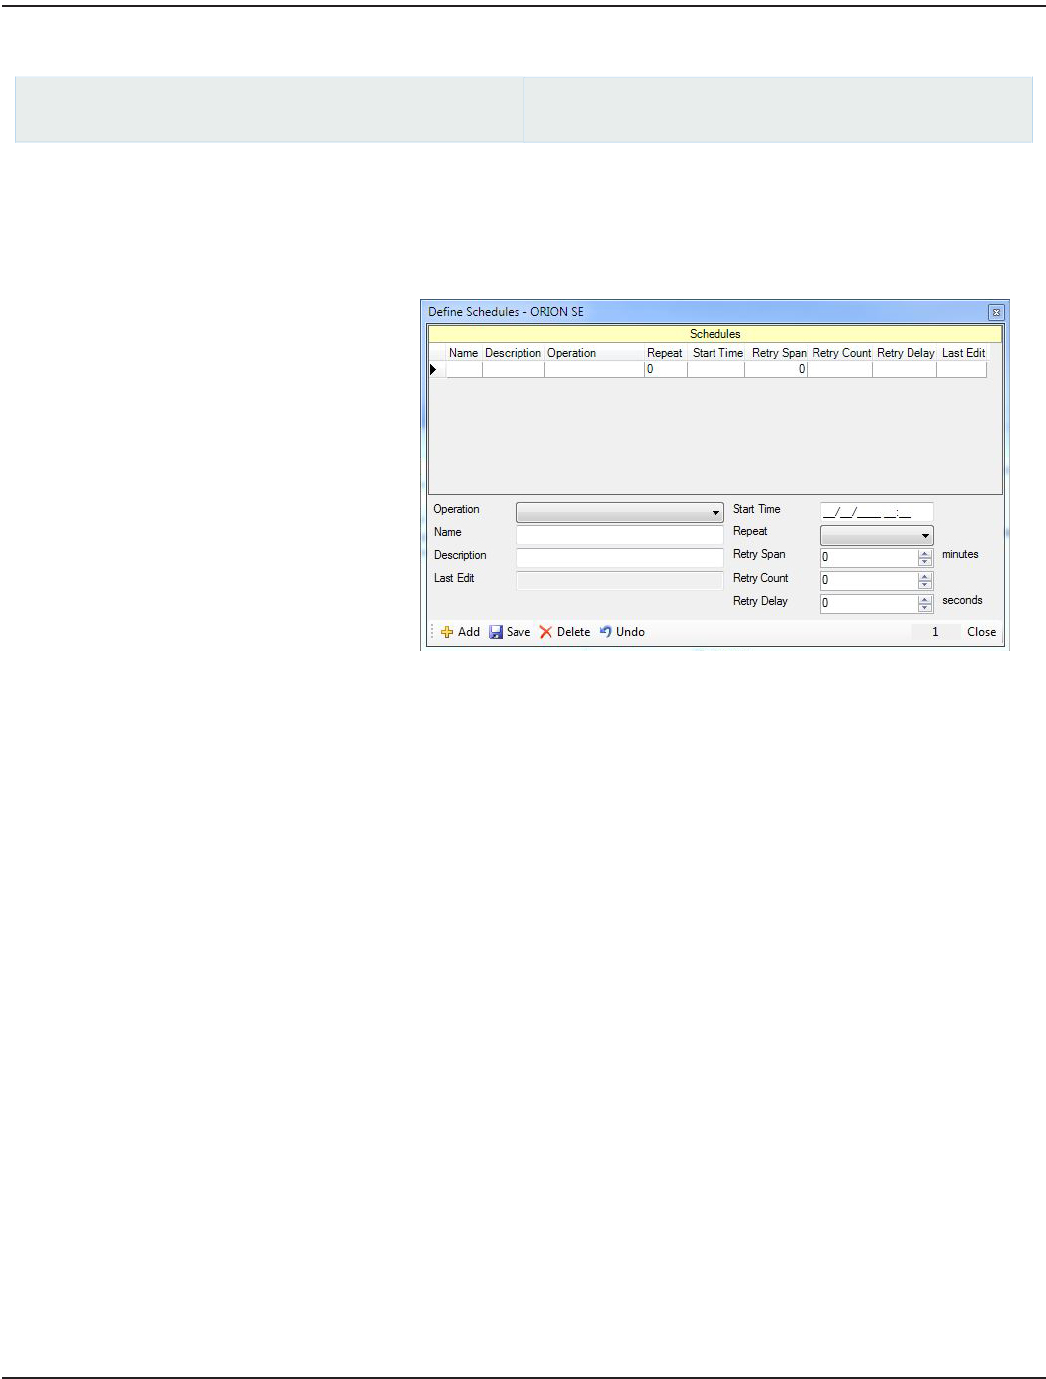
1. Select Dene Schedules from
the lower tool bar on the Gateway
Setup screen.
2. Click Add.
Result: A new row displays in the
Schedules section at the top of
the screen.
3. Dene the new schedule by
entering the following details in the
blank elds in the lower section of
the screen.
• Name: Type the name to associate with the schedule in the field.
• Description: Type an explanation in the field that describes the schedule purpose.
• Operation: Select one of the operations for each schedule using the drop-down menu. Refer to "Schedule
Operations – Four Options" onpage79 to see a description of the four available schedule operations.
• Repeat: Determines how often to repeat the schedule after the initial start time. Select daily, weekly, monthly or
quarterly using the drop-down menu. Making a selection is necessary for the schedule to run.
• Start Time: Type the first date and time to execute the schedule. Use leading zeroes and a 24-hour time format.
Example: 4 p.m. on January 8, 2013 would by entered as 01/08/2013 16:00.
• Retry Span: Use the up and down arrows to select the number of minutes to wait before considering the current
run of the schedule as failed. (1380 = 23 hours; 8640 = 6 days; max = 30240 or 21 days)
• Retry Count: Use the up and down arrows to select the number of times within the Retry Span that the schedule
will retry if it fails. (max = 99)
• Retry Delay: Use the up and down arrows to select the number of seconds between each retry attempt.
(13200 = 3:40; 21600 = 6:00; max = 28800 or 8 days)
• Last Edit: Automatically filled to show the date of the last change made to the schedule setting.
4. Click Save to save the schedule.
Result: The information dened in step 3 lls in the Schedules row at the top of the screen.
ReadCenter® Analytics & Analytics Mobile
Page 78 June 2014