
User guide


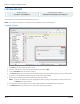


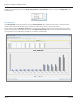
Table Of Contents
- Introduction
- Overview of ReadCenter Analytics and Analytics Mobile
- Program Startup
- Main Screen
- System Outline
- Fixed and Mobile Reading Cycles
- Save/Clear Reads
- Read Input File
- Apply Gateway Readings to the Customer Account Records
- Load Collectors
- Unload Collectors
- Route Reading Reports / Run Reports
- Write Output File
- Gateway Reading Reports
- Custom Reports
- Analytics
- Accounts and System Settings
- System Requirements
- Software Function Detailed Description
- Codes
- Using the Tool Bars
- Radix Handheld File Transfer
- ReadAll Handheld File Transfer
- Mini Mobile Interrogator (MMI) File Transfer
- Backup Operation
- Troubleshooting
- Technical Support

Buttons
• Show Account Opens the Account Records screen with all of the information for the selected account.
• Graph
(History report only)
Opens a screen showing usage calculations and a usage graph for meter readings shown.
Refer to "History Report Graph" onpage32 for details.
• File Enables saving report results to a comma-delimited file. Refer to "File" onpage33 for details.
• Preview Opens a screen with a preview of the report results that can be printed. .
• Apply
(Last Read report only)
Writes meter readings shown in the report to the Account Record for billing purposes. Refer to
"Apply Gateway Readings to the Customer Account Records" onpage18 for more information.
Running Reports
1. Select a report from the list.
2. Click the drop-down in the End Date and
Period elds to specify a date range for the
report.
OTE:N In the software, End Date is at
midnight of the date selected. To
get information for the current
date as well, select an End Date
that is one day after the report
time period. For example, if
you want to see a report with
information through February 2,
select February 3 as the End Date.
OTE:N As the date selections change, the
resulting range is shown in blue in the
tool bar at the bottom of the screen.
3. Click Run Report. The History report is
selected in the example shown.
OTE:N When Run Report is selected, the
section below the Run Report
button, labeled "Set Options for
Report Preview," may become
active, depending on the report.
Result: Report information displays on the
right side of the screen.
User Manual
Page 31 June 2014