ORION® Endpoint Utility Software Application 2.
Page ii ORION® Endpoint Utility April 2014
CONTENTS INTRODUCTION . . . . . . . . . . . . . . . . . . . . . . . . . . . . . . . . . . . . . . . . . . . . . . . . . . . . . . . . . 5 GETTING STARTED WINDOWS UPDATES . . . . . . . . . . . . . . . . . . . . . . . . . . . . . . . . . . . . . . . . . . . . . . . . . . . . . . 8 EQUIPMENT SETUP . . . . . . . . . . . . . . . . . . . . . . . . . . . . . . . . . . . . . . . . . . . . . . . . . . . . . .
PROFILE EXTRACTION . . . . . . . . . . . . . . . . . . . . . . . . . . . . . . . . . . . . . . . . . . . . . . . . . . . . 37 IR Profile Extraction - All Endpoints . . . . . . . . . . . . . . . . . . . . . . . . . . . . . . . . . . . . . . . . . . 38 RF Profile Extraction (ORION ME only) . . . . . . . . . . . . . . . . . . . . . . . . . . . . . . . . . . . . . . . .
INTRODUCTION INTRODUCTION This manual is the guide for using the ORION® Endpoint Utility 2.5.x software. Instructions for installing the software are also included. Audience and Purpose The ORION Endpoint Utility software is an application designed for users who read and program ORION water and gas endpoints. The software can also be used to extract endpoint historical profile data using IR or RF technology.
INTRODUCTION About this Manual The ORION Endpoint Utility user manual has three main parts: • Getting Started This part of the manual covers basic information including the equipment set up, how to start and exit the software program, and how to set the COM ports for the equipment connected to the computer. • User Guide The User Guide is the main part of the manual that includes step-by-step procedures and process details for using the Endpoint Utility software application.
GETTING STARTED GETTING STARTED April 2014 ORION® Endpoint Utility Page 7
WINDOWS UPDATES WINDOWS UPDATES Make sure the laptop on which the software is installed always has all the most recent Windows updates. To check the laptop for the most recent updates, perform the following steps. Windows 7 Click the Windows Start button. Click All Programs> Windows Update. An update message displays in the window that opens. Follow the instructions to install all updates if they are needed. Restart the laptop after making any updates. Windows XP Click the Windows Start button.
EQUIPMENT SETUP EQUIPMENT SETUP IR Setup IR programming cable To use the software for IR applications, connect the IR programming cable (PN: 64436-023) to the computer serial port. If the computer does not have a serial port, you can use a serial USB adapter. Serial port NNOTE: A serial USB adapter can be purchased at most computer supply stores. Make sure to follow manufacturer directions for using the adapter, and install recommended drivers.
COM PORTS COM PORTS Before using the software application, make sure the correct COM (communication) ports are set for any equipment connected to the computer to establish communication with the software. Check the COM Port(s) Windows 7: Click Windows Start to open the menu. Right-click Computer and select Properties> Device Manager. Windows XP: Click Windows Start to open the menu. Right-click Computer and select Properties> Hardware tab> Device Manager. A window similar to the one below opens.
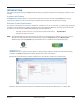
SOFTWARE STARTUP/EXIT SOFTWARE STARTUP/EXIT 1. Double-click the ORION Endpoint Utility shortcut on the desktop. The License Agreement screen displays the first time the software is accessed. Figure 6: Desktop icon NNOTE: The License Agreement must be accepted by an authorized representative of the customer/licensee. Click I ACCEPT. Result: The login screen opens. The login screen includes the software version, and access to the license and trademarks information. Figure 7: License Agreement screen 2.
SETTINGS (Optional) Click View Trademarks to see a list of trademarked products. To close the Trademarks screen and return to the login screen, click Close. Figure 9: Trademarks screen 3. Click the OK button on the login screen to open the software application. NNOTE: Click Cancel if you want to exit without opening the software application. Result: The main screen and main menu is displayed as shown below. Login is complete.
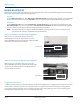
SETTINGS SETTINGS Use the Settings function to set the COM ports for the equipment attached to the computer before you begin using the software application. Figure 11: Settings screen for COM ports IIMPORTAN If using an ORION mobile transceiver, make sure the ME driver is installed and the USB driver is configured according to the instructions. See "Installing the ME Driver" on page 51 and "Configuring the USB Settings (Windows 7 and Windows XP)" on page 59 for complete information.
SETTINGS For the example shown in Figure 13, “COM 5” is selected for ORION ME RF COM. Result: The window closes, and the COM port you selected is displayed on the Settings screen. Figure 13: COM port set 4. Repeat steps 2 and 3 to set the COM port for any additional hardware connected to the laptop. When the COM ports are set, the software application is ready to use.
USER GUIDE USER GUIDE April 2014 ORION® Endpoint Utility Page 15
MAIN SCREEN MAIN SCREEN The software application functions are listed in a menu on the left side of the software screens as shown in Figure 14. Figure 14: Main screen Main Functions IR Programming Used to read and program ORION water and gas endpoints using the IR programming cable, including programming an endpoint following a tamper repair or retrofit installation (RTR water installations only).
IR PROGRAMMING IR PROGRAMMING An example of an IR Programming screen for an ORION Migratable endpoint with an HR-E LCD encoder on a water meter is shown in Figure 15.
IR PROGRAMMING Status Indicators Box is checked when an alert is reported. The status fields that display depend on the encoder and endpoint type. Displays For Field Label Description Endpoint Technology Encoder Type Cover Removal ME, SE Gas Encoder Empty Pipe ME, SE ELCD E-Series meter is reporting a no flow condition in the pipe. Encoder End of Life ME, SE ELCD Encoder or E-Series meter is reporting to the endpoint that the encoder battery life indicator has been activated.
IR PROGRAMMING Meter Information Displays For Field Label Endpoint Technology Encoder Type Description Meter Size and Type ME, SE ELCD, HRE, ENC, RTR The size and type of the meter for which the encoder was programmed. Unit of Measure ME, SE ELCD, HRE, ENC, RTR The unit of measure as defined by the encoder: cubic meters, cubic feet, gallons, imperial gallons or liters. Encoder Type ME, SE ELCD, HRE, ENC The encoder protocol.
IR PROGRAMMING IR Programming Buttons Reading Displays For Button Label Endpoint Technology Encoder Type Description Quick Read All All Initiates an RF Quick Read for the selected endpoint. High Power CE All Forces a brief high powered signal from the endpoint to a gateway receiver. Program/ Force Read All All Toggles, based on the encoder type. For ORION water endpoints with an RTR, Program is used to set the endpoint odometer value following a tamper repair.
IR PROGRAMMING Reading and Programming Endpoints Reading an Endpoint 1. With the IR Programming button selected, align the optical head of the IR cable with the endpoint IR LED port. Figure 16: ORION Endpoint Utility main screen with IR Programming selected 2. Click Press to Read. Result: The endpoint type, meter details and the current read fill the screen. The example in Figure 17 is an ORION Migratable endpoint. The reading is the raw value without read resolution applied. 3.
IR PROGRAMMING Stop, Pause, Start ORION endpoints are programmed at the factory to begin sending meter readings when the register senses flow through the meter. As a result, ORION endpoints can be installed on meters without having to manually start the endpoint. Once water or gas usage has been registered on the meter, the endpoint sends a signal every four seconds (ORION Classic) or every five to six seconds (ORION Migratable and Fixed Network).
IR PROGRAMMING Programming an RTR Endpoint to the Odometer Setting To install an ORION endpoint on an active meter with usage on an RTR, use the following information to ensure that the value in the endpoint matches the current odometer value on the RTR once the endpoint is connected to the RTR. With an RTR, you must also program and set the endpoint to the RTR odometer value following a tamper repair.
IR PROGRAMMING Follow this procedure for programming an RTR endpoint to the odometer setting. 1. On the IR programming screen, double-click in the Current Reading field to select the current read value. Figure 22: Current Reading field 2. Using the keyboard, enter the RTR odometer value in the Current Reading field. Result: The field background is highlighted to indicate an unprogrammed value has been entered. Figure 23: Current Reading field highlighted 3.
IR PROGRAMMING Programming Water Meter Type, Size and Units of Measure (RTR, ADE) To program the water meter type and size for an RTR or ADE, follow these steps. NNOTE: The water meter type, size and units of measure for endpoints connected to an HRE or ELCD encoder type are obtained from the encoder and are not programmable. 1. Align the optical head of the IR cable with the endpoint IR LED port. 2. Click Read Endpoint if a reading is not already registered. 3.
IR PROGRAMMING Force Read (Encoder Output) When an ORION endpoint is connected to a device with encoder output (high resolution or ADE), the Force Read button displays instead of the Program button. Force Read is used to view the real-time encoder odometer value and to verify a successful tamper repair. 1. Align the optical head of the IR cable with the endpoint IR LED port. 2. Click Force Read on the IR Programming screen. Result: The reading value updates to reflect the current encoder odometer value.
IR PROGRAMMING Programming Gas Endpoints The procedure below is for programming an ORION Migratable/Fixed Network gas endpoint. Perform the same steps for an ORION Classic gas endpoint. For a description of the fields and buttons on the screens, see "IR Programming Fields" on page 17 and "IR Programming Buttons" on page 20. Program a Read for a Gas Endpoint 1. From the main menu, click IR Programming. 2. Align the optical head of the IR cable with the gas endpoint IR LED port. 3.
IR PROGRAMMING 5. Using the keyboard, enter the new value in the Current Reading field. Result: The field background is highlighted to indicate an unprogrammed value has been entered. Figure 31: Current Reading field highlighted 6. Align the optical head of the IR cable with the endpoint IR LED port and click the Program button. Hold the optical head of the IR cable steady. The endpoint read is programmed when the highlighted background in the Current Reading field is cleared.
IR PROGRAMMING Change and Program the Gas Drive Circle 1. Click the Change button in the Meter Information section of the IR Programming screen. Result: The Change Drive Circle window opens. 2. Locate the Drive Circle. • Use the selections in the top half of the screen to filter the list on the bottom by choosing Integral or Remote, and choosing the Units, Dials and Res (resolution). • Or just scroll through the list in the bottom half of the window to find the drive circle for the endpoint. 3.
IR PROGRAMMING GPS Location If the latitude and longitude are not set or need to be changed, you can set them manually for any ORION Migratable or Fixed Network endpoint. 1. Click the Set GPS Location button in the GPS Location section of the IR Programming screen. Result: The GPS Input window opens. 2. Enter the Latitude and Longitude in each field, respectively. NNOTE: The field will only accept numeric characters, decimal point (period) and minus sign (–). Figure 35: GPS Location 3.
IR PROGRAMMING Flow Rate Study A flow rate study is a week-long study that can be performed on an ORION Migratable or Fixed Network (in mobile mode) endpoint to report high, low and average flow rates. A flow rate study can also be requested on the Advanced Endpoint Details screen available via the Quick Read screen. Starting a Flow Rate Study With the optical head of the IR cable aligned with the endpoint IR LED port, tap the Start button in the Flow Rate Study section of the IR Programming screen.
QUICK READ QUICK READ The Quick Read screen displays readings for all ORION Migratable and ORION Classic endpoints in range. One endpoint may display several readings during an RF (radio frequency) Quick Read. Figure 41: Quick Read screen RF Quick Read Fields Field Label Description Limit to Single S/N When an endpoint serial number is entered, performs a Quick Read on the endpoint entered via RF. Click in the field and type the serial number for the endpoint you want to read.
QUICK READ RF Quick Read Buttons ORION ME Click ORION ME to Quick Read all ORION Migratable or Fixed Network (in mobile mode) endpoints within range. Click again to stop reading. ORION CE Click ORION CE to Quick Read all ORION Classic endpoints within range. Click again to stop reading. Clear Grid Removes the current grid display and refreshes the screen so you can change selections. The Statistics field clears and restarts with the next Quick Read.
QUICK READ RF Quick Read - All Endpoints The example below is for ORION Migratable or Fixed Network (in mobile mode) endpoints. If you are reading ORION Classic endpoints, perform the same steps using the ORION CE button. NNOTE: To read both ORION Migratable and ORION Classic endpoints simultaneously, see "Changing Quick Read Technology" on page 35. 1. Click Quick Read on the main menu. 2. Click the ORION ME button to start.
QUICK READ Changing Quick Read Technology When reading both ORION Migratable and ORION Classic endpoints, you can quickly change from one technology to the other and back again, or listen simultaneously. NNOTE: Make sure the mobile transceiver and mobile receiver are connected. For help, see "Vehicle and Laptop Setup with Mobile Transceiver and/or Mobile Receiver" on page 9. Steps 1...4 of the following procedure describes changing from an ORION ME Quick Read to an ORION CE Quick Read.
QUICK READ Advanced Endpoint Details (ORION Migratable only) The View Advanced Endpoint Details button on the Quick Read screen becomes active when a single ORION Migratable endpoint is being read via RF. Select this button to access the options described below. Figure 44: Advanced Endpoint Details screen NNOTE: The options described here are also available for ORION Migratable endpoints via IR from the IR Programming screen.
PROFILE EXTRACTION PROFILE EXTRACTION The Profile Extraction option on the main menu gives you the ability to extract historical interval profile data from ORION water and gas endpoints for viewing in the ORION Profile Viewer software. NNOTE: Extracting historical interval profile data from an ORION Migratable endpoint can be performed via IR or RF. Extracting historical interval profile data from an ORION Classic endpoint can only be performed via IR.
PROFILE EXTRACTION IR Profile Extraction - All Endpoints To access profile data for an ORION endpoint using IR, follow these steps. 1. Click to select the IR (CE or ME) radio button. Figure 46: IR profile extraction 2. With the IR cable connected to the laptop, align the optical head of the IR cable with the endpoint IR LED port. 3. Click Initial Read. 4. On the window that displays, select the appropriate meter size and unit of measure. For water endpoints, the Test Circle window will display.
PROFILE EXTRACTION Result: Profile data for the endpoint is extracted. The screen fills as shown below when the data has been retrieved. Figure 50: IR profile extraction complete IR Profile Extraction Details Oldest Reading The date and time of the oldest reading in the data extracted. Newest Reading The date and time of the newest reading in the data extracted. Interval The reading interval at which the endpoint is set: 60 Minutes or 15 Minutes Quantity The number of interval reads retrieved.
PROFILE EXTRACTION RF Profile Extraction (ORION ME only) To access profile data for an ORION Migratable endpoint using RF, follow these steps. 1. Click to select the RF (ME only) radio button. 2. Click in the S/N field and use the keyboard to enter the serial number of the ORION Migratable endpoint. Result: As the radio connection is made, you will see two status messages: "Waiting For Mobile Message" and then "Waiting for Extended Status." Figure 52: RF profile extraction 3.
PROFILE EXTRACTION Result: Two status messages display: "Waiting for Mobile Configuration" and then "Reading Data." A bar displays to show progress. Profile data for the endpoint is extracted and the screen fills as shown below to confirm that the data has been retrieved. Figure 56: RF profile extraction complete RF Profile Extraction Details Field Label Description Oldest Reading The date and time of the oldest reading in the data extracted.
PROFILE EXTRACTION Page 42 ORION® Endpoint Utility April 2014
APPENDIX APPENDIX April 2014 ORION® Endpoint Utility Page 43
GLOSSARY GLOSSARY ADE The Absolute Digital Encoder is a position-based encoder that senses the position of each number wheel to determine the reading for touch and AMR/AMI systems. The ADE encoder displays as ”ENC“ on the software screens. AMI Advanced metering infrastructure (AMI). AMR An automated meter reading (AMR) system that uses radio frequency technology to transmit meter readings between an endpoint and a data collection device.
REMOVING PREVIOUS SOFTWARE REMOVING PREVIOUS SOFTWARE Remove older software versions prior to installing a new version. Follow the instructions for your operating system. NNOTE: If you are installing the ORION Endpoint Utility software for the first time (no previous versions installed), skip this section and go to "Installing the Software" on page 47. Removing Software – Windows 7 1. Click the Start button. Then click Control Panel > Programs and Features.
REMOVING PREVIOUS SOFTWARE Removing Software – Windows XP 1. Click Start > Control Panel> Add or Remove Programs. Control Panel Result: The Add or Remove Programs window opens. 2. Locate and select ORION Endpoint Utility in the Add or Remove Programs window. Add or Remove Programs window 3. Click Remove. Result: The Uninstall window opens. 4. Follow the prompts and click Finish at the end. Result: The selected program uninstalls and any desktop icon is removed. 5.
INSTALLING THE SOFTWARE INSTALLING THE SOFTWARE The ORION Endpoint Utility software disc is provided by Badger Meter. The basic software installation process is the same for Windows 7 and Windows XP. Windows 7 users must perform the additional steps noted page 50. Screen appearance depends on user personalization and operating system. Remove older software prior to installing a new version. See "Removing Previous Software" on page 45.
INSTALLING THE SOFTWARE 4. On the Welcome window, click Next. 5. On the Select Installation Folder window, do the following. • Verify where the software will be located. The Program Files folder is recommended. Click Browse to change the location. • Verify that the radio button next to Everyone is checked if more than one person will be using the software. • (Optional) Click Disc Cost... to view available drives and space on the computer before you install. A window opens as shown in the example.
INSTALLING THE SOFTWARE 6. On the Confirm Installation window, click Next. Result: The software installs. This takes a few seconds. NNOTE: A window may display asking for permission to allow changes to the computer. If the window displays, click Yes. 7. On the Installation Complete window, click Close to close the installation wizard. NNOTE: MICROSOFT .NET 3.5 is required to run the software as designed. See "Minimum System Requirements" on page 5 and "Windows Updates" on page 8 for more information.
INSTALLING THE SOFTWARE Additional Steps - Windows 7 Users Only For Windows 7 users, complete these steps to finish the software installation process. 1. Right-click on the ORION Endpoint Utility desktop icon and select Properties. 2. In the Properties window, select the Compatibility tab and check the box next to "Run this program as an administrator" as shown. 3. Click OK. Compatibility tab Software installation is complete.
INSTALLING THE SOFTWARE Installing the ME Driver The ME Driver is required for communication between the ORION Endpoint Utility software and an ORION mobile transceiver. Follow the driver installation instructions for your operating system if you need to install the driver. The ME Driver only needs to be installed once. If you previously installed the ORION Endpoint Utility or other ORION software such as the ORION Mobile Reading System, you already have the ME Driver and you may skip this section.
INSTALLING THE SOFTWARE Windows Help 6. Scroll down in the Help window and click the link: "Update a driver for hardware that isn't working properly" at the bottom of the window in the Note section as shown. 7. In the window that displays, click the link: "To download and update a driver yourself." NNOTE: An enlarged image of the Help section is shown.
INSTALLING THE SOFTWARE 8. Click the link: "Open Device Manager." A portion of the Help screen with the link is shown. Windows Driver Help Result: Device Manager opens. Device Manager 9. Locate and double-click the MSP430 based CDC Device. Result: The Device Properties window opens.
INSTALLING THE SOFTWARE 10. Click to select the Driver tab. On the Driver tab, click the Update Driver button. Result: The Search window opens. 11. Select "Browse my computer for driver software." Search Device Properties 12. In the window that opens, type “C:\” in the field or browse to select the C:\ drive. NNOTE: It is not necessary to check the box "Include subfolders." 13. Click Next.
INSTALLING THE SOFTWARE 14. A Windows Security window opens as shown. Click the link: "Install this driver software anyway." Result: The ME driver installs. A progress bar displays to show the installation progress. Windows Security Installation progress 15. When the ME driver software update is complete, a window opens. NNOTE: The communication (COM) port number for the driver is now displayed at the top of the final window and the Device Properties window.
INSTALLING THE SOFTWARE Installing the ME Driver for Windows XP NNOTE: This driver only needs to be installed once. If you already have the ME driver installed, skip this section. 1. From the software disc, copy the "OrionSE_USB_0_2.inf” file. 2. Click the Windows Start button. Then click My Computer and paste the OrionSE_USB_0_2.inf file on the C:\ drive of the laptop. Result: The file appears in the C:\ drive as shown. 3.
INSTALLING THE SOFTWARE 6. Select the radio button next to "Install from a list or specific location (Advanced)." Click Next. Install from a list 7. Select the radio button next to "Search for the best driver in these locations." Then check the box next to "Include this location in the search:" and type “C:\” in the field below. Click Next. Result: The Wizard searches for the driver on the C:\ drive and displays it in the next window.
INSTALLING THE SOFTWARE 8. Click to select the Orion SE Mobile COM driver and click Next. Result: The driver software installation begins. A window opens to show the progress. Select the driver 9. A window opens with a message that the software "has not passed Windows Logo testing..." Click Continue Anyway. Result: The Orion SE Mobile COM driver software continues to install. Continue installation 10. The Wizard confirms the driver installation is complete. Click Finish to close the Wizard.
INSTALLING THE SOFTWARE Configuring the USB Settings (Windows 7 and Windows XP) NNOTE: The USB settings only need to be configured once. If you have already configured the USB settings,skip this section. 1. Click the Windows Start button. Then right-click Computer/My Computer and select Properties. 2. Click Device Manager. Result: Device Manager opens. 3. Scroll down in the Device Manager window and locate the Universal Serial Bus (USB) controllers. 4.
ORION® Endpoint Utility Making Water Visible® ADE, ORION, ReadCenter and RTR are registered trademarks of Badger Meter, Inc. Other trademarks appearing in this document are the property of their respective entities. Due to continuous research, product improvements and enhancements, Badger Meter reserves the right to change product or system specifications without notice, except to the extent an outstanding contractual obligation exists. © 2014 Badger Meter, Inc. All rights reserved. www.badgermeter.