ORION® Mobile Reading System (ORS) 2.
Page ii ORION® Meter Reading System (ORS) April 2014
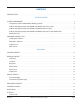
CONTENTS INTRODUCTION . . . . . . . . . . . . . . . . . . . . . . . . . . . . . . . . . . . . . . . . . . . . . . . . . . . . . . . . . 5 GETTING STARTED SYSTEM COMPONENTS . . . . . . . . . . . . . . . . . . . . . . . . . . . . . . . . . . . . . . . . . . . . . . . . . . . . 8 Components of the ORION Mobile Reading System . . . . . . . . . . . . . . . . . . . . . . . . . . .
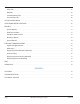
Alerts Tab . . . . . . . . . . . . . . . . . . . . . . . . . . . . . . . . . . . . . . . . . . . . . . . . . . . . . . . . . . 40 Map Tab . . . . . . . . . . . . . . . . . . . . . . . . . . . . . . . . . . . . . . . . . . . . . . . . . . . . . . . . . . . 42 Communications Tab . . . . . . . . . . . . . . . . . . . . . . . . . . . . . . . . . . . . . . . .
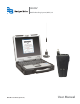
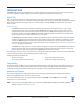
Introduction INTRODUCTION The ORION® Mobile Reading System (ORS) 2.5.x is a software application designed for utility meter route reading using the Panasonic® Toughbook® laptop computer. This manual is the guide for using the software application. About ORS ORS is an automated route meter reading system that incorporates a global positioning system (GPS) to display the location of the reading vehicle on a map while reading meters.
Introduction About This Manual The ORION Mobile Reading System (ORS) user manual has three main parts: • Getting Started The first part of the manual covers basic information including equipment set up, how to start and exit the software application, and how to set the COM ports for the equipment connected to the computer. • User Guide The User Guide is the main part of the manual that includes process details and step-by-step procedures for using the software to read meters.
Getting started GETTING STARTED April 2014 ORION® Meter Reading System (ORS) Page 7
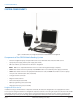
System components SYSTEM COMPONENTS Figure 1: Mobile transceiver, magnetic mount antenna and Panasonic Toughbook Components of the ORION Mobile Reading System • Panasonic Toughbook laptop computer with touch screen, DVD multi-drive and built-in GPS receiver • Laptop AC power supply and DC power supply (not shown) • ORS 2.5.x software, pre-installed on the Panasonic Toughbook NNOTE: ORS 2.5.x is compatible with Panasonic CF-31 and CF-30 Toughbook laptop computers.
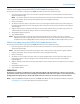
System components Vehicle and Laptop Setup with ORION FHSS Mobile Transceiver Only To set up the vehicle for meter reading using an ORION FHSS mobile transceiver, follow these steps. 1. Place the magnetic mount antenna on the vehicle roof. Ensure that the free area around the base of the antenna equals the antenna height. NNOTE: The antenna must be at least two feet away from other antennas and the cable must be in good condition. 2.
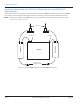
System components Vehicle and Laptop Setup with ORION FHSS Mobile Transceiver and ORION FHSS Mobile Receiver Follow the steps on the previous page to set up the vehicle to use both an ORION FHSS mobile transceiver and an ORION FHSS mobile receiver for mobile reading. Setup with both a transceiver and receiver should resemble Figure 2 below. NNOTE: To ensure the communication (COM) ports are set up correctly for the mobile transceiver and receiver, refer to "Communications Tab" on page 44.
Program startup / exit PROGRAM STARTUP / EXIT NNOTE: Close any other open ORION software application before starting up the ORS software application. Starting the Software 1. Power on the laptop. 2. Switch on the mobile transceiver and/or receiver. 3. Type orion in the log in window. Result: The Windows® desktop is displayed. 4. Double-click the ORION ORS desktop icon shortcut (Figure 3).
Program startup / exit Login Screen The Login screen (Figure 6) is the initial screen that opens when you launch the ORS software application. Below the software copyright date, you will see the state for which maps are loaded. A warning message alerting the meter reader to the dangers of watching the ORS screens while driving is displayed prominently on the screen. Figure 6: Login screen 1.
Program startup / exit 2. Click Accept to acknowledge the warning message (see step 1) and start the software or click Cancel to close and exit the program. If the system detects that the communication (COM) ports are not properly set, a warning message will display. You must set the COM ports to proceed. See "Communications Tab" on page 44.
Program startup / exit Main Screen After the Login screen, the main ORS screen appears, displaying the main menu, tool bar and status bar. Main tool bar Main menu Status bar Figure 10: Main screen with main menu, tool bar and status bar Main Menu The main menu includes all the general functions for collecting meter readings. Load Loads the route from a specified location. NNOTE: If the Load button is inaccessible, the route was already loaded.
Program startup / exit Tool Bar The tool bar at the top of the main screen contains the different commands and configuration options that make up ORS. Except for Settings, the buttons on the tool bar become active when you load a route. Figure 11: Main tool bar Start Begins or resumes the meter reading process. Click Start to navigate to the next screens including List View or Map View. Pause Temporarily stops the meter reading process. To resume the application, click Start.
Program startup / exit Status Bar The status bar, located at the bottom of the Main screen, displays the number of meters left to read in the route, the percent complete and the number of routes and meters loaded. The colors displayed on the bar indicate the reading and communication status for the types of meters being read. Figure 12: Status bar prior to loading route Before the route is loaded, the status bar is gray and reads "Nothing Loaded" as shown in Figure 12.
User guide USER GUIDE April 2014 ORION® Meter Reading System (ORS) Page 17
Loading a route LOADING A ROUTE This section describes the procedure for loading a route. Before loading a route, make sure the ORS software is running and the main menu is displayed on the laptop desktop. If you need help, refer to "Program Startup / Exit" on page 11. NNOTE: For instructions on creating a route load file using the reading data management software, please refer to the reading data management manual. 1.
Reading a route READING A ROUTE When the route files have been loaded, the Start Reading button on the main menu becomes accessible. Figure 16: ORS main menu with active Start Reading button IIMPORTAN When there is one operator, the recommended practice for meter reading is to drive through an area without observing the screen. Then stop when convenient to view progress. Click the Start Reading button to begin.
Reading a route Split View In Split View, the current route is shown in a list at the top of the screen and on a map below the route list. Figure 17: Split View screen The status of Geocoding is shown in the bar on the left side of the map. In Figure 17, the status shows “GPS OFF” indicating that Geocoding is not active. The status bar at the bottom of the screen gives the current status of the ORION ME mobile transceiver and ORION CE mobile receiver.
Reading a route List View In List View, unread meters are displayed as a list in the order loaded from the reading data management software. Figure 19: List View screen Adjusting Columns When information is displayed in columns on any screen in ORS, column order can be changed by selecting a column heading and dragging it, right or left, to a new position. ORS retains the new column format until it is changed again.
Reading a route Map View In Map View, meters are marked by icons on a map of the area, with the reading location as the focal point. An example of a screen displaying unread meters in Map View is shown in Figure 20. Control buttons to the left and right of the map are available in this view. See "Meter Icons" on page 25 for a detailed description of the meter icons.
Reading a route The meter icon changes to reflect the status of the meter throughout the reading cycle. For example, a successfully read meter changes to a green circle as shown in the lower right portion of the screen in Figure 22. Figure 22: Route map with meter icons after reading Reading progress Communication with ORS For a list of all the icons and what they represent, refer to "Meter Icons" on page 25.
Reading a route Map Control The Map control buttons are located on the right and left sides of the display when Map View is selected from the main tool bar. Figure 23: Map buttons left side Figure 24: Map buttons right side Left Side Buttons Legend Toggles between the distance legend and the icon legend. The distance legend displays on the map and defines the distance to which the map is scaled, inches per foot (Figure 25).
Reading a route Meter Icons Meter icons display on the map as visual indicators of the route status. Icons alert the meter reader to potential problems, show when the route reading has been completed and provide the status of any work items that have been assigned. Work items are requests for ORION endpoint data which are included as part of the route file. See "Two-Way Communications" on page 57 for additional information about work items. Meter icons and their descriptions are listed below.
Reading a route Status Icons The following icons denote the status of a meter. They are used for all ORION water and gas endpoints. Read A green circle displays when the meter reading, and work items, if applicable, are received and no problems were reported. Tamper A red letter “T” inside a red circle indicates a potential tamper situation where the meter is not working. For example, a cut wire.
Service details SERVICE DETAILS The Service Details screen displays all of the information stored in ORS for each account. You can view the details for the customer, enter codes, messages and manual meter readings. You can also access the two-way communication functionality for ORION Migratable and Fixed Network (in mobile mode) endpoints. Access the Service Details screen by clicking the Details button next to the account line item in List View.
Service details Daily Reading The time-synchronized daily read that displays below the Current Reading for ORION Migratable endpoints. Service Info Includes customer name, address and the meter serial number downloaded to ORS from the reading data management software. During Quick Read, these fields are blank unless the account is part of the route load file. Location Latitude displays the GPS latitude as a decimal number. Longitude displays the GPS longitude as a decimal number.
Service details Enter/Edit Meter Reading Use the Enter/Edit Meter Reading button on the Service Details screen to manually overwrite a meter reading. Figure 28: Keypad for meter reading entry To enter a reading manually, follow these steps. 1. Click the Enter/Edit Meter Reading button on the Service Details screen. 2. Manually enter a meter reading using the touch screen keypad or type the reading on the laptop keyboard. 3.
Service details Comment Codes/Messages The second tab of the Service Details screen is Comment Codes/Messages. This tab displays any codes or messages relating to a meter. The codes are pre-defined by the reading data management software operator. Reader Codes, Trouble Codes and Comments recorded by the meter reader are sent to the reading data management software operator and cleared at the process of the next billing cycle.
Service details Choosing Reader Codes Reader Codes are used to report non-trouble information about a meter, such as a name change or appointment. Reader Codes are defined in the reading data management software and downloaded to ORS. Figure 30: Reader Codes 1. With the Comment Codes/Messages tab selected on the Service Details screen, click one of the Select buttons under Reader Codes. 2. Click the appropriate code and then click OK.
Service details Choosing a Trouble Code A Trouble Code is used to report a meter problem to the utility office. Trouble Codes are defined in the reading data management software and downloaded to ORS. 1. With the Comment Codes/Messages tab selected on the Service Details screen, click the Select button under Trouble Code. 2. Click the appropriate Trouble Code and click OK.
Service details Create/Edit/Delete Extended Comments The Extended Comments option allows users to create text messages for the utility or notes that can be used later when reporting issues to Technical Support. Figure 32: Extended Comments field Create Comments 1. With the Comment Codes/Messages tab selected on the Service Details screen, select Create to activate the Extended Comments text box. 2. Use the laptop keyboard to type your message.
Service details Figure 34: Extended Comments Field with Edited Message 4. Select Close to save the message when you are finished editing. The message stays with the account. If you want to remove the entire message without saving, select Cancel. NNOTE: If you select Create or Edit and start typing a message, an asterisk (*) appears after the Extended Comments field heading to indicate the message has not yet been saved (Figure 34). Delete Comments 1.
Unloading a route UNLOADING A ROUTE After the route is read, the Unload option is used to write the meter data to a memory stick for transfer to the reading data management software, and to archive the data in ORS in case the memory stick is misplaced or destroyed before the billing cycle is complete. 1. Insert the memory stick into an available USB port on the Toughbook laptop computer. 2. Click the Unload button on the main menu. Figure 35: Main menu - Unload Result: The Select Folder screen opens.
Quick read QUICK READ The Quick Read option on the main menu allows you to read an ORION unit without having a route loaded. This option is handy when you want to verify that a unit is operating correctly or if you want to collect a reading and status of a unit without loading a route. NNOTE: Readings from the Quick Read option are not stored and cannot be transferred to the reading data management software. Enter an endpoint serial number to get a quick read of one endpoint.
Quick read 4. Readings will auto scroll as additional readings are received. To stop the auto scroll and pause the screen, click the AMR To Listen For button again. Then move the scroll bar up or down to view the readings. Figure 38: Quick Read results 5. Click the ORION ME button again to continue the Quick Read or click the Clear Grid button to clear the list. 6.
Settings SETTINGS The Settings option on the main tool bar allows you to change the settings used by the software in its operations. Figure 40: Main tool bar with Settings option NNOTE: A password is required to access and change the information on the Settings screen. See the Settings description at "Tool Bar" on page 15 for more information. When you click the Settings option on the main tool bar and enter the password, the Settings screen opens. The Settings screen has the following five tabs.
Settings General Tab The General tab displays the Units of Measure, Out-of-Route Options and Geocoding Options. When finished making changes to the settings on this screen, select OK and return to the reading cycle. Select Cancel to disregard any changes and return to the main menu. Figure 41: Settings screen - General tab Units of Measure Select English or Metric units for entry and exit zone values.
Settings Alerts Tab The Alerts tab is used to set sounds and popups as audible and visual alerts for issues that occur during a route reading. When finished making changes to the settings on this screen, select OK and return to the reading cycle. Select Cancel to disregard any changes and return to the main menu. Figure 42: Settings screen - Alerts tab NNOTE: The sounds and popup alerts are pre-set.
Settings Types of Alerts Errors A reading error such as, ”Not Receiving GPS“ or ”Not Receiving ORION Signal.“ Warnings A software warning such as ”Invalid Com Port“ or ”GPS is not Active.“ Missed Meters When the latitudes and longitudes are set, an alert is triggered when the vehicle passes through the entry and exit zones set for the meter without receiving a reading. Reads An endpoint reading has been recorded. Tampers Potential tamper situation.
Settings Map Tab The Map tab primarily displays the settings for map location, features, orientation and entry/exit zones. Settings can be customized based on user preferences. When finished making changes to the settings on this screen, select OK and return to the reading cycle. Select Cancel to disregard any changes and return to the main menu. Figure 43: Settings screen - Map tab Map The state name for the map loaded in ORS is displayed in the drop-down field at the top of the screen.
Settings Map Features • Display Velocity On Map When Geocoding Mode is on, this feature displays the current vehicle speed. The maximum speed for setting lat/longs is 15 mph. See "Geocoding Meter Locations" on page 48 for more information. • Display Service Information On Map Displays an identifier for the account, such as the location or name, as determined by the reading data management operator.
Settings Communications Tab The Communications tab displays the plug-in ports (locations) on the laptop required for communication to the mobile transceiver and/or receiver and the GPS. Before reading meters for the first time, it is important to ensure the correct communication (Com/COM) ports have been set for the mobile transceiver and/or receiver to establish communication with the ORS software application.
Settings GPS Receiver • Com Port The GPS is built into the Panasonic Toughbook laptop, and is always assigned to COM3. If you are running ORS on a non-Badger Meter supplied computer, assign the appropriate COM port per the manufacturer's instructions. • Allow GPS to List View Only Mode Display GPS readings in a List View format without displaying a map. • No Data Received Timeout The time (in milliseconds) before notification is given indicating the receiver is not receiving satellite data.
Settings User Interface Tab The User Interface tab shows the default frequency settings for the Panasonic Toughbook laptop computer. The settings on this screen do not typically require modification. If you make changes to the settings on this screen, select OK and return to the reading cycle. Select Cancel to disregard changes and return to the main menu. Figure 46: Settings screen – User Interface tab Computer Monitor Width For all Panasonic Toughbook computers, this field is set at the factory.
Out-of-route reads OUT-OF-ROUTE READS There are times when it is convenient to view readings of all meters in an area, not just those included in the route. For these occasions, ORS provides the Out-of-Route reading option. When enabled, the Out-of-Route option logs the readings of all meters it encounters as if they were on the route. The software creates a report which can be viewed. To set up the Out-of-Route option, follow these steps. 1.
Geocoding meter locations GEOCODING METER LOCATIONS To capture the approximate location of meters automatically, the location coordinates (latitude and longitude) can be gathered automatically. The geocoding feature of the ORS assigns the current location of the vehicle to the meter when the meter reading transmission is received. Furthermore, to capture the closest location to the meter, the software also stores the location of the meter reading that had the strongest signal strength.
Geocoding meter locations 4. Select OK. Result: In Map View, the map control display on the left side of the screen changes to show "GPS OK" and the vehicle speed (Figure 49). 5. Drive the route slowly (between 5 and 10 mph). As meter readings are received, the software logs the latitude and longitude values of each meter reading. The location values for the strongest reading received for each meter are stored.
Geocoding meter locations Changing a Geocoded Entry As meter readings are received, the software logs the latitude and longitude values of each meter reading. The latitude and longitude values can be changed, if needed, on the Service Details screen. 1. With GPS on, drive slowly and stop as close as possible to the meter location. 2. Click the Details button for the meter you want to change. Result: The Service Details screen opens. 3. Select the Current Reading tab if it is not already selected. 4.
Reports REPORTS The Reports feature organizes meter reading information in a number of different ways to facilitate easy information gathering. The screen is organized to accommodate report types, filters and exceptional status filters. • Reports can be maximized to the full screen to see all details. • Reading-status rows are color-coded: gray background for tampers and leaks; color background for high and low readings; white background for all other meters.
Reports Exception Statuses Filter Select one or more check boxes and the screen displays a report for the status option(s) selected. This reporting feature updates with live information. Click the Clear Exception Statuses button to clear all selected statuses, refresh the screen and run an updated status report the next time a box is checked. • Tamper The list of endpoints that have reported a tamper condition. • Reverse Flow The list of endpoints that have reported a reverse flow condition.
Reports 3. To modify or “filter” the report, check Only Low/High Readings to display a report limited to low and high readings only. Figure 54: Report filters 4. To further "filter" the report, check one or more boxes under Exception Statuses Filter. For example, to see a report including those meters that have been successfully read but are reporting a potential leak status, click the Potential Leak box. 5. Check Unread Services Only.
Reports Special Reports Special Reports for the ORS application are described below. Each report is automatically updated as the meter reader views the report and ORS gathers data. Summary Report The Summary report of the current status of in-progress meter readings is displayed in the lower half of the screen as shown in Figure 56. Figure 56: Summary report Total Accounts The number of accounts loaded in the route file. Total Services The total number of services included in those accounts.
Reports Audit Report The Audit report lists all exception conditions encountered in the ORS software according to time and date.
Reports Alert Report An Alert report displays exception conditions in the meters that are reporting their readings. Figure 58: Alert report An Alert report allows you to view each of the alert messages that have been displayed during meter readings. The report indicates potential leaks that were sited and provides the addresses associated with those potential leaks. It also includes the time and date when the reading occurred.
Two-way communications TWO-WAY COMMUNICATIONS ORION Migratable endpoints and ORION Fixed Network endpoints operating in mobile mode are capable of two-way communication with the ORION FHSS mobile transceiver. Using the two-way functionality, extended status, historical interval data and firmware information can be extracted from the endpoint. The Service Details screen for an ORION Migratable endpoint provides access to the two-way communication functionality.
Two-way communications Work Items When ORS is used with ReadCenter Analytics or Analytics Mobile software, the reading data management software operator can request work items to collect extended status, historical interval data and/or the endpoint firmware version using the two-way communication functionality of the ORION Migratable endpoints. Work items can be set up for automatic collection or they can be performed manually by the meter reader.
Two-way communications Requesting Extended Status Manually The Extended Status tab provides access to additional information which has been programmed into an endpoint, including meter type and size, unit of measure, encoder type, as well as exception statuses such as tamper and no usage.
Two-way communications Interval History The Interval History tab gives you the ability to collect an historical interval profile from the endpoint. The data collected becomes part of the route unload file and provides a water usage profile useful in discovering potential leaks, addressing customer questions and/or resolving billing disputes.
Two-way communications Requesting Interval History Manually If it was not requested as an automatic work item, you can manually initiate a request for historical data from an ORION Migratable or ORION Fixed Network (in mobile mode) endpoint by performing the following steps. 1. With the Current Reading tab selected on the Service Details screen, click the Interval History tab. NNOTE: “Not Required/Optional” displays at the top of the screen to indicate that an automatic work item was not requested.
Two-way communications Requesting Firmware Manually If it was not set up to be done as an automatic work item, you can manually initiate a request for the firmware version from an ORION Migratable or Fixed Network (in mobile mode) endpoint by performing the following steps. 1. With the Current Reading tab selected on the Service Details screen, click the Firmware Version tab. NNOTE: “Not Required/Optional” displays at the top of the screen to indicate that an automatic work item was not requested.
Find FIND Search functionality is accessible during an active reading session. The Find option on the main tool bar allows you to search for meters based on specific criteria. Click the Find button on the main tool bar to display the following screen. Figure 70: Find screen Example 1 (Figure 71) To search for a meter, enter information about the particular meter into one of the search fields.
Find Example 2 (Figure 72) In example 2, in addition to the letter "J" in the Name field, the number "4" was entered in the Addr field to narrow the search. There is are three meters in the route with "4" in the Addr field and a "J" in the Name field. As Figure 72 shows, the search includes addresses with the number "4" anywhere in the address.
Unarchive UNARCHIVE ORS stores all route files that have been unloaded. The Unarchive option on the main menu provides access to any previously unloaded route file. The file is "read only" and cannot be changed but the user can unload the data to a memory stick. This is helpful if the previously unloaded file was lost. Figure 73: Main menu - Unarchive 1. Click Unarchive on the main menu. Result: A list of the previous route files displays. Figure 74: Archived readings 2.
Unarchive Page 66 ORION® Meter Reading System (ORS) April 2014
Appendix APPENDIX April 2014 ORION® Meter Reading System (ORS) Page 67
Glossary GLOSSARY ADE® The Absolute Digital Encoder (ADE) is a position-based encoder that senses the position of each number wheel to determine the reading for touch and AMR/AMI systems. The ADE encoder displays as ”ENC“ on the software screens. AMI Advanced metering infrastructure (AMI). AMR An automated meter reading (AMR) system that uses radio frequency technology to transmit meter readings between an endpoint and a data collection device.
Glossary UTC ORS uses Coordinated Universal Time or UTC which is converted to local time in the reading data management software. waiting for MM Waiting for MM (mobile message) displays only when reading ORION Migratable or Fixed Network (in mobile mode) endpoints. The message displays on the Service Details screen and indicates the meter reading vehicle is not yet close enough to the endpoint for the FHSS mobile transceiver to receive the signal or mobile message, or reading has been paused or stopped.
Troubleshooting TROUBLESHOOTING Use the guidelines in this section if you encounter the situations described below during normal ORS operations. COM Port Errors The correct communication (COM) port for the transceiver and/or receiver(s) should be verified prior to reading meters for the first time. For more information, refer to "Communications Tab" on page 44.
Technical support TECHNICAL SUPPORT Errors do not normally occur, so it is important to report all occurrences of error windows to Badger Meter Technical Support. NNOTE: Trouble Codes and/or information from any notes you created in Comments Codes/Messages can be useful when contacting Technical Support.
ORION METER READING SYSTEM (ORS) Making Water Visible® ADE, ORION, ReadCenter and RTR are registered trademarks of Badger Meter, Inc. Other trademarks appearing in this document are the property of their respective entities. Due to continuous research, product improvements and enhancements, Badger Meter reserves the right to change product or system specifications without notice, except to the extent an outstanding contractual obligation exists. © 2014 Badger Meter, Inc. All rights reserved. www.