Badger® ORION® Automated Meter Reading System Trimble® RangerTM Serial Repeater Programmer Installation & Operation Manual IMPORTANT: This manual contains important warnings and information. READ AND KEEP FOR REFERENCE. BadgerMeter, Inc. ORI-IOM-55 P/N 62014-123 Rev.
Trimble® Ranger™ Serial Repeater Programmer Installation and Operation Manual June 2009 Trimble Ranger Serial Repeater Programmer Introduction Welcome to the Trimble Ranger Serial Repeater Programmer. The Serial Repeater Programmer will help you program ORION repeaters to receive transmissions from specific transmitters.
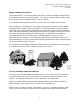
Trimble® Ranger™ Serial Repeater Programmer Installation and Operation Manual June 2009 Badger® ORION® Serial Repeater The Serial Repeater is a receiver/transmitter that can be used with any Badger ORION water or gas transmitter to increase transmission range. The repeater’s plastic enclosure allows it to be placed in non-submersed outdoor locations as well as indoors. A size ‘D’ lithium battery provides power for 15 years; the unit is shipped in the off mode.
Trimble® Ranger™ Serial Repeater Programmer Installation and Operation Manual June 2009 Obstructions might also change. Different seasons, increasing vegetation, and new construction are among the factors that can affect a repeater’s performance. This is why it is important to test the repeater to make sure it is able to receive the signals that need to be retransmitted and to verify that its transmissions are received where needed.
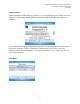
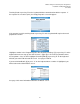
Trimble® Ranger™ Serial Repeater Programmer Installation and Operation Manual June 2009 Getting started When you start the Trimble Ranger, you will see a screen that permits you to choose one of four programs. Touching the ORION Repeater Programmer application button will produce the following: To open the ORION Repeater Programmer application, use the keyboard to enter your initials— up to three characters or letters—and touch Ok or press the “Enter” key on the keyboard.
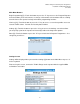
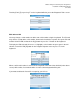
Trimble® Ranger™ Serial Repeater Programmer Installation and Operation Manual June 2009 Main Menu Buttons Begin Programming [P]—Touch the button or press the “P” key to access the Program Repeater menu that allows you to add, remove, or change serial numbers of transmitters that are sending transmissions to the repeater and to perform other programming functions. View Log [V]—Touch the button or press the “V” key to access a screen that provides access to records of SRP actions.
Trimble® Ranger™ Serial Repeater Programmer Installation and Operation Manual June 2009 The Repeater COM Port [R] default is COM1. Follow the same procedure with the IR COM Port [I] button. Typically, the IR COM Port [I] will also be COM1. Touch the Programming Mode [M] button or press the “M” key to select one of two modes. Choose the frequency hopping mode when using Orion frequency hopping transmitters and the narrow band mode when using narrow band transmitters.
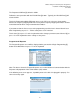
Trimble® Ranger™ Serial Repeater Programmer Installation and Operation Manual June 2009 Button Functions Read [R]—Touch the button or press “R” on the keyboard to read values from the repeater. Prog [P]—Touch the button or press “P” on the keyboard to program the repeater with the current list. Tools [T]—Touch the button or press “T” on the keyboard to display the Diagnostic Tools Menu.
Trimble® Ranger™ Serial Repeater Programmer Installation and Operation Manual June 2009 Touching Read or pressing “R” on the keyboard initiates communication with the repeater.
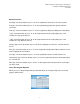
Trimble® Ranger™ Serial Repeater Programmer Installation and Operation Manual June 2009 Touching Tools [T] or pressing “T” on the keyboard will take you to the Diagnostic Tools screen: Edit Selected SN You may change a serial number or add a new serial number using the keyboard. The IR head may also be used to add a serial number. Connect the head to the repeater; line up the IR head and the Orion IR LED; and touch the IR [I] button or press the “I” button on the keyboard.
Trimble® Ranger™ Serial Repeater Programmer Installation and Operation Manual June 2009 If the number you wish to add is already in list, the following will appear: If you try to program the Serial Repeater and have not selected an entry, you will see the following caution: If the number you wish to add is appropriate, the following “in process” screen will appear: In the Programming Successful screen below, use the Comment box to add a note such as “side of house.
Trimble® Ranger™ Serial Repeater Programmer Installation and Operation Manual June 2009 After correcting a serial number or adding a new serial number, touch Done [X] or press “X” on the keyboard. You will be returned to the Program Repeater screen where the changes you have made will appear in the SN column: If programming fails you will go to the screen below. Touch “OK” or press Enter to return to the Program Repeater screen on page 7.
Trimble® Ranger™ Serial Repeater Programmer Installation and Operation Manual June 2009 SN Details This screen will be displayed when you highlight a serial number and touch Show Details [S] on the Program Repeater screen or press “S” on the keyboard.
Trimble® Ranger™ Serial Repeater Programmer Installation and Operation Manual June 2009 Button Functions Listen [L]—Touch the button or press “L” on the keyboard to go to the Listen screen—see page 14. Transmit [T]—Touch the button or press “T” on the keyboard to go to the Transmit screen—see page 17. Done [X]—Touch the button or press “X” on the keyboard to return to the Program Repeater screen.
Trimble® Ranger™ Serial Repeater Programmer Installation and Operation Manual June 2009 Frequency Hopping If you are in the narrow band mode, proceed to page 15. If you’re in the frequency hopping mode, you will have three Channel options: Default, which is midrange (shown on the screen above), low, or high. Clicking the Channel [C] button or pressing “C” on the keyboard will move to low (left screen below) then to high (right screen below) and back to default.
Trimble® Ranger™ Serial Repeater Programmer Installation and Operation Manual June 2009 Listening The Listen screen below will be displayed when you touch Listen [L] on the Diagnostic Tools screen or press “L” on the keyboard when in the narrow band mode or after you choose default, low, or high if you are in the frequency hopping mode. It is designed to help you determine the best location for the repeater in terms of its ability to receive signals from the transmitters it is programmed to hear.
Trimble® Ranger™ Serial Repeater Programmer Installation and Operation Manual June 2009 If Details is touched on the Listen screen or “H” pressed on the keyboard, the following will appear: When the Listen process is complete or aborted, you will see: Touching OK or pressing “Enter” on the keyboard brings up: Highlighting a number in the SN column and touching Select [T] or pressing the “T” key will produce a screen such as: 16
Trimble® Ranger™ Serial Repeater Programmer Installation and Operation Manual June 2009 If Save is touched on the Listen Screen or “S” pressed on the keyboard, the following will appear: If Save is touched on the Save As screen, you will see: Touching Save will preserve changes you have made and store the list of SNs and the transmitter’s status information. Touching Clear on the Listen screen or pressing R on the keyboard will delete all transmitter information from the screen’s SN column.
Trimble® Ranger™ Serial Repeater Programmer Installation and Operation Manual June 2009 Transmit: Narrow Band or Frequency Hopping If you touch Transmit [T] on the Diagnostic Tools screen or press “T” on the keyboard, you will see one of the following transmit screens depending whether you are in narrow band mode or frequency hopping mode.
Trimble® Ranger™ Serial Repeater Programmer Installation and Operation Manual June 2009 Transmit The Transmit screen will be displayed after you touch Transmit [T] on the Diagnostic Tools screen or press “T” on the keyboard and select a frequency (see page 17) if you are in the frequency hopping mode. If you are in the narrow band mode, you will immediately see the Transmit screen.
Trimble® Ranger™ Serial Repeater Programmer Installation and Operation Manual June 2009 Transmitting Touching Transmit SN [S] on the Transmit screen or pressing the “S” keyboard will produce the following: When an SN is highlighted and select touched on the above screen or “S” is pressed on the keyboard, the Transmit SN [S] field on the Transmit Screen will be populated: After inputting the settings described under button functions on page 18, including establishing the transmit delay and transmit time,
Trimble® Ranger™ Serial Repeater Programmer Installation and Operation Manual June 2009 Next, the Countdown Screen will appear and begin counting down the selected time.
Trimble® Ranger™ Serial Repeater Programmer Installation and Operation Manual June 2009 View Log This screen will be displayed when you touch View Log [V] on the Main Menu or press the “V” key on the keyboard.
Trimble® Ranger™ Serial Repeater Programmer Installation and Operation Manual June 2009 Using Technical Support For Badger Meter Technical Support, call 1-800-456-5023. A Support Specialist will answer. Explain the situation that has occurred, the state that the Serial Repeater Programmer is in, and go over the steps you performed just before the problem occurred.
Trimble® Ranger™ Serial Repeater Programmer Installation and Operation Manual June 2009 E-Mailing Technical Support The Meter Technical Sup-port Group is also available via e-mail through the Internet. To send questions or comments to the Technical Support group, address your e-mail to: TechSupport@BadgerMeter.com. The Technical Support Group can respond to your comments or questions by phone, fax, or email. Please include in your message the type of response you would prefer.
Trimble® Ranger™ Serial Repeater Programmer Installation and Operation Manual June 2009 (This page intentionally left blank.
Trimble® Ranger™ Serial Repeater Programmer Installation and Operation Manual June 2009 (This page intentionally left blank.
Badger® and ORION®, are registered trademark of Badger Meter, Inc. Please see our website at www.badgermeter.com for specific contacts. Copyright © Badger Meter, Inc. 2009. All rights reserved. Due to continuous research, product improvements and enhancements, Badger Meter reserves the right to change product or system specifications without notice, except to the extent an outstanding contractual obligation exists. BadgerMeter, Inc. P.O.