
Hardware Solutions for Gas Utilities Manual


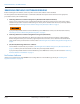

Removing Previous Software Using Factory Reset/Clean Boot
Start the factory reset (clean boot) procedure with the handheld powered on.
If you previously added software to the handheld that you do not want to remove, use the alternative method,
"Removing Previous Software Using Remove Programs" on page 8.
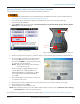
1. Press and hold the green power key. When the countdown timer starts, release the green power key.
Result: The Power Menu displays.
2. Tap the Reset button on the Power Menu and immediately press and hold both the green power key and the
RIGHT key on the handheld keypad.
Figure 1: Power Menu
Figure 2: Hold power key and RIGHT key at the same time
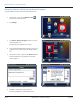
3. When the Clean Boot screen appears, as shown in Figure 3, release both the green power key and the RIGHT key.
4. Use the up/down navigation arrows on the keypad
to select the Ok button on the Clean Boot screen.
Then press the ENTER key on the keypad if you want
to completely clear the handheld.
NOT:N Tapping does not work on the Clean Boot
screen. Use the keypad.
Result: Several screens display during the next few
seconds: Blank screen, "Scanning...Wait" screen,
Windows Embedded screen, Finalizing screen, blank
screen again, and then the Windows Embedded
screen again.
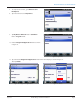
5. Touch the handheld screen to start the reset process
as instructed on the screen.
Figure 3: Clean Boot screen
6. Align the touch screen by tapping the cross hairs. Continue to tap the cross hairs until the screen aligns.
7. At the Password screen, tap Skip.
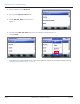
8. Tap the Complete screen to nish the reset.
NOT:N After performing a factory reset, the handheld date and time need to be reset. Tap Windows Start> Settings>
Clocks & Alarms to set the correct time and date.
The handheld is now ready for the new software installation. Refer to "Installing Field Application Software" on page 14.
Press &
hold
Press &
hold
REMOVING PREVIOUS SOFTWARE VERSIONS
Page 7 July 2013 Trimble Ranger 3 Software Installation