Trimble® Ranger 3 Meter Reading System ORION® Software Installation ORI-PM-00100-EN-02 (July 2013) Installation Manual
Page ii Trimble Ranger 3 Software Installation July 2013
CONTENTS INTRODUCTION . . . . . . . . . . . . . . . . . . . . . . . . . . . . . . . . . . . . . . . . . . . . . . . . . . . . . . . . . 5 Audience and Purpose . . . . . . . . . . . . . . . . . . . . . . . . . . . . . . . . . . . . . . . . . . . . . . . . . . 5 System Requirements . . . . . . . . . . . . . . . . . . . . . . . . . . . . . . . . . . . . . . . . .
Page iv Trimble Ranger 3 Software Installation July 2013
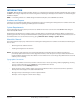
Introduction INTRODUCTION The ORION® Meter Reading System for Trimble® Ranger 3 is an application designed for automated and manual meter reading of ORION water and gas endpoints. This manual is the guide for installing the Field Application software on a Trimble Ranger 3 handheld computer. NNOTE: For installing software on a Trimble Ranger X handheld computer, refer to ORI-PM-00099-EN-02.
Removing previous software versions REMOVING PREVIOUS SOFTWARE VERSIONS Before installing the new software, remove any older versions of the software on the handheld. The Factory Reset/Clean Boot method (1) is recommended. Read the descriptions below and choose the appropriate procedure based on your handheld setup. 1.
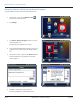
Removing previous software versions Removing Previous Software Using Factory Reset/Clean Boot Start the factory reset (clean boot) procedure with the handheld powered on. If you previously added software to the handheld that you do not want to remove, use the alternative method, "Removing Previous Software Using Remove Programs" on page 8. 1. Press and hold the green power key. When the countdown timer starts, release the green power key. Result: The Power Menu displays. 2.
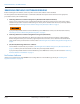
Removing previous software versions Removing Previous Software Using Remove Programs Start the software removal with the handheld powered on. 1. At the home screen, tap the Windows Start button in the lower left corner. 2. Tap Settings. Figure 4: Settings> System tab 3. Tap System> Remove Programs. You may need to scroll to find the icons. Result: The Remove Programs screen opens. 4. Scroll to find the Badger Meter software in the list of programs. The file name starts with "Badger Meter, Inc..." 5.
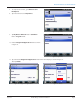
Removing previous software versions 7. To complete the removal, go to Windows Start> File Explorer. 8. Tap in the title bar to show My Device. Figure 8: My Device 9. Tap My Device> Windows folder> Start Menu folder > Programs folder. 10. Find the Badger Field Applications folder as shown in Figure 10. Figure 9: My Device 11. Tap and hold the Badger Field Applications folder until a menu displays as shown in Figure 11. Then tap Delete.
Removing previous software versions 12. Tap in the title bar to show My Device. 13. Tap to open the Application Data folder. 14. Find the BMI_APP_DATA folder as shown in Figure 13. Figure 12: Application Data folder 15. Tap and hold the BMI_APP_DATA folder until a menu displays as shown in Figure 14. Then tap Delete. Figure 14: Delete Figure 13: BMI App Data folder Result: All the meter reading software files are removed. The handheld is ready for the new software installation.
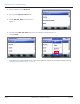
Removing previous software versions Removing Previous Software in Kiosk Mode NNOTE: This procedure is only for handhelds in Kiosk mode. Operating the handheld in Kiosk mode, the main handheld screen appears as it does in Figure 15. Figure 15: Kiosk mode To remove the previous software on a handheld in Kiosk mode, follow these steps. NNOTE: You can also remove Kiosk software by using the procedure "Removing Previous Software Using Factory Reset/Clean Boot" on page 7.
Removing previous software versions 3. Enter the code to unlock the handheld. NNOTE: If you do not have the code, contact Badger Meter Technical Support for the code to unlock Kiosk mode. Result: When the handheld is unlocked, it returns to Admin mode and the Windows Start menu is displayed. Figure 17: Enter unlock code 4. Tap Windows Start> Settings> System> Remove Programs. Figure 18: Remove Programs 5. Tap "Askarya Pocket Kiosk." Then tap Remove.
Removing previous software versions 6. Tap Yes to confirm the Kiosk program removal. Figure 20: Confirm program removal 7. Tap to select the Badger Meter software program in the list. Then tap Remove. 8. When the Remove Program window opens, tap Yes to confirm the program removal. 9. When all programs are removed, tap OK to exit Remove Programs. Figure 21: Remove remaining programs Once the previous software programs are removed, the handheld is ready for the new software installation.
Installing field application software INSTALLING FIELD APPLICATION SOFTWARE The Field Application software comes loaded on the ORION Meter Reading System DVD provided by Badger Meter. Transferring Software File from the DVD to a USB Memory Stick 1. Load the ORION Meter Reading System DVD on a computer with a DVD drive. 2. The DVD folder may open automatically. If not, open Windows Explorer, browse to the DVD drive location and open the DVD folder.
Installing field application software Installing Meter Reading Software on the Handheld Start the software removal with the handheld powered on. If the handheld power is not on, press the green power key on the keypad to power up the handheld. 1. Insert the memory stick with the software files into the USB port on the handheld. 2. Tap Windows Start > File Explorer. You may need to scroll to find the File Explorer icon. Figure 24: Windows Start>Programs>File Explorer Figure 25: My Device 3.
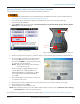
Installing field application software 5. Select Device and tap Install. Result: The file installs on the handheld. A progress screen displays briefly (Figure 28) and the confirmation screen displays when installation is complete (Figure 29). Figure 27: Select Device Figure 28: Software installation in progress Figure 29: Software installation complete 6. Tap OK to close the confirmation screen. 7. Tap the X to close the installer. Result: The Windows home screen is displayed. 8.
Activating kiosk mode ACTIVATING KIOSK MODE After the meter reading software is installed, the Kiosk mode application will be located in the My Documents folder and can be activated from that location. To activate Kiosk mode, follow these steps. 1. Go to Windows Start > File Explorer > My Device > My Documents. Figure 32: My Documents Figure 31: My Device Once Kiosk mode is activated, a password is required to change the setting.
INTENTIONAL BLANK PAGE Page 18 Trimble Ranger 3 Software Installation July 2013
INTENTIONAL BLANK PAGE July 2013 Trimble Ranger 3 Software Installation Page 19
ORION is a registered trademark of Badger Meter, Inc. Other trademarks appearing in this document are the property of their respective entities. Due to continuous research, product improvements and enhancements, Badger Meter reserves the right to change product or system specifications without notice, except to the extent an outstanding contractual obligation exists. © 2013 Badger Meter, Inc. All rights reserved. www.badgermeter.