ORION® SE/ME Endpoint Firmware Updater for Laptop ORI-UM-00211-EN-03 (April 2014) User Manual
Page ii ORION® SE/ME Firmware Updater April 2014
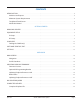
CONTENTS INTRODUCTION . . . . . . . . . . . . . . . . . . . . . . . . . . . . . . . . . . . . . . . . . . . . . . . . . . . . . . . . . 5 Audience and Purpose . . . . . . . . . . . . . . . . . . . . . . . . . . . . . . . . . . . . . . . . . . . . . . . . . . 5 Minimum System Requirements . . . . . . . . . . . . . . . . . . . . . . . . . . . . . . . . . . . . . . .
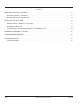
APPENDIX REMOVING PREVIOUS SOFTWARE . . . . . . . . . . . . . . . . . . . . . . . . . . . . . . . . . . . . . . . . . . . . 30 Removing Software – Windows 7 . . . . . . . . . . . . . . . . . . . . . . . . . . . . . . . . . . . . . . . . . . . 30 Removing Software – Windows XP . . . . . . . . . . . . . . . . . . . . . . . . . . . . . . . . . . . . . . . . . . 31 INSTALLING THE SOFTWARE . . . . . . . . . . . . . . . . . . . .
INTRODUCTION INTRODUCTION The ORION® SE/ME Firmware Updater tool 1.2.x is a software application designed to update the firmware of ORION Fixed Network (SE) and Migratable (ME) water and gas endpoints. This manual is the guide for using the software application. Instructions for installing the software are also included. Audience and Purpose This manual is designed for users who update ORION Fixed Network and/or Migratable water and/or gas endpoints.
INTRODUCTION Toughbook Touch Screen In addition to using a standard mouse or keyboard commands, the Panasonic Toughbook is also equipped with a touch screen. If you are using the software on a Toughbook computer, touch the screen using the stylus tool contained in the handle of the laptop to make a selection, or simply tap the screen with your finger. The laptop screen is sensitive enough to allow selecting with a tap even if you are wearing gloves.
GETTING STARTED GETTING STARTED April 2014 ORION® SE/ME Firmware Updater Page 7
WINDOWS UPDATES WINDOWS UPDATES Make sure the laptop on which the software is installed always has all the most recent Windows updates. To check the laptop for the most recent updates, perform the following steps. Windows 7 Click the Windows Start button. Click All Programs> Windows Update. An update message displays in the window that opens. Follow the instructions to install all updates if they are needed. Restart the laptop after making any updates. Windows XP Click the Windows Start button.
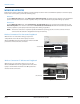
EQUIPMENT SETUP EQUIPMENT SETUP Laptop setup for performing endpoint firmware updates via IR using the IR programming cable, or via RF using an ORION FHSS mobile transceiver, should resemble the diagrams in Figure 3.
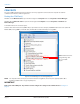
COM PORTS COM PORTS The correct COM (communication) ports must be set for any equipment connected to the computer to establish communication with the software application. Finding the COM Port(s) Windows 7: Click Windows Start to open the menu. Right-click Computer and select Properties> Device Manager. Windows XP: Click Windows Start to open the menu. Right-click Computer and select Properties> Hardware tab> Device Manager. A window similar to the one below opens.
SOFTWARE STARTUP / EXIT SOFTWARE STARTUP / EXIT NNOTE: Make sure the necessary equipment is connected to the computer before starting the software. Refer to "Equipment Setup" on page 9 for more information. Starting the Software 1. Double-click the ORION SE-ME Firmware Updater shortcut on the desktop. Figure 5: Desktop icon NNOTE: The License Agreement screen displays the first time the software is accessed. Click I ACCEPT.
SOFTWARE STARTUP / EXIT (Optional) Click View Trademarks to see a list of trademarked products. To close the Trademarks screen and return to the login screen, click Close. Figure 8: Trademarks screen 3. Click the OK button on the login screen to open the software application. Result: The Single Endpoint Updater screen is displayed with the software main menu along the left side as shown in Figure 9. Figure 9: Single endpoint updater screen Login is complete.
SETTINGS SETTINGS Use the Settings function to set the communication (COM) ports for the hardware attached to the computer before using the software application. A warning message displays if you attempt to use the software and the COM ports are not set correctly. Figure 10: COM ports Settings screen IIMPORTAN If using an ORION mobile transceiver, make sure the ME driver is installed and the USB driver is configured according to the instructions.
SETTINGS In this example, COM 5 is selected for the ORION mobile transceiver. Result: The window closes and the COM port you selected is displayed on the Settings screen. Figure 12: COM port on Settings screen 4. Repeat steps 2 and 3 to set the "IR COM PORT" for the IR programming cable if connected to the computer. When the COM ports are set, the software application is ready to use.
USER GUIDE USER GUIDE April 2014 ORION® SE/ME Firmware Updater Page 15
MAIN SCREEN MAIN SCREEN The ORION SE/ME Firmware Updater functions can be used to update ORION Migratable and Fixed Network endpoints via IR or RF. Figure 13: Single endpoint update screen Button/Field Description Single Endpoint IR/ RF Update Used to update the firmware for a single endpoint using either the IR programming cable or radio frequency. An ORION mobile transceiver must be attached to the laptop computer to use RF.
UPDATING ENDPOINT FIRMWARE UPDATING ENDPOINT FIRMWARE This section provides instructions for the following procedures. • Updating Endpoint Firmware via IR • Updating Endpoint Firmware via RF UPDATING ENDPOINT FIRMWARE CLEARS HISTORICAL PROFILE DATA FROM THE ENDPOINT. HISTORICAL PROFILE DATA CAN BE EXTRACTED PRIOR TO PERFORMING A FIRMWARE UPDATE BY USING THE ORION ENDPOINT UTILITY SOFTWARE (LAPTOP) OR THE ORION FIELD APPLICATION SOFTWARE (TRIMBLE® RANGER HANDHELD).
UPDATING ENDPOINT FIRMWARE Updating Endpoint Firmware via IR 1. On the main menu, select the Single Endpoint IR/RF Update button. The button becomes green when selected. 2. If it is not already selected, click to select the IR radio button in the Update Method field. 3. With the IR cable connected to the laptop, align the optical head of the IR programming cable with the endpoint IR LED port. NNOTE: Make sure the COM port for the IR programming cable is correctly set.
UPDATING ENDPOINT FIRMWARE NNOTE: The number of ”Firmware Blocks“ in the message above the progress bar will vary depending on the endpoint/encoder type. Next, the firmware update is validated. Figure 16: Validating update When the update process is complete, a message displays, stating the endpoint firmware is updated. The new firmware version number is shown in the message. NNOTE: The software application determines the new firmware version for the update based on the endpoint and encoder type.
UPDATING ENDPOINT FIRMWARE Radio Status After the firmware is updated via IR, the endpoint Radio Status buttons display on the screen as shown in Figure 18. NNOTE: Be sure you are viewing the Updater in full screen or have the window open sufficiently so you can see the Radio Status buttons. Figure 18: Start, Stop, Pause radio The following statuses can display in the Radio Status field. Status Description Stopped Endpoint is not transmitting.
UPDATING ENDPOINT FIRMWARE Updating Endpoint Firmware via RF This section provides instructions for updating firmware for single or multiple endpoints using radio frequency (RF). Update Firmware for a Single Endpoint via RF 1. On the main menu, select the Single Endpoint IR/RF Update button. The button becomes green when selected. 2. Select the RF radio button in the Update Method field.
UPDATING ENDPOINT FIRMWARE First, the software verifies and displays the current firmware version and encoder type. A progress bar displays. NNOTE: If necessary, you can click the Cancel button to stop the firmware update and start again later. Figure 21: RF update progress Next, the firmware update is validated. Figure 22: Validating RF update Finally, a message displays with the new firmware version to confirm the update is complete as shown in the example below (Figure 23).
UPDATING ENDPOINT FIRMWARE Update Firmware for Multiple Endpoints via RF Create an Endpoint File Before updating multiple endpoints, create a file of the endpoints to be updated. A list of endpoints can be created from account information in the ReadCenter® reading data management software and downloaded to a .csv file. Refer to the appropriate ReadCenter user manual for details.
UPDATING ENDPOINT FIRMWARE 2. Click Browse to locate the file of endpoints you want to update. Refer to "Create the Endpoint File" on page 23 for more information. Then click Open to import the file. Result: The endpoints in the file are displayed. See the example below. Figure 26: Endpoint file imported 3. Click the Listen For Endpoints button. Result: The RSSI field becomes active, displaying a color bar when the endpoint is in communication with the software.
UPDATING ENDPOINT FIRMWARE 4. Click the Update button for an endpoint at the top of the list with a green bar in the RSSI field. NNOTE: Updates take place individually. Multiple Update buttons cannot be selected simultaneously. Result: The screen information changes to show the update process: • The endpoint serial number and encoder type are identified. • The current firmware version is identified. • A progress bar displays as the firmware is updated.
NO UPDATE REQUIRED NO UPDATE REQUIRED If an endpoint has already been updated to the most current firmware version, the following message displays on the screen when an IR or RF firmware update is attempted, ”No update required. Endpoint already has version x.xx.“ An example of the message is shown in Figure 30.
COMPLETED UPDATES COMPLETED UPDATES From the main menu, select Completed Updates. As each endpoint is updated, the software stores the information and the screen shows a list of endpoints with completed firmware updates as shown in Figure 31. Figure 31: List of updated endpoints The endpoints are listed in the order they were updated, with the most recently updated endpoint at the top of the list. Field Description Serial Number Serial number of the endpoint that was updated.
COMPLETED UPDATES Page 28 ORION® SE/ME Firmware Updater April 2014
APPENDIX APPENDIX April 2014 ORION® SE/ME Firmware Updater Page 29
REMOVING PREVIOUS SOFTWARE REMOVING PREVIOUS SOFTWARE Remove older software versions prior to installing a new version. Follow the instructions for your operating system. NNOTE: If you are installing the ORION SE/ME Firmware Updater software for the first time (no previous versions installed), skip this section and go to "Installing the Software" on page 32. Removing Software – Windows 7 1. Click the Windows Start button. Then click Control Panel > Programs and Features.
REMOVING PREVIOUS SOFTWARE Removing Software – Windows XP 1. Click Start > Control Panel> Add or Remove Programs. Control Panel Result: The Add or Remove Programs window opens. 2. Locate and select ORION SE-ME Firmware Updater in the Add or Remove Programs window. Add or Remove Programs window 3. Click Remove. Result: The Uninstall window opens. 4. Follow the prompts and click Finish at the end. Result: The selected program is uninstalled and any desktop shortcut is removed. 5.
INSTALLING THE SOFTWARE INSTALLING THE SOFTWARE The ORION SE/ME Firmware Updater DVD is provided by Badger Meter. NNOTE: A DVD drive is required to install the ORION SE/ME Firmware Updater software. IIMPORTAN The firmware upgrade resets the historical interval data stored in the endpoint. To preserve the historical data profile information, download the data from the endpoint prior to upgrading the endpoint firmware.
INSTALLING THE SOFTWARE 4. On the Welcome window, click Next. 5. On the Select Installation Folder window, do the following: • Verify where the software will be located. The Program Files folder is recommended. Click Browse to change the location. • Verify that the radio button next to Everyone is checked if more than one person will be using the software. • (Optional) Click Disc Cost... to view available drives and space on the computer before you install. A window opens as shown in the example.
INSTALLING THE SOFTWARE 6. On the Confirm Installation window, click Next. Result: As the software installs, a window with a progress bar displays. This takes a few seconds. NNOTE: A window may display asking for permission to allow changes to the computer. If the window displays, click Yes. 7. On the Installation Complete window, click Close to close the installation wizard. NNOTE: MICROSOFT .NET 3.5 is required to run the software as designed.
INSTALLING THE SOFTWARE Additional Steps - Windows 7 Users Only For Windows 7 users, complete these steps to finish the software installation process. 1. Right-click the ORION SE/ME Firmware Updater desktop icon and select Properties. 2. In the Properties window, select the Compatibility tab and check the box next to "Run this program as an administrator" as shown. 3. Click OK. Compatibility tab Software installation is complete.
INSTALLING THE SOFTWARE Installing the ME Driver The ME Driver is required for communication between the ORION SE/ME Firmware Updater software and an ORION mobile transceiver. Follow the driver installation instructions for your operating system if you need to install the driver. The ME Driver only needs to be installed once. If you previously installed ORION software such as the ORION Mobile Reading System, you already have the ME Driver and you may skip this section.
INSTALLING THE SOFTWARE Windows Help 6. Scroll down in the Help window and click the link: "Update a driver for hardware that isn't working properly" at the bottom of the window in the Note section as shown. 7. In the window that displays, click the link: "To download and update a driver yourself." NNOTE: An enlarged image of the Help section is shown.
INSTALLING THE SOFTWARE 8. Click the link: "Open Device Manager." A portion of the Help screen with the link is shown. Windows Driver Help Result: Device Manager opens. Device Manager 9. Locate and double-click the MSP430 based CDC Device. Result: The Device Properties window opens.
INSTALLING THE SOFTWARE 10. Click to select the Driver tab. On the Driver tab, click the Update Driver button. Result: The Search window opens. 11. Select "Browse my computer for driver software." Search Device Properties 12. In the window that opens, type “C:\” in the field or browse to select the C:\ drive. NNOTE: It is not necessary to check the box "Include subfolders." 13. Click Next.
INSTALLING THE SOFTWARE 14. A Windows Security window opens as shown. Click the link: "Install this driver software anyway." Result: The ME driver installs. A progress bar displays to show the installation progress. Windows Security Installation progress 15. When the ME driver software update is complete, a window opens. NNOTE: The communication (COM) port number for the driver is now displayed at the top of the final window and the Device Properties window.
INSTALLING THE SOFTWARE Installing the ME Driver for Windows XP NNOTE: This driver only needs to be installed once. If you already have the ME driver installed, skip this section. 1. From the software disc, copy the "OrionSE_USB_0_2.inf” file. 2. Click the Windows Start button. Then click My Computer and paste the OrionSE_USB_0_2.inf file on the C:\ drive of the laptop. Result: The file appears in the C:\ drive as shown. 3. Connect the ME/SE transceiver to a power supply and to a USB port on the laptop.
INSTALLING THE SOFTWARE 6. Select the radio button next to "Install from a list or specific location (Advanced)." Click Next. Install from a list 7. Select the radio button next to "Search for the best driver in these locations." Then check the box next to "Include this location in the search:" and type “C:\” in the field below. Click Next. Result: The Wizard searches for the driver on the C:\ drive and displays it in the next window.
INSTALLING THE SOFTWARE 8. Click to select the Orion SE Mobile COM driver and click Next. Result: The driver software installation begins. A window opens to show the progress. Select the driver 9. A window opens with a message that the software "has not passed Windows Logo testing..." Click Continue Anyway. Result: The Orion SE Mobile COM driver software continues to install. Continue installation 10. The Wizard confirms the driver installation is complete. Click Finish to close the Wizard.
INSTALLING THE SOFTWARE Configuring the USB Settings (Windows 7 and Windows XP) NNOTE: The USB settings only need to be configured once. If you have already configured the USB settings, skip this section. 1. Click the Windows Start button. Then right-click Computer/My Computer and select Properties. 2. Click Device Manager. Result: Device Manager opens. 3. Scroll down in the Device Manager window and locate the Universal Serial Bus (USB) controllers. 4.
FIRMWARE COMPATIBILITY CHART FIRMWARE COMPATIBILITY CHART To receive all the features of updated endpoints, ensure you are using compatible product versions. The firmware versions available in the ORION SE/ME Firmware Updater are compatible with the Badger Meter software and hardware products listed here. April 2014 ORION SE/ME Firmware Updater Version Compatible Badger Meter Software Software Version shown and newer 1.2.0 and newer ORION Field Application 2.5.x ORION Endpoint Utility 2.5.
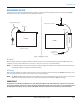
IR PROGRAMMING BRACKET IR PROGRAMMING BRACKET An optional IR Programming Bracket (PN: 65917-001) can be used to assist in reading ORION endpoints. The bracket facilitates correct alignment between the IR optical read head of the programming cable and the IR port on the endpoint, ensuring a steady read position while leaving your hands free. IR Programming Bracket for ORION endpoint Using the Bracket The larger end of the bracket fits the bottom of the endpoint.
TROUBLESHOOTING TROUBLESHOOTING If the software application times out or is unable to update the endpoint firmware for any reason, try the following and then retry updating the endpoint. IR update errors • Clean the IR head and the endpoint infrared ports with a soft dry cloth to remove any debris or moisture. • Disconnect and reconnect the IR programming cable securely to the laptop serial port. • When updating an endpoint, block as much of the surrounding light as possible.
Making Water Visible® Making Water Visible, ORION, ReadCenter and RTR are registered trademarks of Badger Meter, Inc. Other trademarks appearing in this document are the property of their respective entities. Due to continuous research, product improvements and enhancements, Badger Meter reserves the right to change product or system specifications without notice, except to the extent an outstanding contractual obligation exists. © 2014 Badger Meter, Inc. All rights reserved. www.badgermeter.