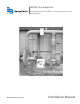
ORION® Gas Endpoints Remote Endpoint for Gas Meters and Volume Correctors with Pulsed Outputs ORI-UM-00168-EN-03 (July 2013) Installation Manual
ORION® Gas Endpoints, Remote Endpoint for Gas Meters and Volume Correctors with Pulsed Outputs Page ii July 2013
Installation Manual CONTENTS DISCLAIMER . . . . . . . . . . . . . . . . . . . . . . . . . . . . . . . . . . . . . . . . . . . . . . . . . . . . . . . . . . . . . . . . . . . . . . . . .5 QUESTIONS OR SERVICE ASSISTANCE . . . . . . . . . . . . . . . . . . . . . . . . . . . . . . . . . . . . . . . . . . . . . . . . . . . . . . . . 5 PRODUCT IDENTIFICATION . . . . . . . . .
ORION® Gas Endpoints, Remote Endpoint for Gas Meters and Volume Correctors with Pulsed Outputs Page iv July 2013
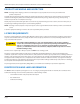
Installation Manual DISCLAIMER The user/purchaser is expected to read and understand the information provided in this manual, follow any listed safety precautions and Instructions and keep this manual with the equipment for future reference. Misuse, mishandling and/or inadequate maintenance may impair performance and/or compromise safety. QUESTIONS OR SERVICE ASSISTANCE If you have questions regarding the product or this document contact: Badger Meter, Inc. P.O.
ORION® Gas Endpoints, Remote Endpoint for Gas Meters and Volume Correctors with Pulsed Outputs PRODUCT UNPACKING AND INSPECTION NNOTE: If damage to the shipping container is evident upon receipt, request the carrier to be present when the product is unpacked. Carefully open the shipping package, follow any instructions that may be marked on the exterior. Remove all cushioning material surrounding the product and carefully lift the product from the package.
Installation Manual INSTALLATION TOOLS • Screwdrivers • Gel-Cap crimper (PN: 59983-001) • Coax stripper • Wire stripper • Wire-cutting pliers • Handheld programmer/data collector Tools are dependent on the type of mounting hardware used. Optional Materials You have a choice of mounting hardware or fasteners to mount the ORION remote endpoint in various meter settings. All ORION remote endpoints are shipped from the factory unprogrammed.
ORION® Gas Endpoints, Remote Endpoint for Gas Meters and Volume Correctors with Pulsed Outputs OVERVIEW OF AN ORION REMOTE ENDPOINT This manual describes installing an ORION remote endpoint and connecting it to a volume corrector such as a Mercury® corrector, a gas RT (Recordall® endpoint), or other pulsed device.
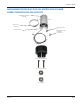
Installation Manual ORION REMOTE ENDPOINT FOR GAS METERS AND VOLUME CORRECTORS WITH PULSED OUTPUTS ORION Remote Endpoint Assembly Clamp 3-¹/6" diameter Cable Strain Relief 4 Screws #8 -16 x 1" 2 Gel-Cap Connectors 1 Two-Wire 1 Three-Wire Remote Installation Bracket Two Screws #8-32 x 5/8" Two Lock Nuts July 2013 Page 9
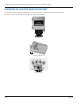
ORION® Gas Endpoints, Remote Endpoint for Gas Meters and Volume Correctors with Pulsed Outputs ENDPOINT DISASSEMBLY If necessary, the endpoint module can be removed from the ORION remote endpoint housing by holding the module bottom and unscrewing the top nut. Unscrew Top Nut ORION Remote Endpoint Housing Hold the Module Bottom Remove the endpoint module and wire.
Installation Manual The ORION remote endpoint module must be put back into the endpoint housing the same way it was taken out. The flat edge and rounded "bulge" on the module must go into the rounded part of the endpoint.
ORION® Gas Endpoints, Remote Endpoint for Gas Meters and Volume Correctors with Pulsed Outputs PROCEDURES FOR MOUNTING THE ORION REMOTE ENDPOINT The ORION remote endpoint can be installed in any indoor or outdoor, non-submersible location. Placement For maximum efficiency the ORION remote endpoint should be placed between 36 and 72 inches off of the ground. 36" - 72" Orientation The ORION remote endpoint should be mounted in a vertical orientation with the open portion of the housing at the bottom.
Installation Manual MOUNTING AN ORION REMOTE ENDPOINT TO A PIPE Insert the clamp through the appropriate slots on the rear of the ORION endpoint. It may be necessary to remove the endpoint from the housing to accomplish this. Refer to “ENDPOINT DISASSEMBLY” on page 10. The clamp fits a pipe up to 3 inches in diameter. A stainless steel clamp is recommended if a larger clamp is needed.
ORION® Gas Endpoints, Remote Endpoint for Gas Meters and Volume Correctors with Pulsed Outputs MOUNTING AN ORION REMOTE ENDPOINT TO A FLAT SURFACE To mount a endpoint to a flat surface, such as a wall or post, four (4) screws (size #8 x 1") are provided. Mounting holes are provided at each corner of a remote endpoint. 1. Place a screw in each hole. 2. In one lower corner of the remote endpoint place a screw and the strain relief. 3. Screw the endpoint into a wall or post.
Installation Manual Prior to beginning the installation procedure, ensure that the following items are available: • Remote Installation Bracket • Two #8-32 x 5/8” stainless steel screws with lock nuts (supplied) • Screwdriver, drill and either a #16 or 3/16” drill bit Remote Installation Bracket To install the Remote Installation Bracket, follow these steps. 1. Determine where on the vertical surface of the AMR Adapter the Bracket is to be installed.
ORION® Gas Endpoints, Remote Endpoint for Gas Meters and Volume Correctors with Pulsed Outputs On the ORION endpoint, there is a small triangle printed on the lower side of the housing. Triangle 4. Align the two triangles and push the bracket and endpoint together. 5. With the installation bracket in one hand and the housing in your other hand, hold the bracket still and twist the housing approximately ¼ turn clockwise until it clicks and locks into place. 6.
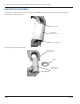
Installation Manual WIRING CONNECTION INSTRUCTIONS There are three types of wiring connections: 1. to a volume corrector 2. to a gas RT with gel caps 3. to an alternative electric or mechanical switch closure Regardless of the mounting method, the remote endpoint should be mounted so the wire exits the module bottom. The wire should be secured to the pipeline or other stationary object using cable ties (not supplied) or other means.
ORION® Gas Endpoints, Remote Endpoint for Gas Meters and Volume Correctors with Pulsed Outputs Volume Corrector Connections To connect the ORION remote endpoint wires to a Mercury or volume corrector output: • Remove the protective tape or gel caps from the end of the ORION remote endpoint lead wire. • Depending on what type of connection is used, the wire insulation may need to be trimmed. The ORION remote endpoint is intended to interface to any Type A pulsed output.
Installation Manual CONNECT THE ORION REMOTE ENDPOINT TO A TWO-CONDUCTOR CABLE FROM A METER OUTPUT If connecting a endpoint to a pair of wires, determine the proper length of wire needed from the ORION remote endpoint and from the pulser. 1. Trim about 3/4 inch of the outer sheath from both ORION wires. This exposes the two individual wires in each. NNOTE: Do not remove the insulation from these wires. 2. Insert the two ORION remote endpoint positive (+) polarity wires into a gel cap.
ORION® Gas Endpoints, Remote Endpoint for Gas Meters and Volume Correctors with Pulsed Outputs 1. Crimp the splices carefully and completely. Use a parallel jaw crimper, such as a Badger Meter PN: 59983-001. NNOTE: For installation instructions see the Model GAS RT Installation Data sheet. 2. If the gel-cap connections are made at the gas RT unit, carefully tuck the wires and gel caps under the plastic gas RT cover. Snap the cover back into place. Snap Cover Into Place Gas RT Gel Caps 3.
Installation Manual ALTERNATIVE PULSE SOURCE CONNECTIONS The ORION remote endpoint is compatible with most switch-closure pulse devices. Use the following ORION remote endpoint polarity descriptions along with the instructions from the alternating pulse source to determine the correct wiring scheme.
ORION® Gas Endpoints, Remote Endpoint for Gas Meters and Volume Correctors with Pulsed Outputs To program the ORION remote endpoint, place the IR cable so the optic read head aligns with the LED output port. LED Output Port Optic Read Head INSTALLATION COMPLETE Installation of the ORION remote endpoint is now complete.
Installation Manual INTENTIONAL BLANK PAGE July 2013 Page 23
ORION is a registered trademark of Badger Meter, Inc. Other trademarks appearing in this document are the property of their respective entities. Due to continuous research, product improvements and enhancements, Badger Meter reserves the right to change product or system specifications without notice, except to the extent an outstanding contractual obligation exists. © 2013 Badger Meter, Inc. All rights reserved. www.badgermeter.