ORION® Mobile Reading System ORS Software Installation ORI-PM-00098-EN-03 (July 2013) Installation Manual
Page ii ORION® Mobile Reading System Software Installation July 2013
CONTENTS INTRODUCTION . . . . . . . . . . . . . . . . . . . . . . . . . . . . . . . . . . . . . . . . . . . . . . . . . . . . . . . . . 5 Minimum System Requirements . . . . . . . . . . . . . . . . . . . . . . . . . . . . . . . . . . . . . . . . . . . . 5 About this Manual . . . . . . . . . . . . . . . . . . . . . . . . . . . . . . . . . . . . . . . . . . . . . .
Page iv ORION® Mobile Reading System Software Installation July 2013
Introduction INTRODUCTION The ORION® Meter Reading System (ORS) is an application designed for automated meter reading ORION water and gas endpoints. This manual is the guide for installing the software on a laptop computer. Audience and Purpose Instructions are included for existing ORION laptop users, with Windows® 7 or Windows XP operating systems, who are updating ORS software, and for users who are installing ORS 2.x for the first time to a customer-supplied laptop.
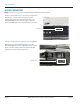
Update windows UPDATE WINDOWS NNOTE: An Internet connection is required to update a Windows operating system. Wireless Connection CF-31 Panasonic Toughbook With the CF-31 on a flat surface facing you, open the compartment on the left side of the laptop. Access the Wireless OFF/ON switch as shown in Figure 1. Move the switch to the ON position for a wireless Internet connection.
Update windows Windows Updates Make sure the laptop has all the most recent Windows updates. To check the laptop for the most recent Windows updates, perform the following steps. Windows 7 Click the Windows Start button (Figure 3), typically in the task bar at the lower left corner of the computer screen. Click All Programs, and then click Windows Update. An update message displays in the window that opens. Follow the instructions to install all updates if you need any updates.
Removing previous software versions REMOVING PREVIOUS SOFTWARE VERSIONS This section includes instructions for removing any previous ORS software. Follow the instructions for your operating system and current software version. Example: If your laptop has Windows 7 and ORS 2.x, follow the instructions labeled A. Windows 7 Windows XP A. ORS 2.x (below) C. ORS 2.x (page 9) B. ORS 1.10.71 or older (page 9) D. ORS 1.10.
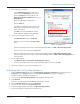
Removing previous software versions 5. View hidden files and folders. • Click the Windows Start button. Then click Control Panel > Folder Options. If the Control Panel is in Category view (see Figure 6), click Appearance and Personalization first, then click Folder Options. Result: The Folder Options window opens. • Click the View tab. • Find Hidden files and folders and select the radio button next to "Show hidden file, folders, and drives." See Figure 8.
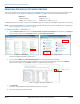
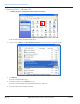
Removing previous software versions C. Removing ORS 2.x (Windows XP) 1. Click Windows Start> Control Panel> Add or Remove Programs. Figure 9: Control Panel Result: The Add or Remove Programs window opens. 2. Locate and select ORS and/or Orion Reading Software in the Add or Remove Programs window. Figure 10: Add or Remove Programs window 3. Click Remove. Result: The Uninstall window opens. 4. Follow the prompts and click Finish at the end.
Removing previous software versions 6. View hidden files and folders. • Click the Windows Start button. Then go to My Computer> Tools> Folder Options. • Click the View tab. • Find Hidden files and folders and select the radio button next to "Show hidden files and folders." • Click OK to close the Folder Options window. Result: Hidden files and folders will now display. Figure 11: Folder options 7. Delete any previous ORS software folders. • Click the Windows Start button.
Installing ors INSTALLING ORS The ORION Meter Reading software comes loaded on two DVDs provided by Badger Meter. Disc 1 contains ORS 2.x software, ORION endpoint utility software and driver files. Disc 2 contains the Map file(s). NNOTE: The basic software installation process is the same for Windows 7 and Windows XP. Windows 7 users must perform additional steps as noted. NNOTE: Screen appearance depends on user personalization and operating system.
Installing ors 4. Double click the setup.exe file as shown in Figure 14. Result: The ORS Setup Wizard opens. If additional files display before the Wizard opens, click Install as necessary. 5. Click Next. Figure 15: Setup Wizard 6. In the next window, verify that the software will be located in the Program Files folder (recommended). You may also click Browse to change the location. See Figure 16.
Installing ors 7. Click Next. Result: A progress bar displays to show installation progress. When the process is finished, the Installation Complete window opens. Figure 18: Installation Complete 8. Click Close. Result: The installation Setup Wizard closes and the ORION ORS icon displays on the desktop. Figure 19: ORS desktop icon NNOTE: Microsoft SQL Server setup starts automatically. The Server setup is part of the ORS 2.x setup and necessary for ORS 2.x to run correctly.
Installing ors Microsoft SQL Server Compact Setup (Windows 7 and Windows XP) 1. The Microsoft SQL Server Compact Setup Welcome window opens automatically after the ORS Setup Wizard completes the software installation. Click Next. Result: If a previous version of SQL Server exists on the laptop, the Program Maintenance window opens as shown in Figure 21. If the Program Maintenance window opens, go to Step 2. If it does not, skip to Step 5. Figure 20: SQL Server Setup 2.
Installing ors 5. Check the radio button next to "I accept the terms of the License Agreement" and click Next. NNOTE: The License Agreement displays after the Microsoft SQL Server Compact Setup Welcome window in Step 1 if the Repair windows are not required. Result: The Installation Program window opens. Figure 24: License Agreement 6. Click Install to begin the Server program installation. Result: A progress bar displays to show installation progress.
Installing ors Completing the ORS Installation (Windows 7 Users Only) For Windows 7 users, complete these steps to finish the ORS 2.x installation process. 1. Right click on the ORION ORS desktop icon and select Properties. 2. In the ORS Properties window, select the Compatibility tab and check the box next to "Run this program as an administrator" as shown in Figure 27. 3. Click OK.
Installing the orion me utility (windows 7 and windows xp) INSTALLING THE ORION ME UTILITY (WINDOWS 7 AND WINDOWS XP) The ORION ME Utility is required for reading and programming ORION ME/SE endpoints. 1. From the ORION Meter Reading System DVD, Disc 1, double-click to open the ORION ME Utility 1.5.3 folder. See Figure 28. Figure 28: Disc 1 files Figure 29: ORION ME Utility Setup file 2. Double-click the setup.exe file. Result: The ORION SE IR and RF Utility Setup Wizard opens as shown in Figure 30. 3.
Installing the orion me utility (windows 7 and windows xp) 4. In the window that displays, verify that the software will be located in the Program Files folder (recommended) as shown in Figure 31. You may also click Browse to change the location. If more than one person will be using the software, verify that the radio button next to Everyone is checked. Then click Next. Result: The Confirm Installation window opens. See Figure 32.
Installing the orion me utility (windows 7 and windows xp) Installing the ME Driver The ME Driver is required for communication between the ORS 2.x software and an ORION ME/SE transceiver. Follow the driver installation instructions for your operating system. Installing the ME Driver (Windows 7) 1. From the ORION Meter Reading System DVD, Disc 1, copy the MSP430_CDC.inf file. 2. Click the Windows Start button. Then click Computer and paste the MSP430_CDC.inf file on the C:\ drive of the laptop.
Installing the orion me utility (windows 7 and windows xp) Figure 38: Windows Help 6. Scroll down in the Help window and click the link: "Update a driver for hardware that isn't working properly" at the bottom of the window in the Note section as shown in Figure 38. 7. In the window that displays, click the link: "To download and update a driver yourself." NNOTE: An enlarged image of the Help section is shown in Figure 39.
Installing the orion me utility (windows 7 and windows xp) 8. Click the link: Open Device Manager. A portion of the Help screen with the link is shown in Figure 40. Figure 40: Windows Driver Help Result: Device Manager opens. Figure 41: Device Manager 9. Locate and double-click the MSP430 based CDC Device as shown in Figure 41. Result: The Device Properties window opens. See Figure 42.
Installing the orion me utility (windows 7 and windows xp) 10. Click to select the Driver tab. On the Driver tab, click the Update Driver button. Result: The Search window opens as shown in Figure 43. 11. Select "Browse my computer for driver software." Figure 43: Search Figure 42: Device Properties 12. In the window that opens, type “C:\” in the field or browse to select the C:\ drive as shown in Figure 44. NNOTE: It is not necessary to check the box "Include subfolders." 13. Click Next.
Installing the orion me utility (windows 7 and windows xp) 14. A Windows Security window opens as shown in Figure 45. Click the link: Install this driver software anyway. Result: The ME driver installs. A progress bar displays to show the installation progress. Figure 45: Windows Security Figure 46: Installation progress 15. When the ME driver software update is complete, a window opens as shown in Figure 47.
Installing the orion me utility (windows 7 and windows xp) Installing the ME Driver (Windows XP) 1. From the ORION Meter Reading System DVD, Disc 1, copy the MSP430_CDC.inf file. 2. Click the Windows Start button. Then click My Computer and paste the MSP430_CDC.inf file on the C:\ drive of the laptop. Result: The file appears in the C:\ drive as shown in Figure 49. 3. Connect the ME/SE transceiver to a power supply and to a USB port on the laptop.
Installing the orion me utility (windows 7 and windows xp) 6. Select the radio button next to "Install from a list or specific location (Advanced)." Click Next. Figure 51: Install from a list 7. Select the radio button next to "Search for the best driver in these locations." Then check the box next to "Include this location in the search:" and type “C:\” in the field below as shown in Figure 52. Click Next. Result: The Wizard searches for the driver on the C:\ drive and displays it in the next window.
Installing the orion me utility (windows 7 and windows xp) 8. Click to select the Orion SE Mobile COM driver and click Next. Result: The driver software installation begins. A window opens to show the progress. Figure 53: Select the driver 9. A window opens with a message that the software "has not passed Windows Logo testing..." Click Continue Anyway. Result: The Orion SE Mobile COM driver software continues to install. Figure 54: Continue installation 10.
Installing the orion me utility (windows 7 and windows xp) Configure USB Settings (Windows 7 and Windows XP) 1. Click the Windows Start button. Then right click Computer/My Computer and select Properties. 2. Click Device Manager. Result: Device Manager opens. 3. Scroll down in the Device Manager window and locate the Universal Serial Bus (USB) controllers. 4.
Installing the orion ce utility (windows 7 and windows xp) INSTALLING THE ORION CE UTILITY (WINDOWS 7 AND WINDOWS XP) The ORION CE Utility is required for reading and programming ORION CE endpoints. The ORION Meter Reading System DVD, Disc 1, includes the most current ORION CE Utility version and should be installed even if the laptop already has a prior version of the ORION CE Utility. 1. From the ORION Meter Reading System DVD, Disc 1, double-click the ORION Utility Setup ver 2.x.x E-Series folder.
Installing the orion ce utility (windows 7 and windows xp) If more than one person will be using the software, verify that the radio button next to “Everyone” is checked. Then click Next. Result: The Confirm Installation window opens. Figure 63: Select location Figure 64: Confirm Installation 4. Click Next. Result: The Utility software installs and the Installation Complete window opens. 5. Click Close.
Installing the map files (windows 7 and windows xp) INSTALLING THE MAP FILES (WINDOWS 7 AND WINDOWS XP) 1. Insert the ORION Meter Reading System DVD labeled Disc 2 into the computer DVD drive. Result: The window opens displaying the map file(s). Figure 67: Map file 2. Double-click the state map .exe file. For example, the Wisconsin state map file (WI.exe) is shown in Figure 67. Result: The self-extracting window opens as shown in Figure 68.
ORION is a registered trademark of Badger Meter, Inc. Other trademarks appearing in this document are the property of their respective entities. Due to continuous research, product improvements and enhancements, Badger Meter reserves the right to change product or system specifications without notice, except to the extent an outstanding contractual obligation exists. © 2013 Badger Meter, Inc. All rights reserved. www.badgermeter.